I know I need to get a better location/setup for my sharpening so I actually do it before it becomes an all afternoon chore. Show me what works for you in how you set up your sharpening.


 [OP]
Contributor
[OP]
Contributor
I know I need to get a better location/setup for my sharpening so I actually do it before it becomes an all afternoon chore. Show me what works for you in how you set up your sharpening.
Contributor
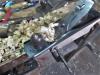
My sharpening station gets bigger every time I re-organize the shop, at least so far. Pic is a nominal 24x48 bench top with 6" bench grinder, diamond stones at the front left and a Norton 3 stone oil system left rear. I took this picture leaning against the chop of my leg vise, the sharpening area is literally one step away from my work area.
The bench from the home store has three drawers. The upper left drawer has sharpening jigs in it. The wide bottom drawer and the upper right drawer are dedicated to sporting goods maintenance. The lower shelf is where I keep all my chemicals, and the shelf above the bench top has stuff I have to root around in right regular.
Lately, for the first time EVER, I have been paying (even more) better attention to my plane irons and have been able to leave the 8k diamond stone mounted up for quick touch ups on the go. I find the more accessible my sharpening gear is, the more frequently I sharpen - and I spend less time sharpening during each event.
The setup I have is good for straight edges, and I can freehand kitchen knives on the oil stones. If you hand me something dull with a curve on it, like a gouge or a framing slick I will have to clear off my bench top, lay on the sacrificial top and get some other jigs out. If you hand me a lathe/turning tool with some femininity to it I will need a step ladder to get my Kalamazoo 1x42 belt sander down from a high shelf. Someday when I have a bigger shop I will have a lathe again, and a bigger sharpening station with the Kalamazoo bolted down.
I really like the 40grit Norton white stone I have, but it is mounted to a 6 inch grinder that I despise. I have a couple pieces from Lee Valley that can be bolted down to a bench in front of a grinder that is also bolted down. Those will make dealing with skew edges much easier, but I am very likely to upgrade my grinder before I permanently install the LV bits. In the middle is a bottle of jojoba oil and a rag well and truly saturated with same.
The spray bottle is more or less 50:50 clean water: Simple Green for raising swarf off my diamond stones. The plywood/2x2 thingy has marks on the other side so I can just throw stuff in a jig and dial in 25 degrees, 30 degrees and so on.
 Contributor
K.I.S.S. Keep It Simple Solution?
I have a shop rag I lay down on my workbench...keeps the bench clean. And that is about it. Other than setting the 6" grinder into the end vise, to run the Unicorn Wheel..
Really do not have the room to set up a "Dedicated Sharpening Bench" in my shop.
Workshop Tour, Bandsaw.JPG
There IS a corner though...that has the "other" 6" grinder...and a Sanding center ( 6" Disc + 4" x 36" Belt) with a spot light overhead....that I use for more than just sharpening...
YMMV..
A Planer? I'm the Planer, and this is what I use
Contributor
Scott, you reminded me how much I miss my Norton 3 stone system, such a great set up. I had a soft ark, hard, and surgical black when you could get those stones in those sizes. Wish I had never gotten rid of it. Your little diamond stone caddy is nice, too.
Kevin

 Contributor
In the process of building a new cabinet under it, and a backsplash around the back, but I needed to use it, so using it like this for now.
Pictures are in the process It gets used for other things besides sharpening too. Sink is off CL. Until I get the new woodworking shop built, it will live in the mechanic shop. I doubt many people park a tractor beside their sharpening sink. When I was working on old houses, it was one of the first things we set up on site.
No need for soaking when you use a steady stream of water. No such thing as wasting water here, and no need for a trap since no sewer gasses are involved. It just empties outside the wall. No mess. No recycled dirty water.
Last edited by Tom M King; 10-22-2023 at 11:57 AM.
Member
If I ever get around to it, I plan on using the Cosman setup under the end of the bench with 2 stones. Only difference is my finest grit is 8000 Shapton. Once I get that set up, I think I'll sell my Veritas training wheels and go back to free hand. 30 seconds to sharp sounds pretty good to me.
 Contributor
Improved sharpening holder ...
Grinder and buffer ..
Regards from Perth
Derek
Contributor
I really should clean mine up.IMG_1993.jpg
 Contributor
If I am at home I use my little Grizzly Tormek copy. I have it plumed with ice maker tubing and it sits on a tray that drains to the sink. If I am out on a job I use a two sided carborundum stone with oil, water or spit. If I am in a pinch and the stakes are not too high I can often make decent improvement to a dull tool with a brick, smooth concrete or a carefully selected rock. I rarely think of using anything high speed for wood working tools.
IMG_1618.jpg
Last edited by Maurice Mcmurry; 10-22-2023 at 1:48 PM.
Contributor
In the adjacent powder room, which has been abandoned to solely my use.
Shelf over the toilet, which is made to slide forward, but in practice I leave in place. Rarely use a bench grinder, but have a Makita sharpener that I set up outside for tool restorations and jointer & planer knives. It goes on a utility table with a bucket on the shelf below to catch the water.
Having a permanent set up is great, away from the dust is good, zero steps to the sink, and the height- no bending over, is a big bonus.
The stones are used on a plastic tub with glass plate lid- sold to hold water stones I believe. The tub is filled with water as ballast, a lip catches the drips, and it raises the tool above other things on the shelf. Being able to orient the stones to a natural motion for the tool being sharpened is also an overlooked benefit.
IMG_4531.jpegIMG_4532.jpeg
Contributor
Thanks Kevin.Originally Posted by Kevin Adams

I mostly use the Norton system for kitchen knives and hunting knives and fishing knives, but it is a useful thing for sure. I think my oil stones are 80, 220 and 400 grit. I inherited the thing from my grandpa, but once I got it into working order the only original piece still in use is the old lid that doesn't fit the new oil tray very well.
I am kinda shocked the caddy is still in service. It was my first attempt at 'sizing' the end grain with TBII. I have done it a few times with epoxy. Anyroad the stones came in, I opened all the packaging to check for shipping damage, and I didn't have a place to put away the diamond stones.
I found some scrap plywood laying around that was a little thicker than the diamond plates and just clamped up a multilayer sandwich - divider /ply blank/ divider/ etcetera; and then glued pieces onto the clamped up midsection. The stock is white oak. I had had about a foot of flat sawn white oak laying around for months and finally resawed that into 1/4 inch x 8/4 x 12 inch QSWO knowing I would use that for something someday.
I have mostly done end grain sizing with West 105 resin and 207 clear hardener. TBII seemed to work the same, glob some on the end grain, watch it soak in and start to gel, then more glue and responsible (not very much) clamping pressure.
When I had all the pieces glued on and was waiting for the glue to dry I was hoping the caddy would last two weeks, but it is still doing fine 3-5 years later.
Couple pics.
 Contributor
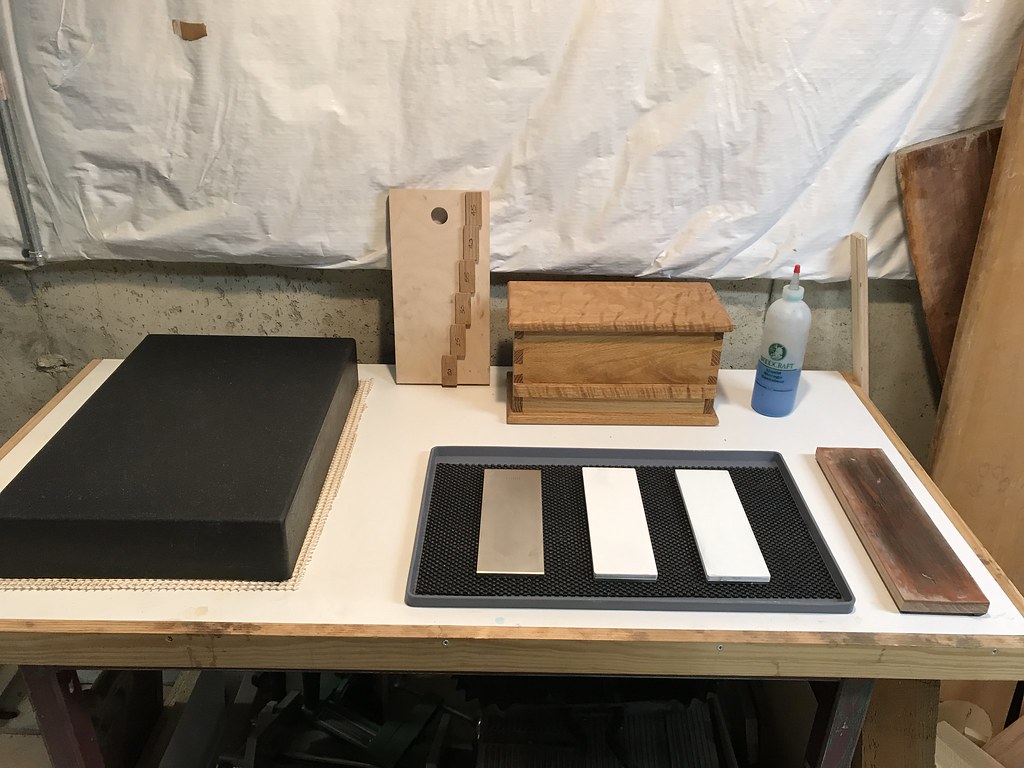
Mine is pretty basic. It's just a melamine top on a metal stand. I use a simple three stone setup plus a strop. The small surface plate is for sandpaper or abrasive film. My stones are Shapton so I don't need much water. The silicone tray keeps what little mess there is contained. I wash it out every couple of months. I keep a sharpening jig and other odds and ends in the oak box.
Sharp solves all manner of problems.
Contributor
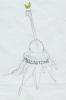
I just went and took a pic of my guide plate. You saw the back of it a bit ago on page one this thread. It is a fairly expensive piece of veneered plywood I got as a free scrap. On the back side, previously pictured, is just a piece of Joe 2x2 so I can clamp the underside into any old vise and have both hands free.
If I was a pro working full time in my shop space I would indeed attach wee guide blocks so I could load whatever iron into my sharpening jig, advance the iron to touching the guide block, with the jig on the edge of the plywood and get after it, with the realization every time an iron hit the guide block I would be digging a bit of a hole in the guide block. If I were a pro, which I am not, I would be watching for the divot cutting into the guide block to cause an ever increasing angle on whatever bevel I was hoping to set.
Having a bit of chip cut out of the guide block will cause the iron in the sharpening jig to stick out of the jig a little further and a little further ending up with a higher and higher resultant angle on the iron. Someday the 30 degree angle I think I am set for will be 32 or 34 degrees and eventually I will experience tearout that could have been prevented.
Were I a full time pro I think I could see this coming, spin the reference block 180 degrees on the reference surface in anticipation of future tearout and keep going. However, I am merely a moderately serious amateur. Instead of guide blocks, I have elected knife marks in the reference surface. A bit slower for each episode, but I will never have to rotate (or replace) the guide blocks on my reference face because I am not using guide blocks on the reference face.
It is fairly late here, but I suspect the "30 degree LN 1 inch MJS" mark refers to my 1" LN bench chisel having been sharpened so many times that I need to use the Mortise Jaw Set (MJS) for that chisel now as it doesn't fit in the ordinary (bench chisel and bench plane) jaw set anymore.
20231023_004900.jpg
Contributor
IMG_8414.jpg
Cabinet was there when I moved in. My grinder is set up as Derek Cohen describes on his site. The platform my stones sit on is baltic birch veneered with torrified maple. The little stone holder blocks are placed such that I can use them to set the common angles I use for a honing guide, in the event I'm using it. I mostly use shapton pro - I felt like the glass stones wore too quickly. The stone on the far right is used exclusively for the ruler trick. I recently added a sink, just out of frame. This has been a luxury.
The overhead cabinet was scrounged from a laundry room remodel.
New Sharpening Station (13).jpg
The Harbor Freight tool cabinet was on some holiday sale for about twice what the drawer slides and casters would have cost so I just bought it. Stones, pads, and guides are in the top drawer. Less often used items and a Worksharp 3000 are in the other drawers. There was more than enough room for what I use to hand sharpen so the balance of anything I use to sharpen anything got relocated and is now near the sink for easy clean up.
"A hen is only an egg's way of making another egg".
Samuel Butler
 Posting Permissions

 Reply With Quote