Results 1 to 15 of 15

Thread: Build thread for making Hybrid Power/Hand Tool Mouldings

  1. #1
    Join Date
    Feb 2011
    Location
    Carlsbad, CA
    Posts
    2,230
    Blog Entries
    2

    Build thread for making Hybrid Power/Hand Tool Mouldings

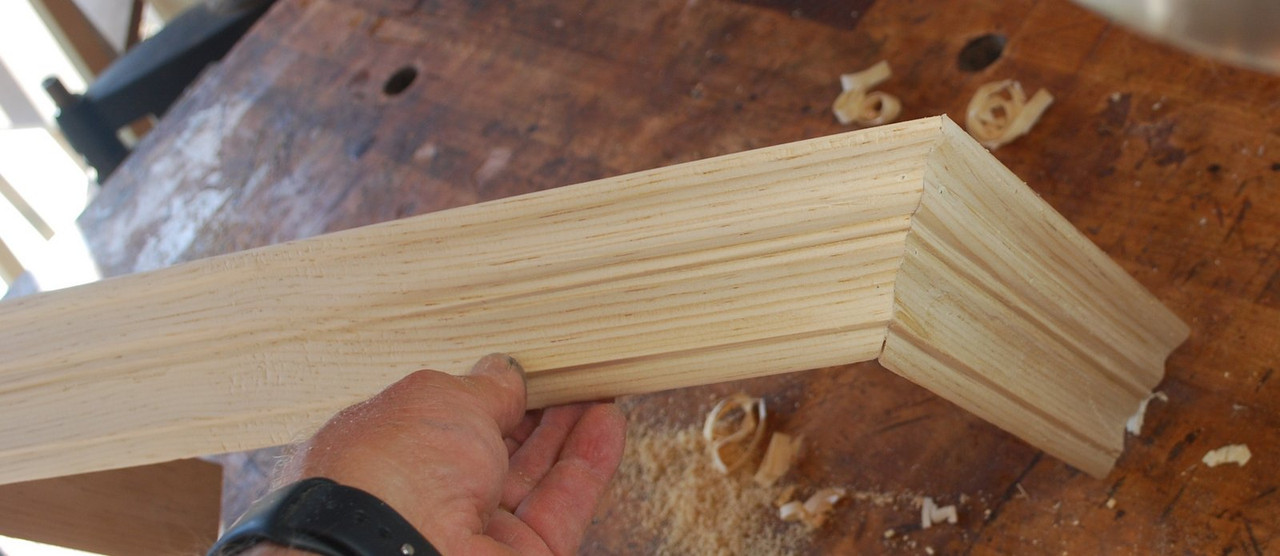
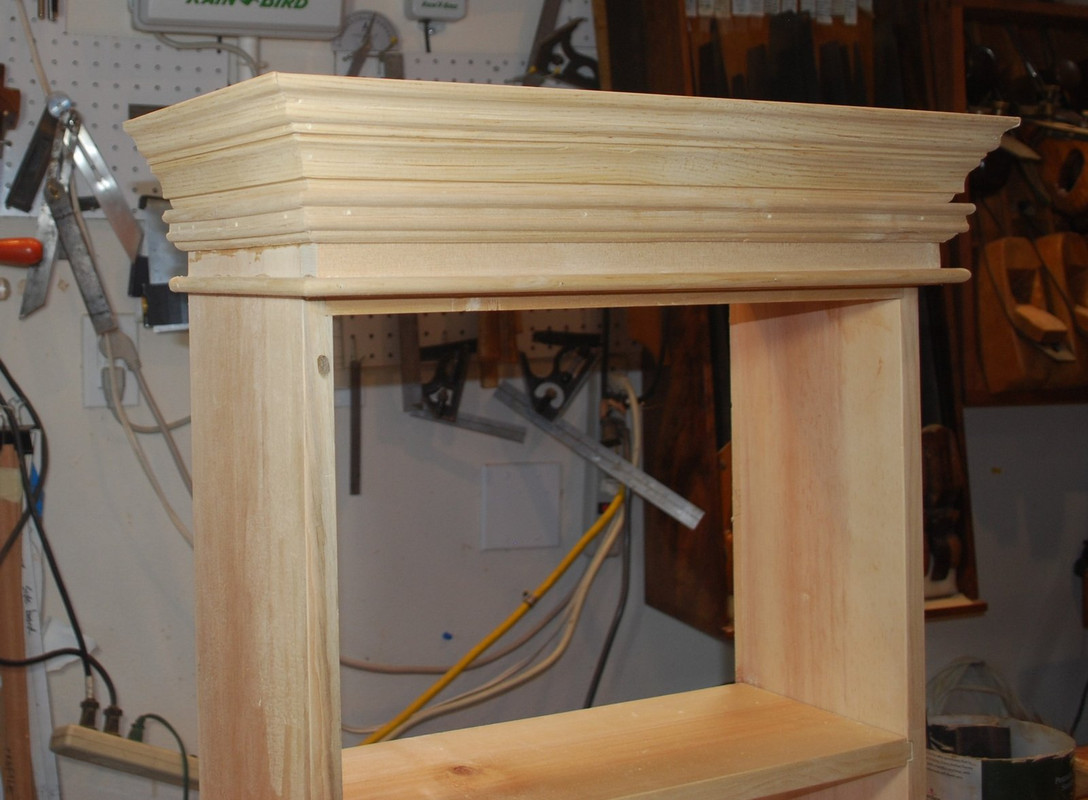
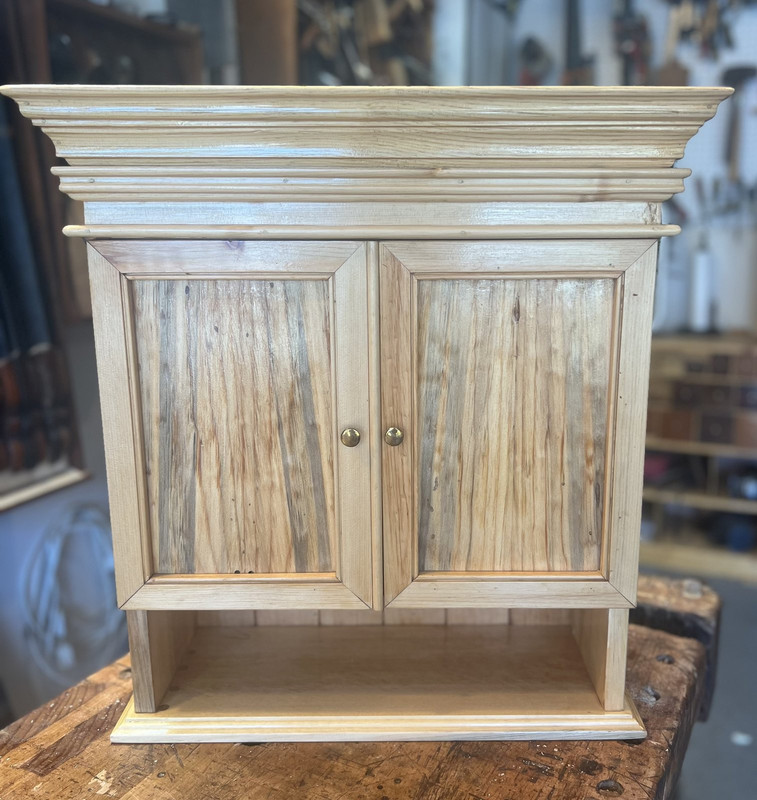
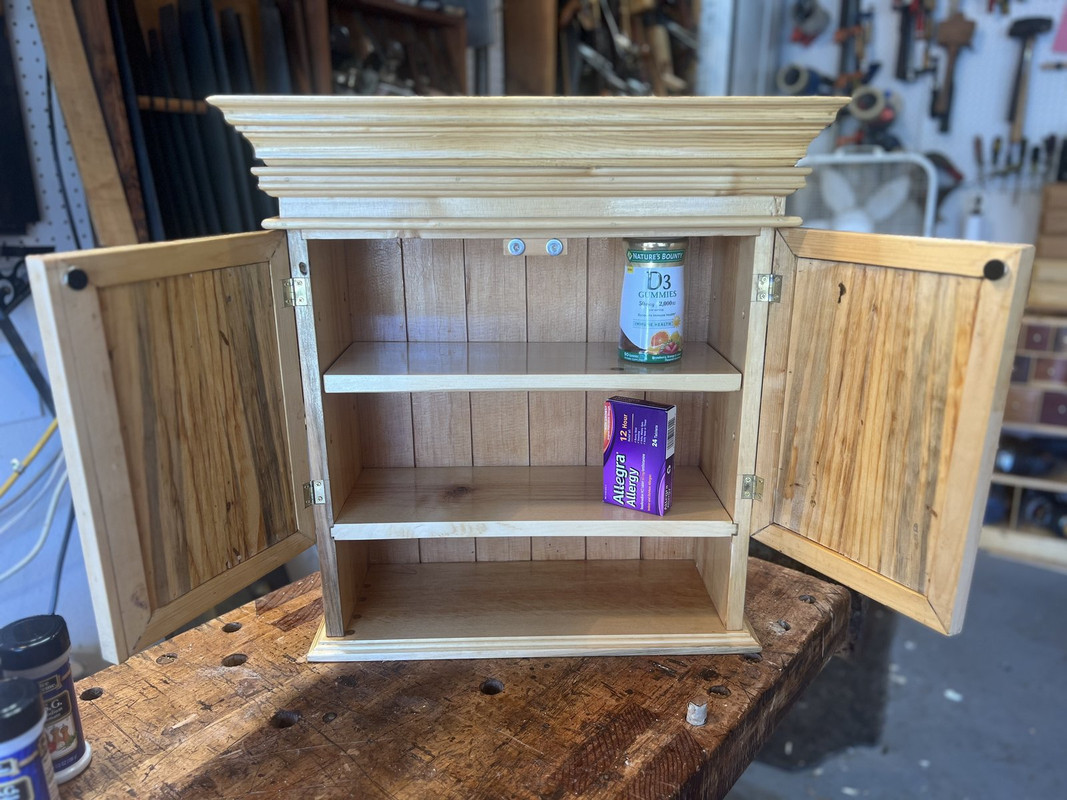
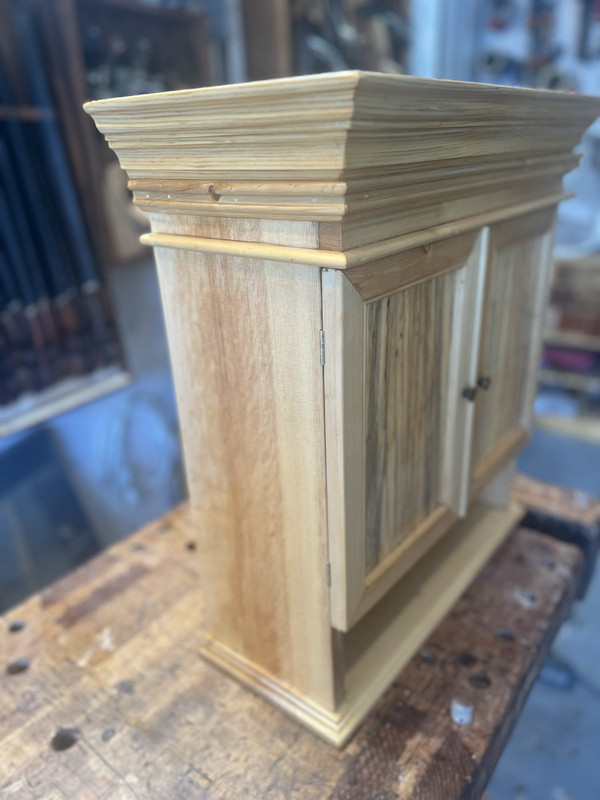
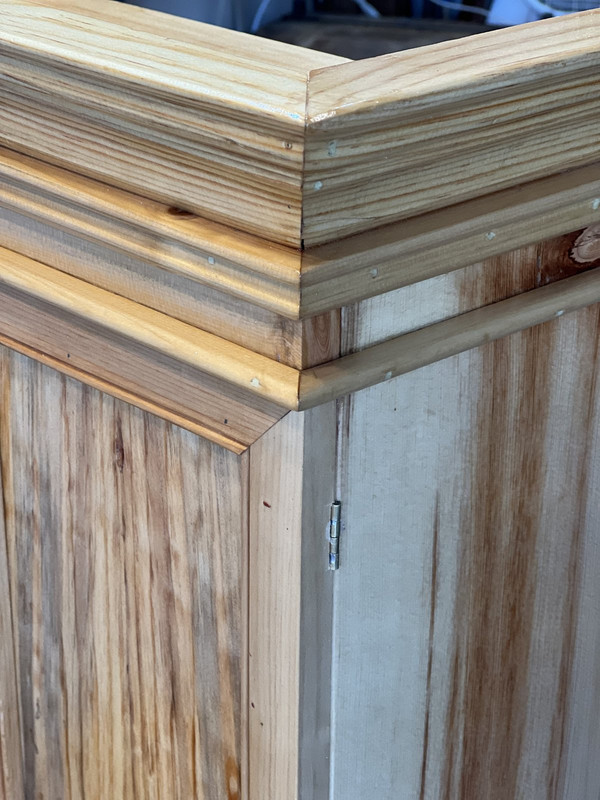
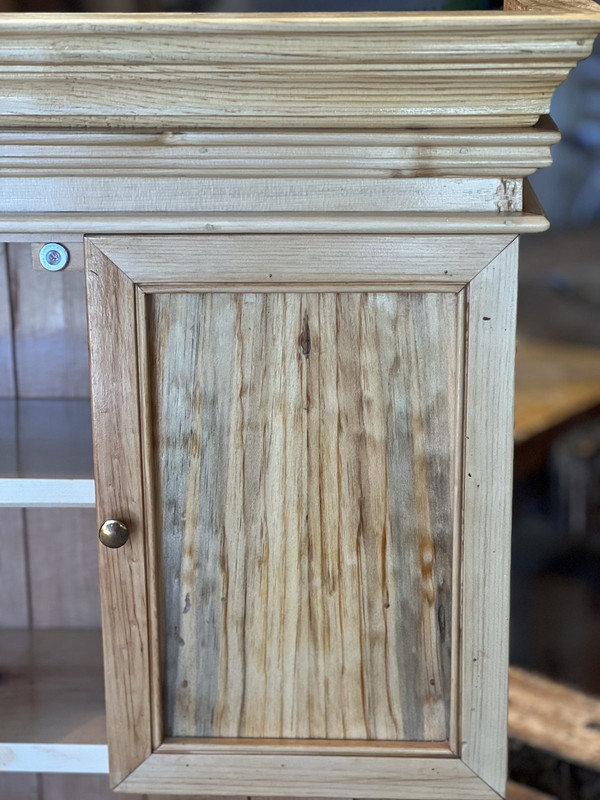
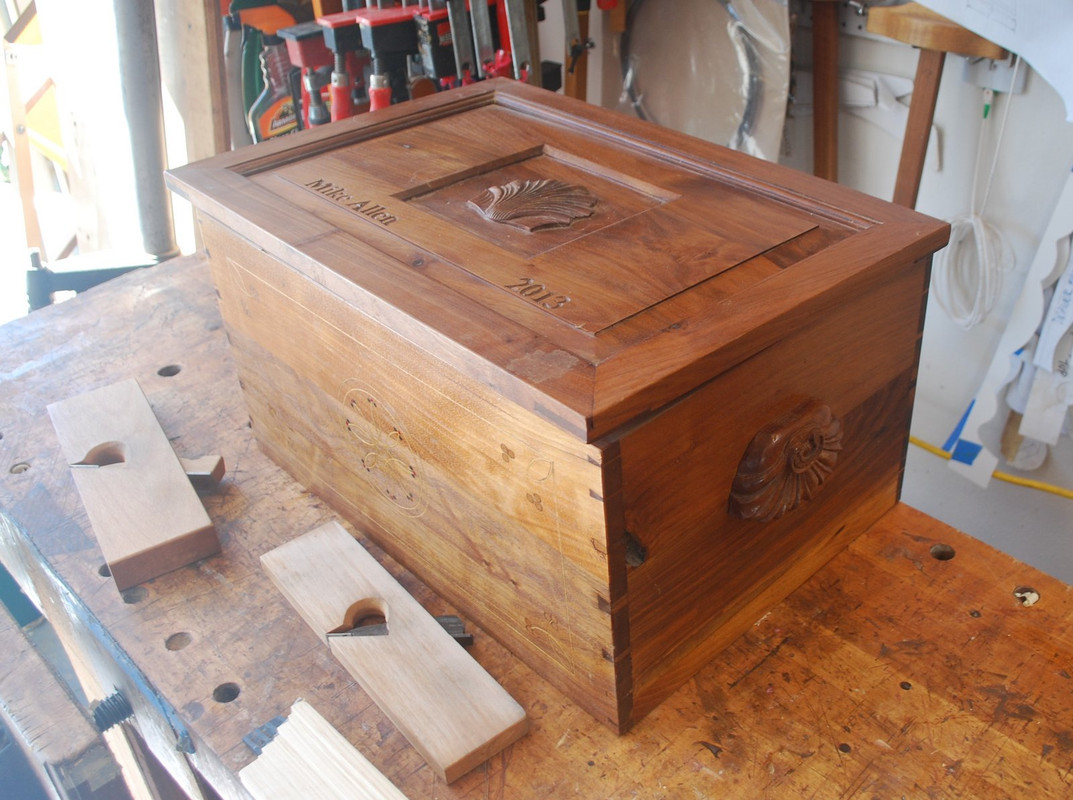
    I do a lot of early American style/reproduction pieces that involve complex moldings that can’t be done with commercially available router/shaper bits. I enjoy doing these using a combination of machinery to remove the bulk of the waste and hollow and round planes to create the final molding profiles. Here’s some pictures/descriptions of a recent build:

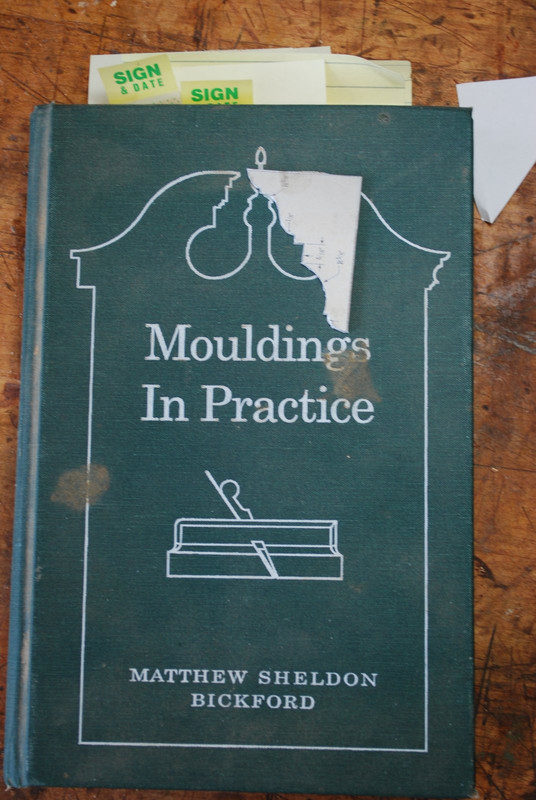
    Big fan of Matthew Bickford’s book “Moldings In Practice”. One of the few I actually keep in the shop not the library. Has lots of great historically accurate examples. I scan the profiles I like onto my computer and then re-size them for the piece I’m making. Then print out a hard copy and transfer it to card stock as a template.


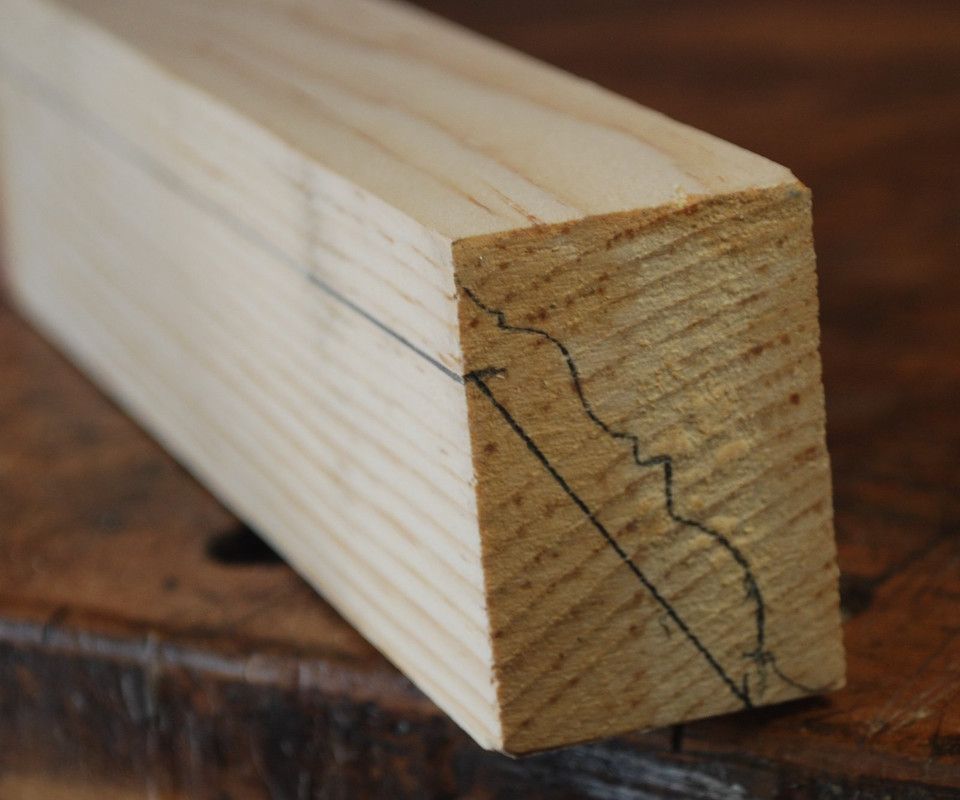
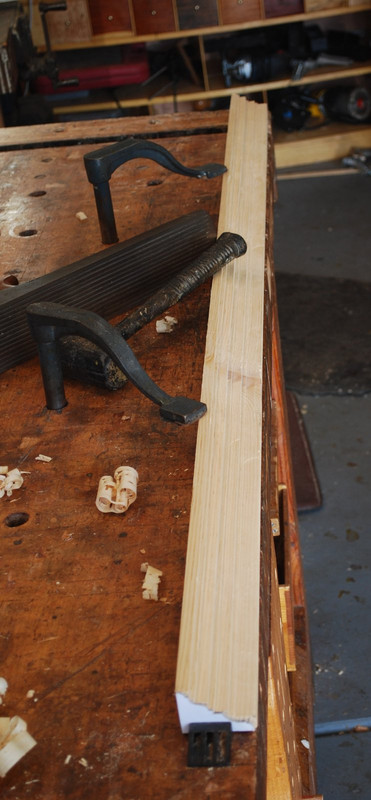
    Here’s a profile traced on the end grain of the pine I will use for the molding.


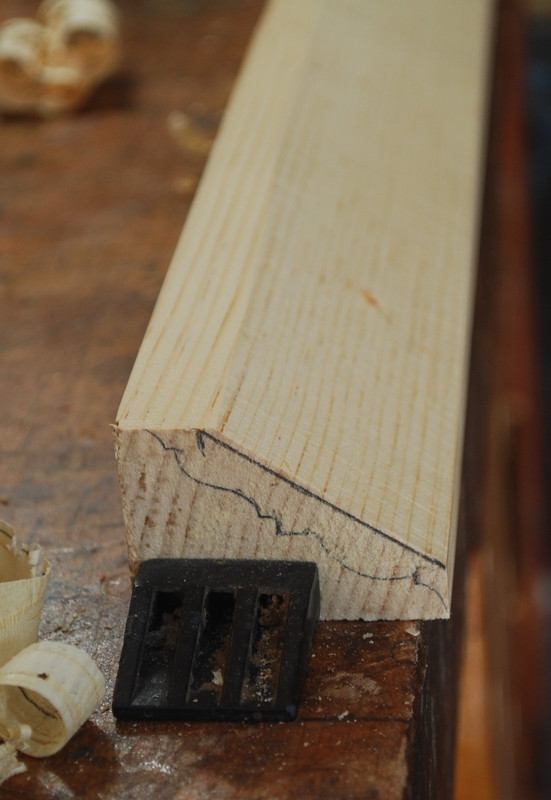
    First step for me is removing the bulk of the waste. I don’t have a table saw but use a bandsaw for this process.


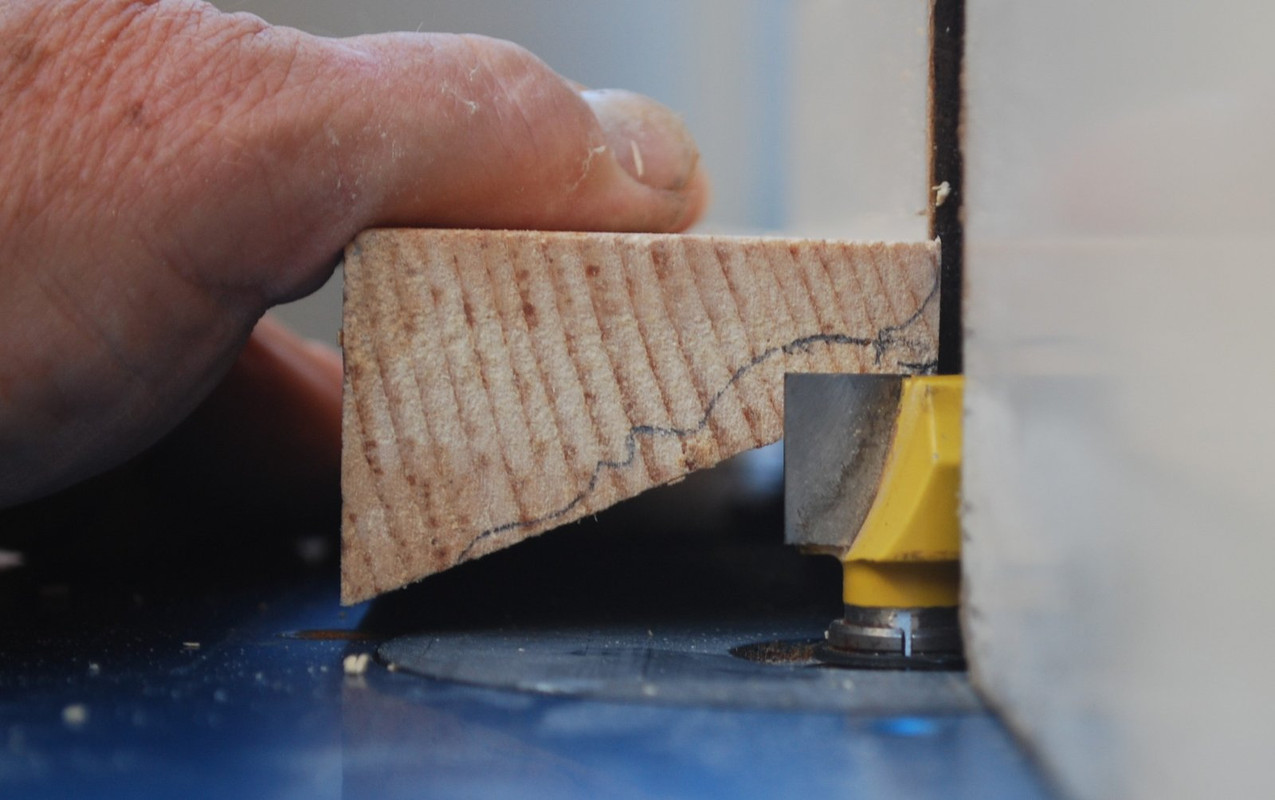
    As Bickford’s book very well explains, the key step in the molding process is creating square rabbits that the H&R planes can run along to create the curved profiles. I do this on a router table. I typically try to leave flat reference surfaces on both edges of the molding stock so that it’s easier to run through the router table, however when I cut the waste on the bandsaw for this piece, I left this end a little too skinny, but there is a flat reference surface on the majority of the stock on both sides. This is one operation where I miss having a tablesaw- which rarely happens.


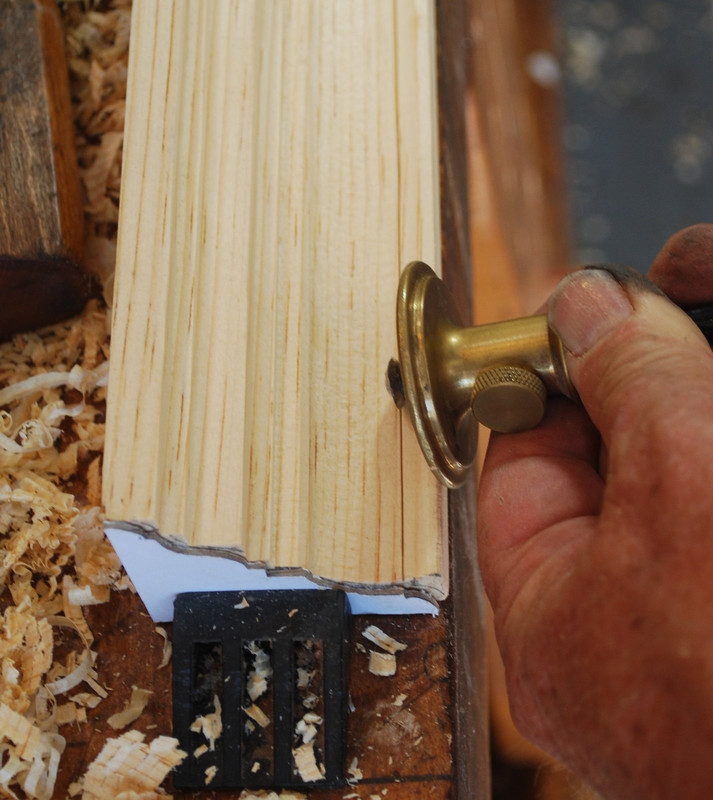
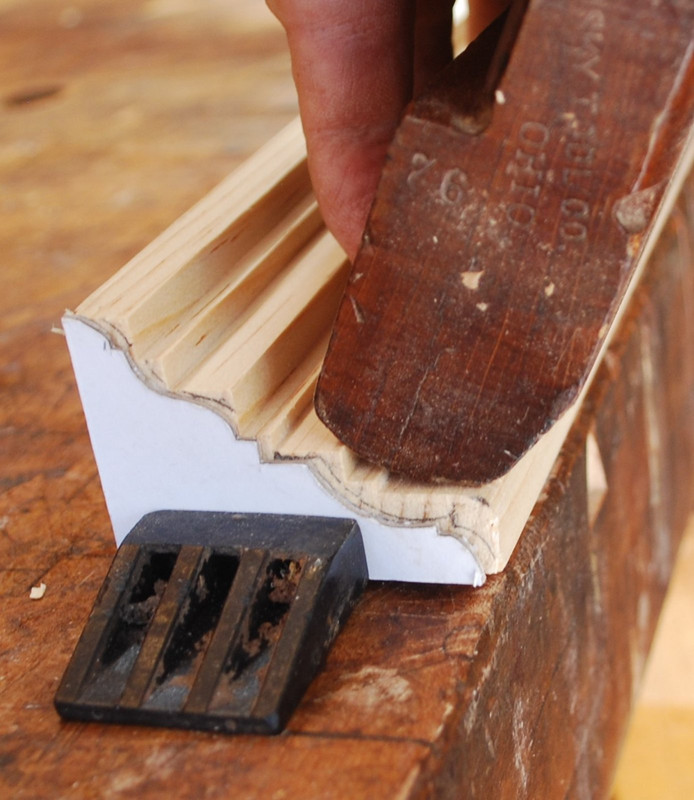
    With the rabbits established, was moving the molding stock between dogs to the bench. I have a shooting board I use for holding smaller mouldings, but this one is big enough to simply clamp between dogs


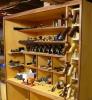
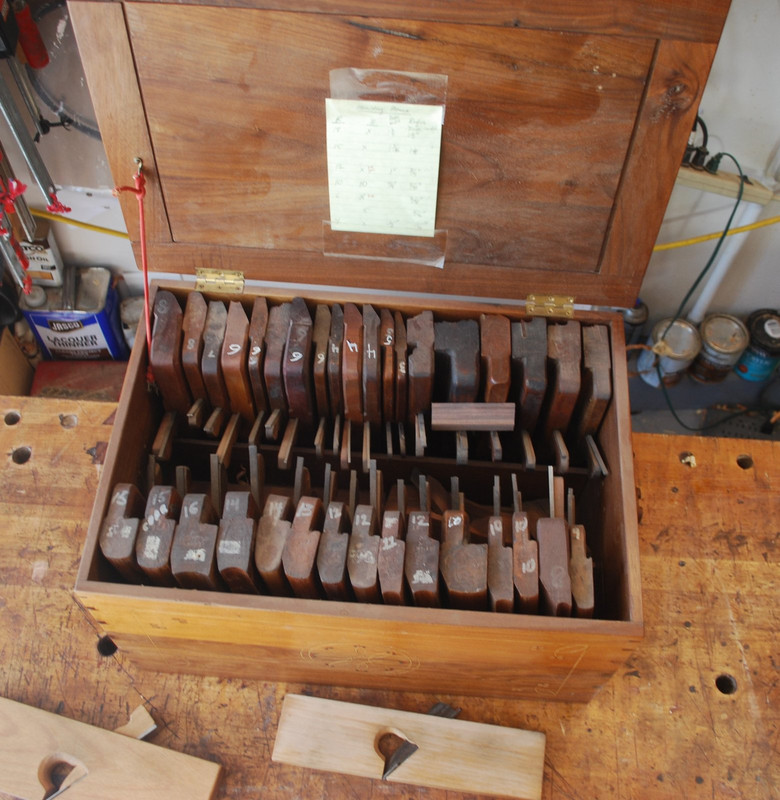
    Here’s some pictures of shop-made rabbit planes and H&R’s. My H&R’s are combination of mixed vintage and 3 shop made pairs following a Fine Woodworking magazine how-to article. I like to write the number describing the size of the profile on the back of the plane for easy reference.


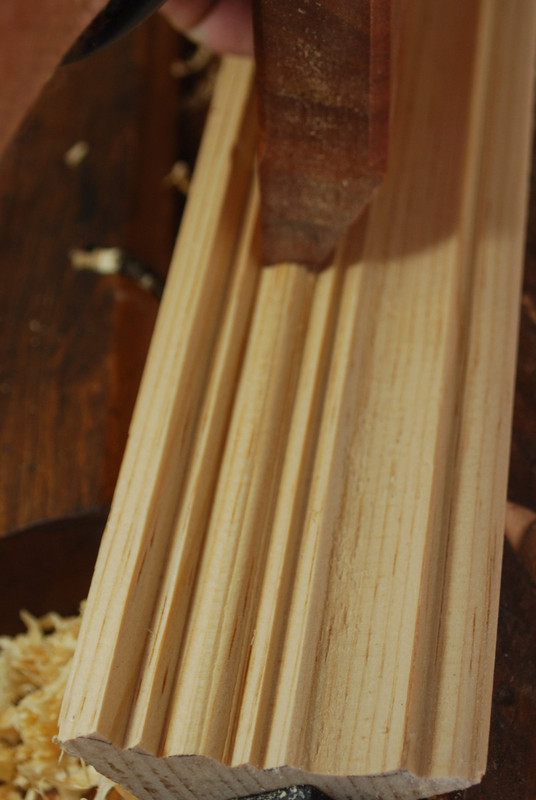
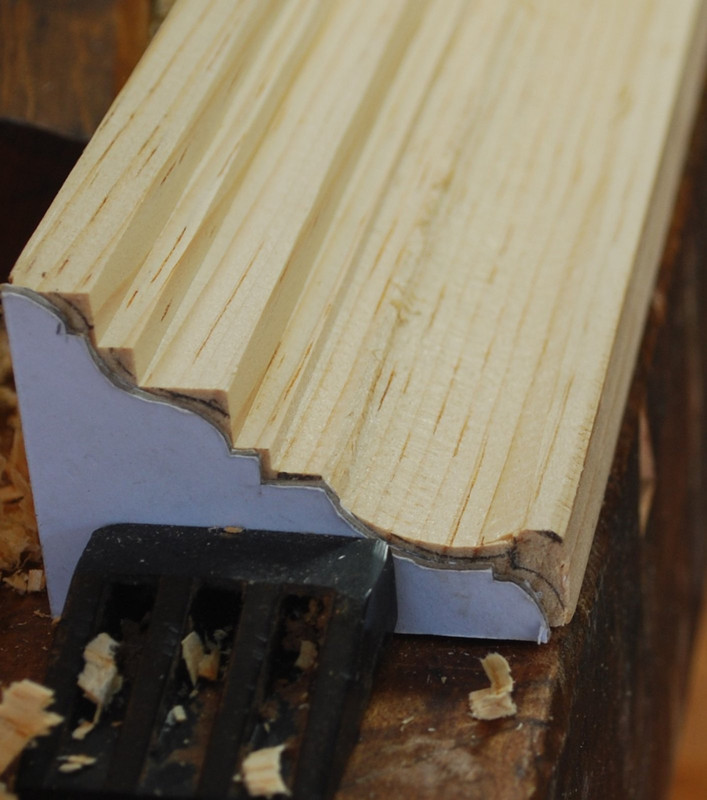
    First step here was to find the round bottom plane that matched the curvature of the profile and begin running it along the rabbits to create the curved surface. I spent many hours fettling my planes to ensure the curvature of the blade aligns with the curvature of the sole. Best tip for me was to leave the iron in the plane slightly proud of the sole and then shape the iron with file/stone/abrasives to get the correct curvature, before moving to final sharpening.


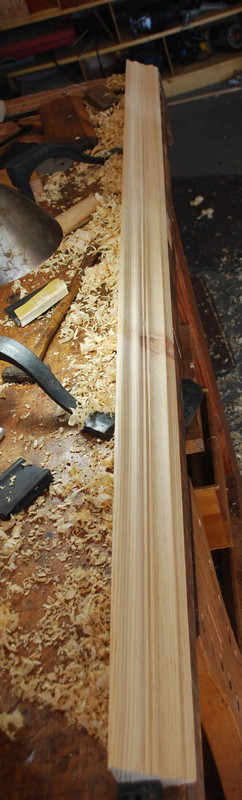
    Here’s the curve established.

    Last edited by Mike Allen1010; 11-13-2023 at 2:43 PM.

  2. #2
    Join Date
    Feb 2011
    Location
    Carlsbad, CA
    Posts
    2,230
    Blog Entries
    2
    Next step was to establish the thumbnail profile on bottom edge. Because this profile is on the edge the molding couldn’t establish the rabbit on the router table so I used a marking gauge to establish the line, and then set the corner of a well tuned rabbit plane into the gauge line and worked backwards to establish the 1/8” rabbit.


    Here’s a picture of a #6 hollow working on the corner of a rabbit to establish the convex curve part of the molding.


    Some final pictures of the completed molding. I have a set of rubber curved sanding blocks I think I got from Rockler that are super helpful in cleaning up both the convex and concave curves in the molding.


    I glue some spacer blocks into the corners and pin/glue the cornice molding square before adding it to the top of the cabinet.


    I assembled the carcass sides/tops with through dovetails, so I ended up adding a second piece of molding to cover that end grain. From a design perspective I think the cornice mouldings are really overdone for the cabinet as a whole. Pretty typical story for me – my entry point into this project was wanting to make this molding, however as per usual didn’t really think through how to incorporate the fun woodworking element into the overall design. Yep, definitely been here before! At least I had fun.


    Thanks for looking, Mike.

  3. #3
    Join Date
    Jun 2010
    Location
    twomiles from the "peak of Ohio
    Posts
    12,185
    Looks good to me!
    A Planer? I'm the Planer, and this is what I use

  4. #4
    Join Date
    Sep 2007
    Location
    Longview WA
    Posts
    27,468
    Blog Entries
    1
    Nice looking cabinet Mike.

    From a design perspective I think the cornice mouldings are really overdone for the cabinet as a whole.
    If it hangs on a wall the molding provides a nice hiding place for small items.

    jtk
    "A pessimist sees the difficulty in every opportunity; an optimist sees the opportunity in every difficulty."
    - Sir Winston Churchill (1874-1965)

  5. #5
    Join Date
    Jun 2010
    Location
    twomiles from the "peak of Ohio
    Posts
    12,185
    Jewelry Box. spline pattern.JPG
    This takes a few cuts...
    Jewelry Box, crossing the T.JPG
    And is glued into here...
    Thin Lid, groove be gone.JPG
    When stain a different colour..
    PIP, all stained, hinge view.JPG
    And the grain goes all the way around the outside of the box....looks like someone had installed 4 hinges at the corners, and just fold the board into a box...and added a lid..
    A Planer? I'm the Planer, and this is what I use

  6. #6
    Join Date
    Sep 2008
    Location
    N. Idaho
    Posts
    1,621
    Great thread and great work as always Mike. I'd love to have a box of H&Rs like that!

    Best,
    Chris
    "You can observe a lot just by watching."
    --Yogi Berra

  7. #7
    Join Date
    Jun 2010
    Location
    twomiles from the "peak of Ohio
    Posts
    12,185
    Note around the bottom of this pine box...
    A Fancy Pine box. Moulding.JPG
    Molding was simply done with a Stanley No. 45, with a few cutters...been a few years ago...
    A Planer? I'm the Planer, and this is what I use

  8. #8
    Join Date
    Feb 2020
    Location
    Camarillo, CA
    Posts
    423
    Thanks! I appreciate seeing how people do operations like this.

    I agree the cornice is a lot for that cabinet, but if the cabinet is hung high enough on a wall, might work.

  9. #9
    Join Date
    Feb 2014
    Location
    Lake Gaston, Henrico, NC
    Posts
    9,084
    That's a fantastic looking molding. If I making more that a few sticks of molding, like for four nine lite big sash, I keep on making runs across a table saw taking off as much wood as I can at different settings with guide strips sometimes. That leaves little for the molding plane to do but make a few finishing strokes.

    I was thinking I had a picture after doing the table saw runs, but must have forgotten to take any. This will give you an idea of the number of pieces. Glazing bars and muntins have to be run on both sides, of course. I run the muntins long to start with, and only cut the short pieces out after the profiles are finished.
    Attached Images Attached Images

  10. #10
    Join Date
    Apr 2017
    Location
    Clarks Summit PA
    Posts
    1,747
    Mike, excellent demonstration of hand work! Moldings are always a challenge and we need build threads like this to keep the hand tool approach alive. Thank you!

  11. #11
    Join Date
    Feb 2011
    Location
    Carlsbad, CA
    Posts
    2,230
    Blog Entries
    2
    Thanks for the feedback . Now that we’re in the empty nester house, I ‘ve got nowhere to put this so my son talked me into trying to sell it on Etsy. I have no idea how that works but he is doing all the internet work. I’m happy to give it away , I really just enjoy the building process. What do you think I should price this cabinet at? I’m sure lots of variables depending on location etc. , but I really have no idea. Any suggestions welcome!!

    Thanks, Mike

  12. #12
    Join Date
    Apr 2008
    Location
    Dayton Ohio
    Posts
    964
    My niece had asked for a bunch of spindles and a rail to restore a section missing at the bottom of her 1890's home. I made the spindles first. She then sent me a profile of the rail. (I live a couple hundred miles away, so this was all done by internet). Here's the profile:

    Sketch.jpeg

    The size required was larger than I could easily find so I had to glue up a couple pieces of red oak. I then added a piece to the bottom so I could shape the main profile. I used hand planes and sandpaper for the major round profile.
    Then I ran it thought the table saw a bunch of times to remove more of the waste.

    Saw 1.jpgSaw 2.jpg

    Used gouges, planes and sandpaper to smooth out the profile.

    Finally I cut a channel in the bottom and then made a filler for it. My niece would end up cutting the filler into small sections to go between the spindles.

    Val5.jpg

    I gave her extra spindles and the rail was about a foot longer than needed, for her to cut. She used the extras to color match the existing.

    Looks pretty good.

    Rail Done 2.jpg

  13. #13
    Eric , good work ,and good deed ! I much prefer the ‘stacked balls’ ,rather than the ‘spool turnings’. Here’s a tip, when children are
    there tell them not to run on the stairs , ‘cuz that will make all the balls fall !

  14. #14
    Join Date
    Feb 2011
    Location
    Carlsbad, CA
    Posts
    2,230
    Blog Entries
    2
    Quote Originally Posted by Christopher Charles View Post
    Great thread and great work as always Mike. I'd love to have a box of H&Rs like that!

    Best,
    Chris
    Thanks Chris, when I made this box I was learning carving and string inlay (I’m still learning) and this was a chance to practice.

    “Shop projects” or thing’s intended for shop use only are some of my favorite- don’t have to fuss much with plans, extreme precision etc. Just freelance and have fun - Any “extra “ details/design elements are just for my own amusement.

    I have this fantasy that after I’m long gone, my kids/grandkids may discover the various tool chests, cabinets, tool boxes, benches I made and decide they’d might be worth hanging onto for use in some other capacity. For example, my battle scared 8’ maple Rubo cabinetmakers bench as kitchen island? - nah, that’s crazy- or is it?
    Cheers!

  15. #15
    Join Date
    Feb 2011
    Location
    Carlsbad, CA
    Posts
    2,230
    Blog Entries
    2
    Quote Originally Posted by Christopher Charles View Post
    Great thread and great work as always Mike. I'd love to have a box of H&Rs like that!

    Best,
    Chris
    Quote Originally Posted by Eric Brown View Post
    My niece had asked for a bunch of spindles and a rail to restore a section missing at the bottom of her 1890's home. I made the spindles first. She then sent me a profile of the rail. (I live a couple hundred miles away, so this was all done by internet). Here's the profile:

    Sketch.jpeg

    The size required was larger than I could easily find so I had to glue up a couple pieces of red oak. I then added a piece to the bottom so I could shape the main profile. I used hand planes and sandpaper for the major round profile.
    Then I ran it thought the table saw a bunch of times to remove more of the waste.

    Saw 1.jpgSaw 2.jpg

    Used gouges, planes and sandpaper to smooth out the profile.

    Finally I cut a channel in the bottom and then made a filler for it. My niece would end up cutting the filler into small sections to go between the spindles.

    Val5.jpg

    I gave her extra spindles and the rail was about a foot longer than needed, for her to cut. She used the extras to color match the existing.

    Looks pretty good.

    Rail Done 2.jpg
    Great job Eric- looks terrific! I’m guessing your niece may have more of these home repair projects for you in the future based on your great results here!!

Posting Permissions

  • You may not post new threads
  • You may not post replies
  • You may not post attachments
  • You may not edit your posts
  •