Results 1 to 13 of 13

Thread: First attempt at restoring handplane

  1. #1
    Join Date
    Feb 2018
    Location
    Coquitlam
    Posts
    395

    First attempt at restoring handplane

    Wanted to have a smaller plane dedicated to random work in the shop and home.

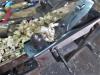
    Bought a #4 plane, and probably overpaid. Cleaned it up, painted the japaning, lapped sole and sides lightly, epoxied the broken front knob, added shim to stop the rear handle from moving, and lightly lapped the frog.

    Sole is not perfectly flat but plane gets .002" shavings so stopped lapping before doing any damage. Knobs and handle seem to be rosewood. Sadly, front knob broke into 3 pieces after removing paint. Ended up epoxying the pieces together. They got finished with garnet shellac. With dark color epoxy lines are barely visible.

    Currently, it's seeing decent use in cleaning up plywood edges for a wall to wall showcase I am building.

    PXL_20231114_065346991.jpg
    PXL_20231114_065339767.jpg
    PXL_20231114_055815813.jpg
    PXL_20231114_055420403.jpg
    PXL_20231114_055325231.jpg
    PXL_20231114_055313896.jpg
    PXL_20231027_040203056.jpg
    PXL_20231027_040157149.jpg

  2. #2
    Join Date
    Jun 2010
    Location
    twomiles from the "peak of Ohio
    Posts
    12,188
    Looks good to me! Is there a Stanley Logo on the iron? Appears to be a Type 12?

    Someone will ask....is there a Stanley Logo on the lateral lever?
    A Planer? I'm the Planer, and this is what I use

  3. #3
    Nice job, it looks great. The important thing though is that it works well.
    Dave Anderson

    Chester, NH

  4. #4
    That's an amazing transformation. Good job!

    Mike
    Go into the world and do well. But more importantly, go into the world and do good.

  5. #5
    Join Date
    Sep 2007
    Location
    Longview WA
    Posts
    27,473
    Blog Entries
    1
    Good work Anuj.

    You've turned an ugly duckling into a beautiful odd duck.

    Two patent dates with an adjustable frog make that a type 10. Not very common, but one of the best Stanley made.

    jtk
    "A pessimist sees the difficulty in every opportunity; an optimist sees the opportunity in every difficulty."
    - Sir Winston Churchill (1874-1965)

  6. #6
    Nice work!

    Now all you need is a No. 5 and No. 7. Plus a scrub plane. Probably add a No. 3 so you can set it up differently and have two smoothers. And a No. 8 for jointing really long boards. Probably a No. 6 for when the No. 5 isn't quite long enough. And a 5-1/2 to save time. Maybe a 4-1/2 as well. And a 112 for scraping figured grain. A No. 78 for rabbets. A No. 92 for cleaning up tenon shoulders. A 71 for dadoes and truing up cheeks on tenons and flattening mortise bottoms. And a 10-1/2 and 11 for getting right up against corners. A No. 13 for curved surfaces. And of course a 151 spokeshave in both flat and curved bottoms, because not everything is flat. A 60-1/2 and a 9-1/2 block plane. A No. 51 for your shooting board, is a must. And a No. 55 combination plane so you don't have to buy a whole bunch of planes that eat up all of the room in your shop!

    That's if you just want some basic users and don't want to start a collection or get anything that's too task specific.

  7. #7
    Join Date
    Jan 2010
    Location
    Lafayette, Indiana
    Posts
    1,379
    Anuj, you are in for an interesting journey. Nearly 14 years ago, I posted here with pics of my first Neader tools buy. An old timer that many may remember, Harry Strasil responded to my post about restoring an old #4 with these words:

    "... before you go to a lot of maybe unneccasary work, just clean the bottoms (soles) of the planes. sharpen the irons and give em a test drive. ... its all about if the tool works to satisfy you, not how pretty it is, after all its an old user tool not some extremely rare priceless thing that should be put on a pedestal behind glass and worshipped. Its like anything else old, even bodies, as it went thru life it got used and abused and picked up a few dents and scars, but they still work."

    If you look at the Neander sticky thread, there is a post of Harry's "Coffin Builders" workbench. I'd say the condition of your plane was quite a bit worse than the one I started with 14 years ago, so I think your restoration was time well spent, but sometimes all some of the old tools need is a bit of sharpening. Congratulations on your project. It looks good.

  8. #8
    Join Date
    Sep 2007
    Location
    Longview WA
    Posts
    27,473
    Blog Entries
    1
    I tend to agree with Harry Strasil's words posted by Joe.

    Some of my planes look like they were chewed up and spit out by a large dog. However, they work fine and that is what counts.

    jtk
    "A pessimist sees the difficulty in every opportunity; an optimist sees the opportunity in every difficulty."
    - Sir Winston Churchill (1874-1965)

  9. #9
    Join Date
    Feb 2018
    Location
    Coquitlam
    Posts
    395
    Quote Originally Posted by steven c newman View Post
    Looks good to me! Is there a Stanley Logo on the iron? Appears to be a Type 12?

    Someone will ask....is there a Stanley Logo on the lateral lever?
    Quote Originally Posted by Dave Anderson NH View Post
    Nice job, it looks great. The important thing though is that it works well.
    Quote Originally Posted by Mike Henderson View Post
    That's an amazing transformation. Good job!

    Mike
    Quote Originally Posted by Jim Koepke View Post
    Good work Anuj.

    You've turned an ugly duckling into a beautiful odd duck.

    Two patent dates with an adjustable frog make that a type 10. Not very common, but one of the best Stanley made.

    jtk
    Thank you!

    Yes, internet search suggested it's Type 9 or 10. Good to know it's 10. It's a very nice feeling holding and using a plane that's a century old. And, will most likely survive another.

    Jim, I always had this in my list of items to do, since you fixed my #3 several years ago

  10. #10
    Join Date
    Feb 2018
    Location
    Coquitlam
    Posts
    395
    Quote Originally Posted by Jimmy Harris View Post
    Nice work!

    Now all you need is a No. 5 and No. 7. Plus a scrub plane. Probably add a No. 3 so you can set it up differently and have two smoothers. <Truncated>
    Thank you!

    I do want to grab a #6, and #8. Have seen few #6 on FB marketplace. Will pull the trigger one day.

  11. #11
    Join Date
    Feb 2018
    Location
    Coquitlam
    Posts
    395
    Quote Originally Posted by Joe A Faulkner View Post
    Anuj, you are in for an interesting journey. Nearly 14 years ago, I posted here with pics of my first Neader tools buy. An old timer that many may remember, Harry Strasil responded to my post about restoring an old #4 with these words:

    "... before you go to a lot of maybe unneccasary work, just clean the bottoms (soles) of the planes. sharpen the irons and give em a test drive. ... its all about if the tool works to satisfy you, not how pretty it is, after all its an old user tool not some extremely rare priceless thing that should be put on a pedestal behind glass and worshipped. Its like anything else old, even bodies, as it went thru life it got used and abused and picked up a few dents and scars, but they still work."

    If you look at the Neander sticky thread, there is a post of Harry's "Coffin Builders" workbench. I'd say the condition of your plane was quite a bit worse than the one I started with 14 years ago, so I think your restoration was time well spent, but sometimes all some of the old tools need is a bit of sharpening. Congratulations on your project. It looks good.
    Quote Originally Posted by Jim Koepke View Post
    I tend to agree with Harry Strasil's words posted by Joe.

    Some of my planes look like they were chewed up and spit out by a large dog. However, they work fine and that is what counts.

    jtk
    I have a suspicion this won't be the last. After I put it together and it worked, was a really wonderful feeling.

    Noted. Will start with sharpening and testing next time. This time I jumped directly into making in shine.

  12. #12
    Quote Originally Posted by Anuj Prateek View Post
    I have a suspicion this won't be the last. After I put it together and it worked, was a really wonderful feeling.

    Noted. Will start with sharpening and testing next time. This time I jumped directly into making in shine.
    Do it however you like. I happen to like restoring old tools. However, I also try to buy the cheapest, rustiest old tools that still have a chance to be coaxed into a decent worker. So I tell myself that I want to keep some of that old-tool charm, but I think really, I just get to a point where it's good enough and I'm ready to move on. So wherever that balance lies for you is as good a place as any to stop.

  13. #13
    Join Date
    Jun 2010
    Location
    twomiles from the "peak of Ohio
    Posts
    12,188
    Ok..yesterday..I turned down a Craftsman No. 4 that had the grooved sides, and steel Frog (Toad) priced at $25+ tax....Same Antique Mall...another seller had...Stanley No. 604 ($225) a Stanley No. 40($75)and a 8ppi "Dovetail Saw" for $55....too rich for my Budget....

    January Rust Hunt, total tool haul.JPG
    $50 Total for this, plus a Lockset
    January Rust Hunt, new door latch.JPG
    To replace the one on my Bathroom's door...($3)

    I needed the No. 80 body, to replace a broken and badly Brazed together one...The No. 51 merely needed a new bolt (Spares Box) and a replacement for the Expansive Bit that failed...Irwin No. 22 with the gear drive adjuster..and a Tap wrench size I didn't have...and will need to work on the No. 80 swap..

    OP's future?
    Workshop Tour, Plane Til.JPG
    Fancy, or..
    Workshop Tour, Tool Cabinet opened.JPG
    Busy?
    A Planer? I'm the Planer, and this is what I use

Posting Permissions

  • You may not post new threads
  • You may not post replies
  • You may not post attachments
  • You may not edit your posts
  •