Page 1 of 2 12 LastLast
Results 1 to 15 of 18

Thread: Morris chairs - white oak with cherry accents

  1. #1
    Join Date
    Feb 2010
    Location
    Collegeville PA (30 min west of Philly)
    Posts
    1,143
    Blog Entries
    1

    Morris chairs - white oak with cherry accents

    I followed TWW guild for this one since there were many new-to-me techniques. I found the series of videos and templates/plans extremely helpful, and learned a ton.

    The most challenging parts of the project were the damn corbels at the end. ha! Tough to get those compound angles just perfect.

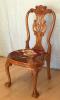
    I got a deal on a batch of rough lumber, white oak. It was really rough it turns out... hence the deal I suppose. Not a lot of quarter sawn in the mix, but I was able to make some nice grain choices I think.

    For the curved arms and back slats, I decided to do the center laminations in cherry for some visual interest. I then incorporated cherry pins at all key joints for mechanical strength and to continue the accent theme.

    I traded some cutting boards to a friend to sew the cushion covers for me.

    Doing two chairs at once ended up being ambitious. About 150 parts in total. I ended up using odie's oil to finish... I was just soooo done with this project that considering any other approach was beyond my energy reserves.

    The wife is happy, and this is what is most important.

    _finished 1.jpg

    _finished 2.jpg

    _finished 3.jpg

    _finished 4.jpg

    Thanks!
    Bob R.
    - Bob R.
    Collegeville PA (30 minutes west of Philly)

  2. #2
    Join Date
    Apr 2017
    Location
    Clarks Summit PA
    Posts
    1,747
    Very nice Bob, they certainly add an artisan's touch to your room. I like the cherry lamination - is that about 1/4 inch? How did you laminate it between the oak? .

  3. #3
    Join Date
    Feb 2010
    Location
    Collegeville PA (30 min west of Philly)
    Posts
    1,143
    Blog Entries
    1
    I guess I'll need to start on another room at this point - everything in this pic (except the couch) is something I built. Living room, done. Next!


    The arm rests are almost exactly 1" thick in total and consist of 6 equal layers (2 white oak, 2 cherry, 2 white oak). The back rest slats are the same approach, but thinner total thickness, and fewer lamination layers.

    I followed Marc's approach by using a bending form to achieve this. Worked well (and building the jigs was a significant time spend on this build overall).

    Of note... I could not resaw these laminations on my G0555 bandsaw. Either it is underpowered, or I have tension wrong. Dreadfully slow even with a brand new, high quality blade intended for the task. I ended up cutting all of these on the table saw and then very carefully trueing up at the planer. Lots of muscle effort, and lots of waste in this approach, but it worked well and final results were spot on. A better bandsaw, and drum sander would have been preferable (and are now "on the list").

    arms lots of layers.jpg


    As I was making the laminations, I kept careful track of the 4 "top boards" that were the book matches I wanted to feature.
    arms book match.jpg


    I got quite good and comfortable at the operation by the time I'd done 4 arm rests and 12 back rest slats. But "operation" is definitely the right word. Lots to do, quickly, and correctly... and repeat with consistency.
    arms prep for glue up.jpg

    Can never have enough clamps, right?
    arms lamination form and clamps.jpg
    - Bob R.
    Collegeville PA (30 minutes west of Philly)

  4. #4
    Join Date
    Sep 2013
    Location
    Wayland, MA
    Posts
    3,668
    That's a handsome chair! Nicely done.

  5. #5
    Join Date
    Feb 2003
    Location
    McKean, PA
    Posts
    15,652
    Blog Entries
    1
    Very nice chair and stool. I bet they are heavy.

    You might want to check your band saw belt tension. I have a delta 14" band saw with a 3/4 hp motor and I can resaw 1 x 5 hickory. When I first tried to resaw anything, the saw would bog down and the cut went very slowly. Then I noticed that the motor rpm didn't seem to change only the wheel rpm's Tightening the belt worked wonders.
    Lee Schierer
    USNA '71
    Go Navy!

    My advice, comments and suggestions are free, but it costs money to run the site. If you found something of value here please give a little something back by becoming a contributor! Please Contribute

  6. #6
    Join Date
    Feb 2010
    Location
    Collegeville PA (30 min west of Philly)
    Posts
    1,143
    Blog Entries
    1
    I will definitely look into that more Lee. I'll admit that my tensioning method is presently "tighten it a lot and hope it works", which is fine for basic curve cuts, but probably not scientific enough for resawing.

    Thanks for the kind words guys! I can say this... it will be a lonnnnnnng time until I build another set of these. It was a long and tiring build (both mentally and physically). But, the chairs ought to survive several generations, and I'm proud of the end results.
    - Bob R.
    Collegeville PA (30 minutes west of Philly)

  7. #7
    Join Date
    Dec 2010
    Location
    WNY
    Posts
    9,750
    And proud you should be; those chairs are very nicely done. I really like the cherry accents, sort of Stickley gone modern. The light finish enhances the contrast and brightens the room, too. For using "difficult wood" you did a masterful job of picking and matching grain in the various parts.

    If you plan to do much bent lamination work, a vacuum bag will make glue-ups much less stressful as you only need to build one mold and the bag takes the place of all those clamps and assures even pressure everywhere. Getting your bandsaw into good shape will make life a lot better, too. The Grizzly 0555 looks like a Delta 14" cast iron clone. I have the Delta and used to regularly cut 10" wide veneer on it with a 1/2" 3 tpi blade with a 1.5 hp motor. It's not fast, and it takes very good setup, but it will do it. You should be able to cut 6" wide veneer on yours with the 1 hp motor it has. You can't get a lot of tension on a 1/2" blade, about 10 - 12ksi, but that's enough if the setup is good and you don't overfeed it. A 3/8" 4 tpi blade might actually work better since you can get more tension. A big problem with these smalls saws is the low power limits how fast you can cut and that adds heat to the blade which dulls the teeth more quickly. The solution is to use a new blade for any resawing/veneer work and be willing to change it when it starts giving poor results.

    John

  8. #8
    Join Date
    Mar 2003
    Location
    SE PA - Central Bucks County
    Posts
    65,896
    Very nice work, Bob!
    --

    The most expensive tool is the one you buy "cheaply" and often...

  9. #9
    Join Date
    Feb 2010
    Location
    Collegeville PA (30 min west of Philly)
    Posts
    1,143
    Blog Entries
    1
    Excellent eye on the grain matching, and thank you for noticing. As an example, each of these legs is a minimum of 2 pieces glued up. I really try hard to make things like this invisible, and to plan "ugly pieces" to be in the cutoff areas etc.

    grain matching.jpg


    Separately... if anyone that is "without lathe" like me ever needs a path to making knobbed pegs.. let me know. I figured out a path that worked great.

    latheless pegs.jpg
    - Bob R.
    Collegeville PA (30 minutes west of Philly)

  10. #10
    Join Date
    Jan 2007
    Location
    Michiana
    Posts
    3,079
    Very Impressive. You nailed the traditional form and the light finish really lends an airiness to the pieces. My bride and I are both huge A&C fans. I've made some accessory pieces but don't have the guts to try a chair. Here's one of my tables next to a Morris chair and Stool made by a company in New York.

    53488257887_d1cd3a4710_k.jpg
    Sharp solves all manner of problems.

  11. #11
    Join Date
    Feb 2014
    Location
    NE Florida
    Posts
    315
    You did an outstanding job on the chairs.
    Chris

  12. #12
    Join Date
    Nov 2021
    Location
    Mid West and North East USA
    Posts
    2,942
    Blog Entries
    2
    I like the personal touches on a classic design. Very nice work! I still have not tracked down the Jimmie Rodgers song that has a line about a Morris chair and a log fire.
    Best Regards, Maurice

  13. #13
    Join Date
    Feb 2010
    Location
    Collegeville PA (30 min west of Philly)
    Posts
    1,143
    Blog Entries
    1
    Thanks Rob! Love that table you made, would like to see more pics and closeups if you have some? (also thanks for all the other kind comments... whether woodworkers will admit it or not, praise from "those that know" is extremely appreciated and valued)

    That chair and stool set look really nice, and very much like the plans I followed. What I have found is that "those in business" tend to make some very pragmatic decisions to make production profitable / viable. As an example, making the back rests (which are entirely invisible behind the cushion) was easily 25% of the total build time in my case because both the rails and the slats were curved. That's a space where I usually see straight rails, straights slats.... which honestly, I could have done and it wouldn't have removed an ounce of functionality. I feel "accomplished" for having achieved it well (and consistently across both chairs), but it really was a somewhat frivolous time expenditure in retrospect.

    curved backrest rails and slats.jpg


    Other examples of this dynamic which felt more "worth it" (because they can be seen) would be tapered legs on stools and chairs, tapered arm rest, matching curves under arm rest.


    You can see some of these nuances better pre-upholstery:

    before upholstery.jpg

    Edit: unable to be seen... the "cherry dowels for strength" concept is inclusive of holding the arm rests down to the side assemblies. In those cases, I hid the pin in the cherry lamination layer. This would be the weakest area of the chair given the weight of the chairs, and the tendency to pick them up using the arm rests. This gives me a ton of confidence that there are no failure points in these pieces.
    Last edited by Bob Riefer; 01-27-2024 at 9:48 AM.
    - Bob R.
    Collegeville PA (30 minutes west of Philly)

  14. #14
    Join Date
    Nov 2022
    Location
    Northern Colorado
    Posts
    1,138
    Well done, you should be proud of yourself. I’m like you sometimes where if it’s too and arduous the fun starts to fade LOL.

  15. #15
    Very nice and refreshing look there! Well done.

Posting Permissions

  • You may not post new threads
  • You may not post replies
  • You may not post attachments
  • You may not edit your posts
  •