Page 1 of 2 12 LastLast
Results 1 to 15 of 23

Thread: Tapered Round Legs with a simple 4th axis

  1. #1
    Join Date
    Dec 2010
    Location
    WNY
    Posts
    9,749

    Tapered Round Legs with a simple 4th axis

    I'm making a table with round, tapered legs. I'm not a very good turner, and the tapers on these legs need to be dead straight, so I was pretty sure I would struggle to do that. I have a friend who could turn them in his sleep, but I like to do things for myself, regardless if it takes longer, so .... I decided to see if I could do it on my CNC.

    I don't have a 4th axis on my CNC. OK, I'll make a simple jig and to turn the legs with a cordless drill. That was easy enough. A dowel in the end of the leg and a piece of 3/8" all thread at the head for the drill to turn. I thought I was on easy street until I found out I didn't have enough height available on the Z axis to cut the tapers from the top. Then I realized I didn't have enough reach from the Z-axis to the centerline of the legs anyway, so I had to make the cut along the side of the leg using a pocket cut. I hope that makes sense.


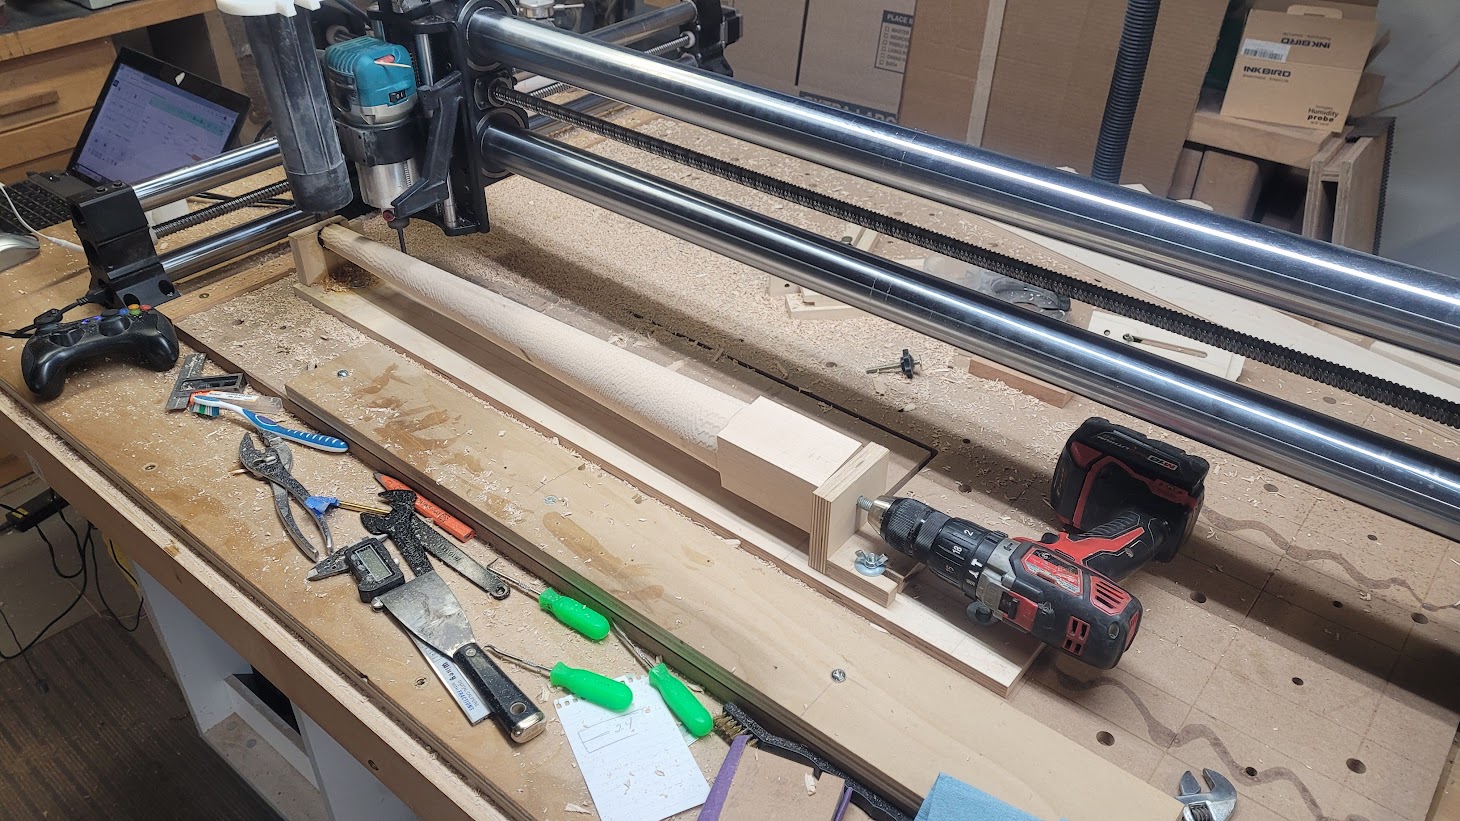
    Cutting with the side of the bit gives a much rougher cut than using the end of the bit, but it was the only method available to me with the height limitation I have, unless I removed the spoilboard and raised the Z-axis mount up higher, and I wasn't going to do that. The good news was it sanded out beautifully and I have my nice, clean, straight tapers.


    I really smoked the end of the leg against the jig from unnecessarily pushing on the drill.

    It took a couple of hours to build the jig and figure out how to make the cut, and almost an hour to machine it with the very conservative toolpath parameters I used. My friend could turn one in less than 10 minutes. But I did it myself.

    One down, three to go.

    John

  2. #2
    Join Date
    Mar 2003
    Location
    SE PA - Central Bucks County
    Posts
    65,893
    Nothing like a little creativity to solve a challenge!
    --

    The most expensive tool is the one you buy "cheaply" and often...

  3. #3
    Join Date
    Apr 2018
    Location
    Cambridge Vermont
    Posts
    2,291
    I picked up some cheap aluminum blocks off of ebay to raise my 1F up about 2 1/2" inches. I know people put a spacer where the X axis mounts to the Y axis but I didn't want to fool around trying to make something fit. I just have a block at all 4 corners. Before that I had a 3/4" spacer to account for the spoilboard. But I still was loosing Z axis range. When I upgraded to the Z-20 I would say at least 1/3 of the range wasn't usable. I ended up drilling holes in the aluminum blocks by clamping the blocks onto the 1F and a drill bit in my spindle. Cut like butter with a precision that would be hard to match. If needed I can take a picture.

    I like your "poor man's" solution. I'm planning on making some table legs in the near future and I may have to borrow your idea. I would like to mix both round and square into the design. You could easily make the holes in both plywood pieces at each end of the lathe large enough for a bearing to fit into. Maybe even cut a slot in the plywood so you could clamp it onto the bearings to hold them in place. That way the project could easily spin.

  4. #4
    Join Date
    Jan 2007
    Location
    Ottawa, ON Canada
    Posts
    1,473
    FWIW, before I had the rotary attachment for my CNC, I did similar projects as double-sided jobs. I use VCarvePro as my CAD/CAM application.

    That said, I love your solution.
    Grant
    Ottawa ON

  5. #5
    Join Date
    Dec 2010
    Location
    WNY
    Posts
    9,749
    Quote Originally Posted by Grant Wilkinson View Post
    FWIW, before I had the rotary attachment for my CNC, I did similar projects as double-sided jobs. I use VCarvePro as my CAD/CAM application.

    That said, I love your solution.
    Grant, if you cut any round, tapered legs like these, did you use the fluting toolpath to do it? I use V-Carve Pro, too.

    John

  6. #6
    Join Date
    Dec 2010
    Location
    WNY
    Posts
    9,749
    I've thought about that Alex, but the problem I see is having to add a lot more sheets to the waste board for regular projects. I have used my 1F to cut through the tabletop when I installed the vertical work holding fixture in it. Also, I regularly use bits that are only 1.5" long. and they barely touch the 3/4" spoilboard. How do you deal with this when the machine is elevated so much?

    If I had to cut more than 4 legs I would install bearings in the end blocks, as you suggested. I wore out the drive end after 2 legs from the 3/8" all thread wearing the plywood sloppy. I switched to a bolt so the smooth shank now rides in the 3/8" hole in a new block and that will get me through the other two.

    These legs are for the Lane table I'm building. They have an interesting design. The round tapered section meets a square section where the aprons attach. Nothing new there, but the outside corner is rounded to match the diameter of the leg where it meets the square section. I hand planed that corner and here's what it looks like. High tech and old tech in the same piece. I think the design is quite elegant.


    John

  7. #7
    Join Date
    Nov 2022
    Location
    Northern Colorado
    Posts
    1,137
    That's super clever John and you can't argue with the final results, they look great!

  8. #8
    Join Date
    May 2008
    Location
    MA
    Posts
    2,260
    Great setup. One of the modes of an indexer does just this (emulates a lathe). The cut path is a series of deeper and deeper passes while the indexer just spins.

    If I did not have an indexer it would be worth upgrading this fixture with a center support (or live center), and adding a chuck to hold the piece to turn it. Knobs, tote knobs, handles, etc, anything axisymmetric. (if you are ambitious add a motor to rotate it). You might get a lot of use from it...

  9. #9
    Join Date
    Jan 2007
    Location
    Ottawa, ON Canada
    Posts
    1,473
    Quote Originally Posted by John TenEyck View Post
    Grant, if you cut any round, tapered legs like these, did you use the fluting toolpath to do it? I use V-Carve Pro, too.

    John


    John. I apologize for the delay in replying. I've been away from here for a while.

    I apologize, too, as I misspoke. I do use VCarvePro on my own machine. I have acccess to an older version of Aspire on a buddy's machine. I did the tapered legs on his Aspire, using a two rail sweep, double sided job. It's quite simple doing it that way.

    Now that you mention the fluting toolpath, I think I'll try that. I want to try using the moulding toolpath, too. I don't do these often and now that I have the rotary, I can use it.

    Your approach is ingenious.
    Grant
    Ottawa ON

  10. #10
    Join Date
    Mar 2003
    Location
    SE PA - Central Bucks County
    Posts
    65,893
    Grant, the Moulding Tool Path is one of the most incredibly useful things...even though I use Aspire, I do not do 3D modeling unless it's the only way to accomplish the task. It takes more time to create and refine and takes a whole lot longer to cut. If I can use the moulding tool path to get the contours and shapes I need, that's what I use. Example, contoured guitar bodies.
    --

    The most expensive tool is the one you buy "cheaply" and often...

  11. #11
    Join Date
    Jan 2007
    Location
    Ottawa, ON Canada
    Posts
    1,473
    Quote Originally Posted by Jim Becker View Post
    Grant, the Moulding Tool Path is one of the most incredibly useful things...even though I use Aspire, I do not do 3D modeling unless it's the only way to accomplish the task. It takes more time to create and refine and takes a whole lot longer to cut. If I can use the moulding tool path to get the contours and shapes I need, that's what I use. Example, contoured guitar bodies.
    I couldn't agree more, Jim. I do picture frames frequently and use the moulding toolpath for all of them. I played with a few in Aspire on my buddy's machine, but didn't find anything that I couldn't do with the moulding toolpath in VCarve, and, as you say, the job runs much more quickly.
    Grant
    Ottawa ON

  12. #12
    Join Date
    Mar 2003
    Location
    SE PA - Central Bucks County
    Posts
    65,893
    Yea, it's like "the secret sauce" for so many things which extends the value of the "more affordable" VCarvePro for sure. The only reason I have Aspire is because I got a job early on that required it and it was worth enough money that the customer funded it without question as an add-on to the work. V12 will be out soon and it will be interesting to see the new features, etc.\
    --

    The most expensive tool is the one you buy "cheaply" and often...

  13. #13
    Join Date
    Jan 2007
    Location
    Ottawa, ON Canada
    Posts
    1,473
    My woodworking is a hobby/passtime. I lucked into VCarvePro when a friend closed his woodshop and allowed me to pay only the licence transfer fee to "buy" it. I've since updated to 11.55. I've been reading of the improvements coming in v12,but at $300 cdn to upgrade, there will need to be some real goodies to entice me to go for it.
    Grant
    Ottawa ON

  14. #14
    Join Date
    Mar 2003
    Location
    SE PA - Central Bucks County
    Posts
    65,893
    Yes, the devil is in the details. I waited to upgrade from 10x to 11x for awhile but I suspect I'll go to 12 if there's something there that interests me. Do note that there is a little increase in the upgrade cost going forward, but my understanding is that for a short time, folks upgrading right away will get the opportunity to upgrade for the previous upgrade price. For Aspire, that's $400 vs $450. So as soon as the details of what's new come out, consider them thoroughly so that if you do choose to go to v12, you can do it during that short window where the previous upgrade price will prevail. They are doing this to insure that long time customers who have kept up don't have a disadvantage compared to people who recently upgraded to v11.55 and get the V12 gratis. (This information is from a thread and company post in the Vectric forum)
    --

    The most expensive tool is the one you buy "cheaply" and often...

  15. #15
    Join Date
    Nov 2022
    Location
    Northern Colorado
    Posts
    1,137
    I’m upgrading and I’m glad they are allowing old users to catch up. The more people buy it the longer it will last an improve long term.

    John my goal this year is to do a project on my 4th axis!!

Posting Permissions

  • You may not post new threads
  • You may not post replies
  • You may not post attachments
  • You may not edit your posts
  •