Page 2 of 3 FirstFirst 123 LastLast
Results 16 to 30 of 35

Thread: Build a case for some chisels?

  1. #16
    Join Date
    Jun 2010
    Location
    twomiles from the "peak of Ohio
    Posts
    12,190
    Both ends were done first, going across the grain...a "stop line" was marked along the center of the edge, and about a 1/4" or so down the face...Tools?
    Chisel Case, Base and clean up, tools.jpg
    Spokeshave where the grain allowed...otherwise it was just the No.3...Got both ends done, on both faces..
    Chisel Case, Base and clean up, short ends done.jpg
    Then hand sanded with 80 and 220 grit sandpaper....then the long grain edges were done..
    Chisel Case, Base and clean up, long edge done.jpg
    Trying to keep that sharp corner....

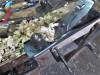
    Once all four edges were Thumbnailed...time for the glue bottle..
    Chisel Case, Base and clean up, 3rd hand.jpg
    Used a caul across the front...and..
    Chisel Case, Base and clean up, base glued in place.jpg
    3 clamps around in back.

    Will let this mess sit a day...while I figure out the building of a Drawer....and. whether to use through dovetails for it...we'll see...

    Stay tuned..
    A Planer? I'm the Planer, and this is what I use

  2. #17
    Join Date
    Jun 2010
    Location
    twomiles from the "peak of Ohio
    Posts
    12,190
    Got the lid to size
    Chisel Case, Drawer, blank for the lid.jpg

    4 parts for a Drawer..
    Chisel Case, Drawer, Parts milled.jpg
    Milled a place for the drawer to house a plywood...
    Chisel Case, Drawer, Craftsman # 3720.jpg
    Dovetails as well..
    Chisel Case, Drawer, second back corner.jpg
    A Planer? I'm the Planer, and this is what I use

  3. #18
    Join Date
    Jun 2010
    Location
    twomiles from the "peak of Ohio
    Posts
    12,190
    Keyboard issues this morning...had to go and replace it. Seems a cat had walked across the computer desk, and knocked over my glass of Tonic & Gin...right onto the keyboard.
    Monday....gotta love it...not. The way things are going this morning, I think I might just leave the Shop closed for today..

    As for that plane?
    Chisel Case, Drawer, shavings.jpg
    Craftsman No. 3720..aka..Sargent No. 79, Type 2......that Mr. Brown was kind enough to nickel plate up like new...
    Chisel Case, Drawer, layout work.jpg
    Dovetail layouts, as I had to work around that rebate...
    Chisel Case, Drawer, dry fit back.jpg
    Back 2 corners are done...need to find out the width/depth and cut the plywood to size...length is fine..
    Chisel Case, Drawer, busy day.jpg
    The #3720 does make a mess on the shop floor...had to sweep up the floor when I was done...
    Chisel Case, Drawer, Parts milled.jpg
    Lid and all 4 drawer parts...will see how today goes along....and how bored I get...
    A Planer? I'm the Planer, and this is what I use

  4. #19
    Join Date
    Jun 2010
    Location
    twomiles from the "peak of Ohio
    Posts
    12,190
    This case can then sit on a shelf..until a Project comes along that needs chisels...then it can sit down on the end of the bench, where I can access the sizes I need that day...when not in use, back onto the shelf.

    Thinking I'm going to do Half Blind Dovetails for the front...we'll see how the Brain works, today...
    A Planer? I'm the Planer, and this is what I use

  5. #20
    Join Date
    Jun 2010
    Location
    twomiles from the "peak of Ohio
    Posts
    12,190
    Half blind dovetails for the front of the drawer...meant I needed to cut existing pins back about 1/8" from where the others were...instead of 1/2" long pins...they needed to be 3/8" long..

    I still lay the pins out at 1/2" long, though...
    Chisel Case, Drawer assembly. pins done.jpg
    Then cut them for final length..then used those pins to do the layout for the tails..
    Chisel Case, Drawer assembly, double check.jpg

    Just traced around. Dovetail saw to cut inside the waste side of those lines..just nicking the base lines. then the chopping began..
    Chisel Case, Drawer Assembly, chopping needs done.jpg
    Some with a normal chisel, and some with...
    Chisel Case, Drawer assembly, special chisel.jpg
    One that was reground into a triangular shape, to get into the corners better..

    Got both front corners done, and tried a dry fit...
    Chisel Case, Drawer assembly, 4 corners done.jpg
    And this is what you will see when the drawer is closed...a panel was cut to size, and dry fitted..
    Chisel Case, Drawer assembly, bottom fitted.jpg
    Was about the right length, just a hair too wide...plane skimmed enough off for a nice snug fit....then the clamps and glue arrived..
    Chisel Case, Drawer assembly, glued up.jpg

    So....later today, I'll remove these clamps, clean things up...might see about a wood knob. Then work on that lid..

    Stay tuned..
    A Planer? I'm the Planer, and this is what I use

  6. #21
    Join Date
    Jun 2010
    Location
    twomiles from the "peak of Ohio
    Posts
    12,190
    Ok...those clamps came off this morning...back was cleaned up..
    Chisel Case, drawer work, back cleaned up.jpg
    Followed by both ends, and then the front..
    Chisel Case, drawer work, front cleaned up.jpg
    And the top edges leveled...then the bottom was leveled...
    Chisel Case, drawer work, level the bottom.jpg
    As some of the rebate edges were a hair proud of the panel

    Was able to do a test fit..
    Chisel Case, drawer work, test fit.jpg
    But, until a knob was installed, didn't feel like push it all the way in...

    A support was added to the inside of the drawer...
    Chisel Case, drawer work, seeing what fits.jpg
    Then laid out the diagonals, to find the center of the drawer front..
    Chisel Case, drawer work, cordless drill.jpg
    A cordless drill was used. A Mini Shaker Peg was modified to fit....
    And NOW I can push the drawer in as far as it can go...
    Chisel Case, drawer work, knob done.jpg
    Maybe tomorrow, I can work on that lid a bit?

    Stay tuned..
    A Planer? I'm the Planer, and this is what I use

  7. #22
    Join Date
    Jun 2010
    Location
    twomiles from the "peak of Ohio
    Posts
    12,190
    Lid needs a rebate, like this older case has..
    Chisel Case, Lid & Feet, need this rebate.jpg
    Which gives the hinges a bit more room, and the rebate acts as a stop when the lid is opened..so..
    Chisel Case, Lid & Feet, rebate done.jpg
    Ends were a bit deeper than the front and back edges..used the case to mark out where the rebates went..then start on the ends..
    Chisel Case, Lid & Feet, end grain started.jpg
    working on end grain, with a Stanley No. 3, Type 11...trying NOT to nick the rebate's walls..then do the "top" edges..
    Chisel Case, Lid & Feet, end grain done.jpg
    And smoothed out with 220 grit...then, with both ends done, repeat for the long grain edges..
    Chisel Case, Lid & Feet,sanded thumbnail.jpg
    Was trying to keep a "crisp" corner...
    Chisel Case, Lid & Feet, profile of edges.jpg
    All sanded to 220 grit..am now about ready to make some feet for the case to sit on...

    Stay tuned..
    A Planer? I'm the Planer, and this is what I use

  8. #23
    Join Date
    Feb 2020
    Location
    Camarillo, CA
    Posts
    423
    I’m just catching up on this thread. The chisel box looks like it is coming along nicely, but I have a more important question: Do you often have a gin and tonic in the mornings?

    If so, I have something to look forward to when I retire!

  9. #24
    Join Date
    Jun 2010
    Location
    twomiles from the "peak of Ohio
    Posts
    12,190
    Sorry..Dry Shop...I save the booze for when I am done for the day....sometimes a Guinness,,sometimes the Tonic & Gin.....now and then maybe a shot of good Irish Whiskey?
    A Planer? I'm the Planer, and this is what I use

  10. #25
    Join Date
    Jun 2010
    Location
    twomiles from the "peak of Ohio
    Posts
    12,190
    Was working on feet for the case to sit on...Miter saw cuts..
    Chisel Case, Lid & Feet, GEM Mitre box.jpg
    Were having an issue...when a part is 1/4" x 1/4" square...and the back corner that meets the fence on a folding Mitrebox...
    Chisel Case, feet, mitersaw issues.jpg
    Has a round-over..small parts can ( and did) roll backwards a bit, into the gap...not an issue with 90 degree cuts...but with a 45 degree sort of cut, it becomes angled...decided to put the GEM away, and continue with the bandsaw..
    Chisel Case, feet, ready for glue up.jpg
    Will sort through this mess, tomorrow...to find the best 4 to glue up as feet for under the case...always nice to have a few spares handy...

    Hinges:
    Chisel Case, lid work, the hinges.jpg
    Had a "flaw" at least for me...so...this was used to correct that flaw..
    Chisel Case, Metal work, Monarch Vise.jpg
    And the flaw?
    Chisel Case, Metal work, the before.jpg
    Note the gap back by the barrel? We have ways...
    Chisel Case, Metal work, leaves flattened.jpg
    Pinch it in the Monarch Vise, once per side..hammer adjust for any bends going on...

    Need to do a bit of layout work, before these tools can do their thing..
    Chisel Case, lid work, tools and screws.jpg
    Stay tuned...
    A Planer? I'm the Planer, and this is what I use

  11. #26
    Join Date
    Jun 2010
    Location
    twomiles from the "peak of Ohio
    Posts
    12,190
    Layout work...the barrel of the hinge, sits in the rebate under the lid..
    Attachment 518680
    I set the hinge at the corner of the rebate, make a mark on the other end of the hinge,,,the lay out the hinge locations..

    I needed a way to keep the lid ( and the case) from hopping around on the bench, while I worked to install the hinges...so...
    Attachment 518681
    For the lid. a 6" clamp will do ( case needed 12" clamps) one on each end...
    Attachment 518682
    Only had to remove the thickness of the hinge's leaves...Wide chisel along the back..1/2" chisel to chop the waste..3 hits, move, 3 hits, move..before the last hits, turn the chisel so that the flat back faces away from the waste...then pare away the waste...wide chisel to flatten things a bit. Eggbeater drill, with a 1/16" bit, for the pilot holes. Phillips screwdriver to drive the tiny screws that came with the hinges (and clock them..)
    Repeat for the other end..
    Attachment 518683
    Then use these hinges, to lay out the locations on the case..
    Attachment 518684
    And chop and drill...Then the "FUN" part...Holding the lid in place, while trying to install a screw, with a screwdriver...with just 2 hands..and one of them shakes a lot..once THAT one screw is in...the rest follow easy enough..
    Attachment 518685
    Then try to close the lid....found a high spot on the back left corner of the case...lowered that down a bit..
    Attachment 518686
    I don't have a way to "latch it" closed..yet...so..
    Attachment 518687
    I think that will do the trick, for now..

    As to how many chisels?
    Stay tuned..
    A Planer? I'm the Planer, and this is what I use

  12. #27
    Join Date
    Jun 2010
    Location
    twomiles from the "peak of Ohio
    Posts
    12,190
    This is getting very OLD! To correct this? Either the Mods FIX the site...or...I have to go back and re-load EACH of those photos...seems to happen about once a month..there is NOTHING changed on MY end of things....same picture size, same loading actions...they even show up when I go to edit the post...as soon as I hit "save" these stupid blue "Attachment 123456" blurbs take the place of the photo...and...when I click on those..it tells me this is invalid? WTF!

    IF you people want to see thiose photos in the last post..talk to a Mod....

    I will try to post ONE more time, to see IF the Photo BS has been fixed....
    A Planer? I'm the Planer, and this is what I use

  13. #28
    Join Date
    Jun 2010
    Location
    twomiles from the "peak of Ohio
    Posts
    12,190
    Shoptime today? feet installed....fancy feet, at that..
    Chisel Case, feet, end view.jpg
    With glue and very small nails..
    Chisel Case, feet, nails & tools.jpg
    Letting this sit overnight...

    Stay tuned..
    A Planer? I'm the Planer, and this is what I use

  14. #29
    Join Date
    Jun 2010
    Location
    twomiles from the "peak of Ohio
    Posts
    12,190
    Laundry Detail. this morning...so..despite it being a Monday....the feet have been leveled...need to unload the washer after a bit...and the Chisel Case...and see about a finish of some sort..

    Dungeon Wood Shop Spring Cleaning is also underway...amazing what one finds underneath the piles of junk....

    Stay tuned..
    A Planer? I'm the Planer, and this is what I use

  15. #30
    Join Date
    Jun 2010
    Location
    twomiles from the "peak of Ohio
    Posts
    12,190
    A coat of Witch's Brew was mixed first....old stuff was a bit too red...dumped what was left of the Special Walnut into the can..and gave it a good stir..
    Coat has been brushed on..and I am allowing it to dry...before the next step....

    have to go and unload the Clothes Dryer after bit...will see how things are doing...maybe a rub-down with 0000 steel wool? We'll see...

    Photos? When this site gets it's act together, I MIGHT post a few....
    A Planer? I'm the Planer, and this is what I use

Posting Permissions

  • You may not post new threads
  • You may not post replies
  • You may not post attachments
  • You may not edit your posts
  •