Page 1 of 2 12 LastLast
Results 1 to 15 of 24

Thread: Made new fireplace mantel for plasma

  1. #1
    Join Date
    Dec 2005
    Location
    Southeastern NH
    Posts
    11

    Made new fireplace mantel for plasma

    So the Mrs. And I found a great deal on a plasma after the Turkey Day holiday and picked it up. Of course that led to us wanting a new sound system, mantle, furniture.. etc… You know how it goes. I thought I'd share with you all. Here’s my build of the mantle:


    Picture #1 = This is what our bland wall/fireplace looked like in the beginning. The basic builders mantle with slate surround. We never really used that part of the room.


    Pic #2 = I ripped down the Mantle. Slate is still up.


    Pic #3 = This is my second attempt at the legs for the mantle (The Mrs. didn’t like the feet on my first one). It’s basically a 10” column cut in ½, then put on a custom sled and run through the planer to true up the back, mounted to an MDF board. The top and bottom are generic column footings and caps cut in half (from HD). You’ll see in a later picture that I decided not to use the generic cap and made my own (which would make the final leg design my third!!!). Here it is before I changed the top:


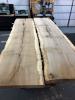
    Pic #4 = This is the final piece I used for the front of the face of the mantle. The next few pics will show how I cut it out:


    Pic #5 = The jig for the arch. I drew an ellipse (from some hard to understand formula I found on the web, but eventually mastered , then mounted it on a piece of MDF which was mounted to a piece of plywood.


    Pic #6 = I slid a large piece of MFD up to the middle piece of MDF (and under the ellipse)


    Pic #7 = Got out my trusty router with a straight 1/2 inch cutting bit and followed the contour of the ellipse. This cut the perfect ellipse into the large MFD board. This picture shows it after I made the cut. NOTE: the new ellipse cutout produced here will be used later to make the molding which will fit below the arch.


    Pic #8 = In this fuzzy pic, you can see that I created 2 of the arch panels and created a box to form the main arch of the mantel. It’s dry-fitted to the top of the mantle (upside-down). I actually bought the top piece of the mantle it is fitted in @ Lowes because it was cheaper than buying the wood and making it myself… If you like it, it called the “Heritage Oak 6’ “ and is at Lowes.


  2. #2
    Join Date
    Dec 2005
    Location
    Southeastern NH
    Posts
    11

    Part II

    Pic #9 = In this pic, I removed the slate and taped where the TV would be going. I also ran the power from the back of where the TV will be to the fuse panel. I didn’t get an inline surge suppressor b/c I didn’t think of it until earlier this week. I be getting one very soon.


    Pic #10 = In this pic I had run most of the wires, mounted and wired my new front speakers (Polk RM30’s for L and R and a Polk RM302 for the center). I also moved the switches on the right of the mantle. Originally, there was one switch on each side of a stud, but that got in the way of the larger mantle. So I put in a new box and re-routed the wires to a double-gang box. I was also dry-fitting the new legs here. I know it looks ugly, but I have vision. Oh, I also put up the first few pieces of marble. I have a tile cutter, but am terrible at cutting curves, so I put them in behind before the mantle was mounted. Later, the marble will “appear” as if I actually cut the curves into it.


    Pic #11 = This is the jig I made out of the pieces I routed out while creating the arch. I ended up bending 6 pieces of ¼ inch wood around this to create the molding which will sit below the arch. Lots of glue, clamps, and Sam Adams involved in this process!! All I have for a pic is the jig, I forgot to take on when the wood was actually clamped.


    Pic #12 = This is a pic of the arch-piece with the curved and straight molding attached (upside down). It’s kind of fuzzy, but you get the picture.


    Pic #13 = This is a pic of the mantle mounted on the wall. As a side-note, I also routed part of the back of the arch part to allow it to go around the already mounted marble and still allow it to mount flat against the wall.


    Pic #14 = Here I added in a ¼ piece of hardboard for the center of the back (don’t worry, it’s secure to the wall and the plasma mount will ultimately mount through this directly to the studs). I also added a ¾ inch frame around it made of MDF.


    Pic #15 = Here I added 2 more strips of ¾ inch MDF on the outer edges of the top of the mantle (for a total of 2.25 inches out from the wall on the outside, ¾ in the middle frame and ¼ directly behind the TV). I like the 3 different levels. I also added in some molding around the perimeter of the hardboard where it meets the ¾ inch MDF. In the end, this really helped to frame the TV. After a lot of swearing and running back and forth from the family room to the workshop, I also cut and mounted all the crown molding.


  3. #3
    Join Date
    Dec 2005
    Location
    Southeastern NH
    Posts
    11

    Part III

    Pic #16 = Painted it all white and put on the OMNI mount. It’s the 200lb flat mount one. You may also see that I added thin strips of poplar to all the vertical edges for a shadow effect. They were routed to be rounded over on the outside and stick out about ¼ inch past the flat parts.


    Pic #17 = Side-angle pic of the same thing. This shows the different 3-d effects of the wood.


    Pic #18 = Here it is with the marble on the sides of the mantle done, the paint on the walls (Behr – Velvety Merlot), and the plasma mounted.


    Pic #19 = And here it is finished. I still need to add in the switchplate and get a unit for the components to the right.. But the marble is done.


    This is my first mantel (and my first curved molding). I enjoyed making it and think it adds to the room. Oh, and my profession has nothing to do with woodworking, so please be kind Thanks for looking.

  4. #4
    Join Date
    Mar 2006
    Location
    SoCal
    Posts
    22,514
    Blog Entries
    1
    That rocks. Wait, I'm seeing green! Beautiful!
    "A hen is only an egg's way of making another egg".


    – Samuel Butler

  5. #5
    Join Date
    Nov 2006
    Location
    Fallbrook, California
    Posts
    3,562

    Cool

    Have you considered changing professions? That mantle is fantastic. I can't believe this is only your first one. Thanks for sharing.
    Don Bullock
    Woebgon Bassets
    AKC Championss

    The man who makes no mistakes does not usually make anything.
    -- Edward John Phelps

  6. #6
    Join Date
    Jun 2005
    Location
    Meridian Id
    Posts
    528
    Al, very well documented! the construction turned out great and really makes the room pop, you done good!!!!!

  7. #7
    Nice work Al. You have inspired me. It's time that I got busy.....

    Cheers,
    ave F.

  8. #8
    Join Date
    Mar 2005
    Location
    New Lenox, Illinois
    Posts
    709
    Al, That is OUTSTANDING work!!! This is a great testement to "it's all in the details". Ya' done good...
    If you can't fix it with a hammer, you have an electrical problem.

  9. #9
    Al, wow that really looks great. Everything about it looks perfect.
    Thanks for taking the time to document,


    Howie

  10. #10
    Join Date
    Jun 2005
    Location
    Kissimmee, Florida
    Posts
    205
    Really looks sharp there, Al. Set back have a cold one, pat yourself on the back, and take a couple days off to watch TV.
    Roger

  11. #11
    Join Date
    Mar 2003
    Location
    SE PA - Central Bucks County
    Posts
    65,924
    Really nice work, Al!!!

    Question...did you tilt the screen down just a bit for the viewing angle? I can't really tell from the pictures.
    --

    The most expensive tool is the one you buy "cheaply" and often...

  12. #12
    Al,

    Wow!!! I love it!!! The mantle turned out great!!!

    t
    [SIGPIC][/SIGPIC]

  13. #13
    Join Date
    Feb 2003
    Location
    In the foothills of the NM Sandia Mountains
    Posts
    16,650
    Outstanding job! Great attention to detail, it looks very high-end professional. Kick back and have a few Sam Adams!
    Please help support the Creek.


    "It's paradoxical that the idea of living a long life appeals to everyone, but the idea of getting old doesn't appeal to anyone."
    Andy Rooney


  14. #14
    Join Date
    Feb 2003
    Location
    Just outside of Spring Green, Wisconsin
    Posts
    9,442
    That is truly magnificent, Al! Really a great transformation, which would look equally splendid even w/o the plasma & speakers! The only thing that I have a slight issue with is, it almost sounded like you were going to buy something to house your components!!! Tell me it isn't so!
    Cheers,
    John K. Miliunas

    Cannot find REALITY.SYS. Universe halted.
    60 grit is a turning tool, ain't it?
    SMC is totally supported by volunteers and your generosity! Please help if you can!
    Looking for something for nothing? Check here!

  15. #15
    Join Date
    Sep 2006
    Location
    Darien, Ga
    Posts
    166
    Al,

    The mantle is awesome, thanks for taking pictures of the process. The LOML bought a plasma after T-day also, so when I finish my shop one of the first things I have to build is a wall system to hold the plasma and all my av equipment.

Similar Threads

  1. Design of Fireplace Built-ins
    By Scott Coffelt in forum Design Forum
    Replies: 5
    Last Post: 01-27-2005, 8:11 PM
  2. Shop Made Joiner and Boatwright Tools Part One
    By Bob Smalser in forum Neanderthal Haven
    Replies: 3
    Last Post: 12-10-2003, 11:19 PM
  3. Shop Made Joiner and Boatwright Tools Part One
    By Bob Smalser in forum General Woodworking and Power Tools
    Replies: 2
    Last Post: 12-09-2003, 10:02 AM
  4. Shop Made Joiner and Boatwright Tools Part Two
    By Bob Smalser in forum Neanderthal Haven
    Replies: 0
    Last Post: 12-09-2003, 2:26 AM
  5. Shop Made Joiner and Boatwright Tools Part Two
    By Bob Smalser in forum General Woodworking and Power Tools
    Replies: 0
    Last Post: 12-09-2003, 1:13 AM

Posting Permissions

  • You may not post new threads
  • You may not post replies
  • You may not post attachments
  • You may not edit your posts
  •