Results 1 to 14 of 14

Thread: Jointer Upgrade, Helical Head

  1. #1

    Jointer Upgrade, Helical Head

    I spent some time tonight upgrading the cutter head on my General 480 jointer.


    After taking a class a year ago at Marc Adams one of the lasting impressions for me was that the jointers there all had helical heads. They cut like a dream and I went looking for the feasibility of buying one for my own jointer.

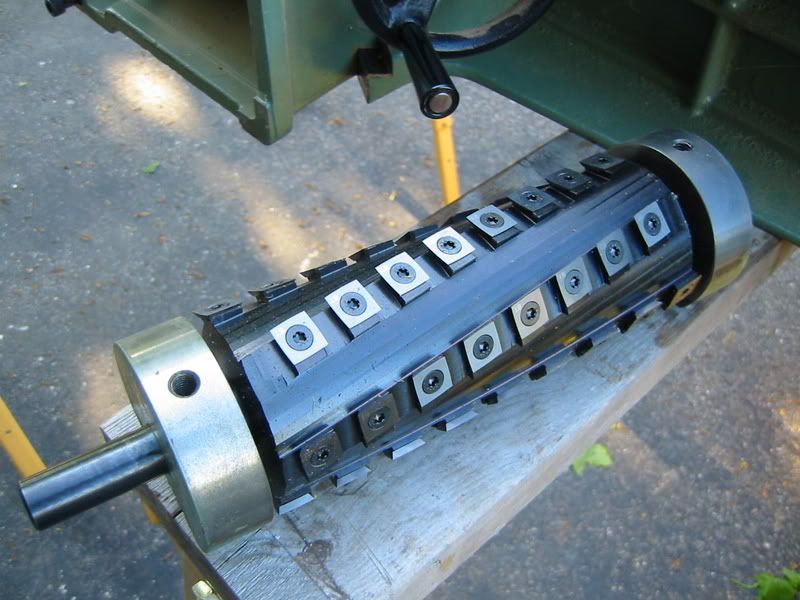
    I bought a special one made just for my jointer, from Byrd, it’s what they call a Shelix head, the carbide cutters at an angle as well as being set in a helical row.

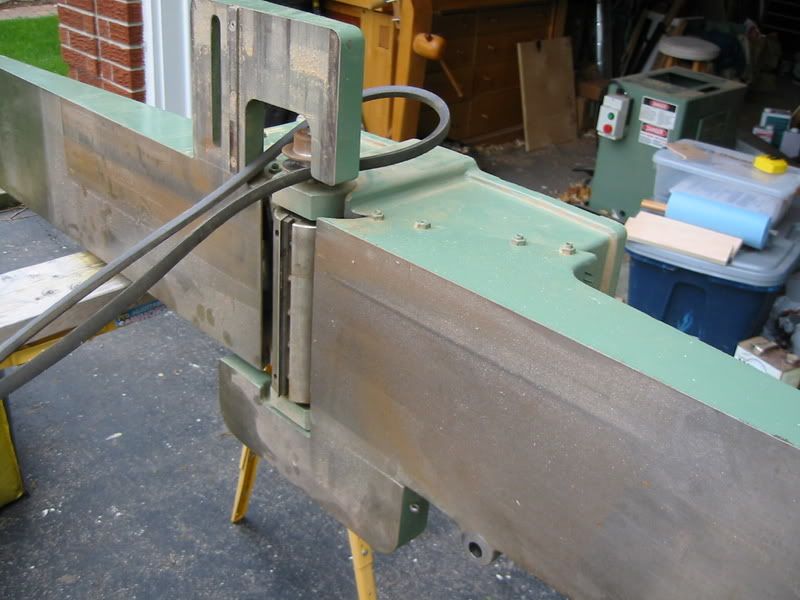
    I removed the jointer fence, then the jointer from the base


    Set it up on a saw horse to work, a neighbour helped me lift he beast.


    I took the old cutter head out,


    removed the head


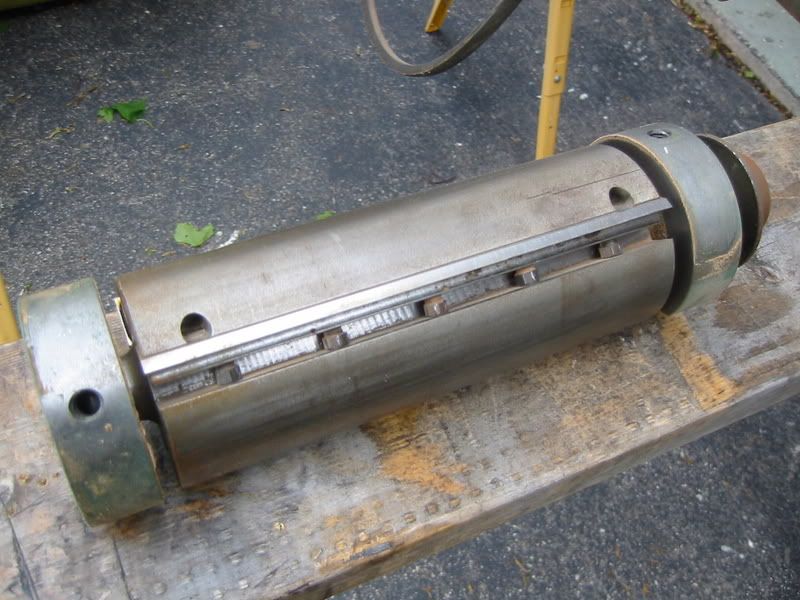
    Getting the bearings off the old head was a chore, a piece of wood used as a drift and a steady blow with a hammer made things go along


    I replaced the bearings with new ones and pressed them on the new cutter head.


    Here it is ready for final assembly


    I will set it up and run it this weekend, I am looking forward to the improved performance.

    Total time today was about 3 hours.
    Take care,
    Jim

  2. #2
    Thanks for the nice post Jim.

    Looks like you could do some rust prevention while you have the thing apart.

  3. #3
    Quote Originally Posted by Eddie Darby View Post
    Thanks for the nice post Jim.

    Looks like you could do some rust prevention while you have the thing apart.
    Yes Eddie,

    I just opened the shop after the winter, a few tops even though protected have some rust on them
    Take care,
    Jim

  4. #4
    Join Date
    Feb 2003
    Location
    Griswold Connecticut
    Posts
    6,935
    Quote Originally Posted by Jim Shaver, Oakville Ont View Post
    Yes Eddie,

    I just opened the shop after the winter, a few tops even though protected have some rust on them
    Nice post Jim, and I empathize completely. I always have some rust bloom starting after winter. The humidity changes and cold go right through all of the prep, and covers. Cleaning the planer is the hardest.

  5. #5
    Join Date
    Mar 2003
    Location
    SE PA - Central Bucks County
    Posts
    65,923
    That looks like a very nice upgrade to your jointer, Jim. 'Looking forward to your comments after the weekend about how you like it!
    --

    The most expensive tool is the one you buy "cheaply" and often...

  6. #6
    Join Date
    Dec 2004
    Location
    St. Louis
    Posts
    3,349
    Eagerly watching, since I'm going to do the same thing when my Byrd lands.
    Where did I put that tape measure...

  7. #7
    Jim,
    Why did you put the jointer on it's side? I don't get it.

  8. #8
    Quote Originally Posted by Richard Butler View Post
    Jim,
    Why did you put the jointer on it's side? I don't get it.
    I put it on its side so I could access the bolts that hold down the bearing housings, they are secured from the base.
    Take care,
    Jim

  9. #9
    Join Date
    Dec 2004
    Location
    Boston, MA
    Posts
    919
    Jim,

    I really enjoyed those pictures. Thanks. Let us know what you think of the differences in jointing performance.

    ~mark

  10. #10
    Join Date
    Mar 2005
    Location
    Houston, TX
    Posts
    857
    Thanks for the post. Did you need special tools to press in the new bearings?

  11. #11
    Lose that V belt and get a flat belt and you will gain almost 8% more power.

    V belts chew up 10% on average. Straight gears are pretty good but the best power transmission - bar none - is a steel flat belt. They are some what scary when they aren't set up right.

  12. #12
    A nice rust prevention trick for areas with high risk that have long down times, is to put T-9 from Boeshield on in a thick layer, and then just leave it there until the spring time, then you wipe it off, and you're ready to go. I also put plastic wrap over the T-9 surfaces. Small items I put in zip-lock bags with T-9.

    http://www.leevalley.com/wood/page.a...=1,43415,43440

  13. #13
    As always...nice. Thank you Jim.
    Glenn Clabo
    Michigan

  14. #14

    Nice Jim,

    Ya gotta love the green stuff!

    I was hoping you would post some pictures of this upgrade when it happened.

    Great to see you got it done. It looks great. I looking forward to hearing what you think of the change.

    That would really be nice on the planer!

    Greg

Similar Threads

  1. WW Guild Purchase Advice on 12" Jointer
    By john lawson in forum General Woodworking and Power Tools
    Replies: 7
    Last Post: 12-09-2006, 7:14 PM
  2. Final jointer upgrade
    By John Miliunas in forum General Woodworking and Power Tools
    Replies: 21
    Last Post: 11-09-2005, 2:47 PM
  3. Replacement helical cutterhead for jointer?
    By Christopher Pine in forum General Woodworking and Power Tools
    Replies: 2
    Last Post: 02-20-2005, 12:15 AM
  4. Custom Byrd Shelix for Jointer
    By Alan Turner in forum General Woodworking and Power Tools
    Replies: 3
    Last Post: 10-21-2004, 5:03 PM
  5. Truss vs. Pan Head Screws
    By Chris Padilla in forum General Woodworking and Power Tools
    Replies: 7
    Last Post: 05-15-2004, 2:10 PM

Posting Permissions

  • You may not post new threads
  • You may not post replies
  • You may not post attachments
  • You may not edit your posts
  •