Rick, one question I have is, on the backside where your hinges are is the top laying on the frame or are the hinges holding it up some ?


 Guest
Guest
Rick, one question I have is, on the backside where your hinges are is the top laying on the frame or are the hinges holding it up some ?
[OP]
Member
Hi Chuck-
When I assembled the table I clamped the top to the frame and then installed the hinges (which are springloaded fire-door hinges to make it easy to lift the top).
I'm not in the vicinity of the table right now, so I don't know if something has shifted, but the top SHOULD be resting on the frame.
Guest
Chuck is onto the answer here. For the top to sag, it needs to "pucker" up at the corners. If you can conceive of some way to hold it down at this corners, it will be harder for the center to sag. Just make sure the four corners are held firmly against the cabinet and the center should take care of itself.Originally Posted by Rick Hubbard

Guest
One other thing that I just noticed when looking at one of the pictures Rick, is the face of your fence looks like it is pushing down on your router plate on the left side and possibly causeing it to dip. You may want to take the fence off and check the bottom for flatness and make sure that isn't bowed causeing your table to dip. I'm really starting to think the answer is the fence. If the fence is flat and true on the bottom it should keep the top from saging. Much like a beam support, except it's ontop.
Last edited by Chuck Lenz; 09-11-2007 at 9:37 AM.
Member
Rick: can you expand on why you consider the T-track and mitre track to be "miserable"? Does it relate to weakening the top and thus contributing to the sag? Won't you lose some functionality without at least the mitre track?
Thanks.
Ken
Contributor
I like your hinged top but to remove the sag you will probably need to shim it and clamp it down good when in use.
I built a RT into my TS using the infamous Delta warped extension tables. I actually had two replacements sent out and even the best one was bowed down in the middle even w/o a router.
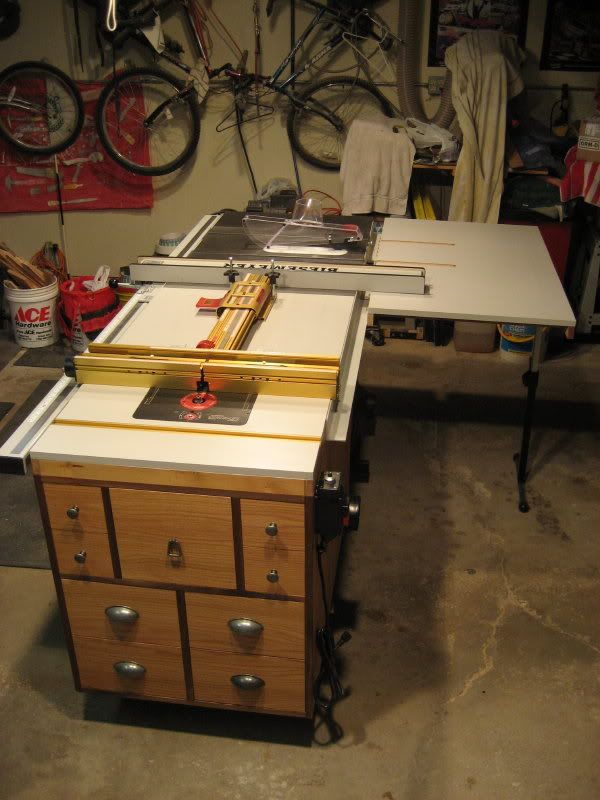
Here's the final result:
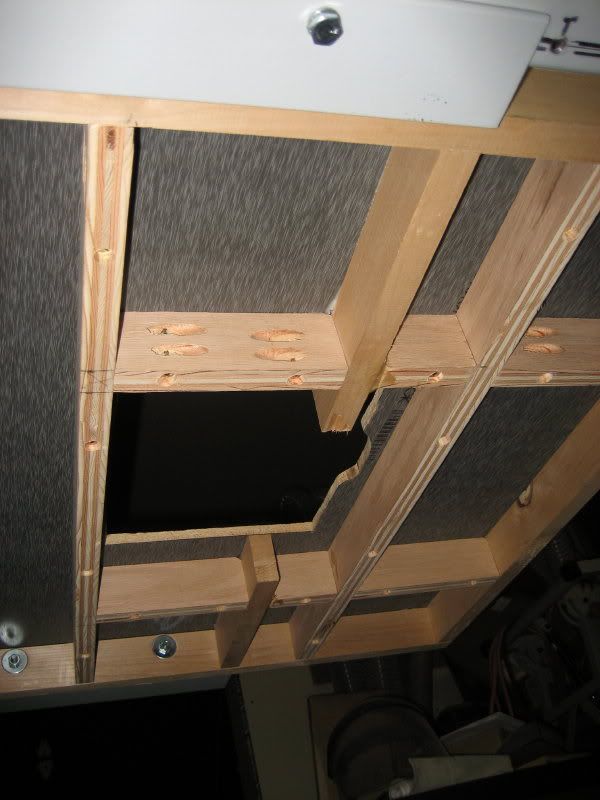
This is the bottom - I added a few support bars:
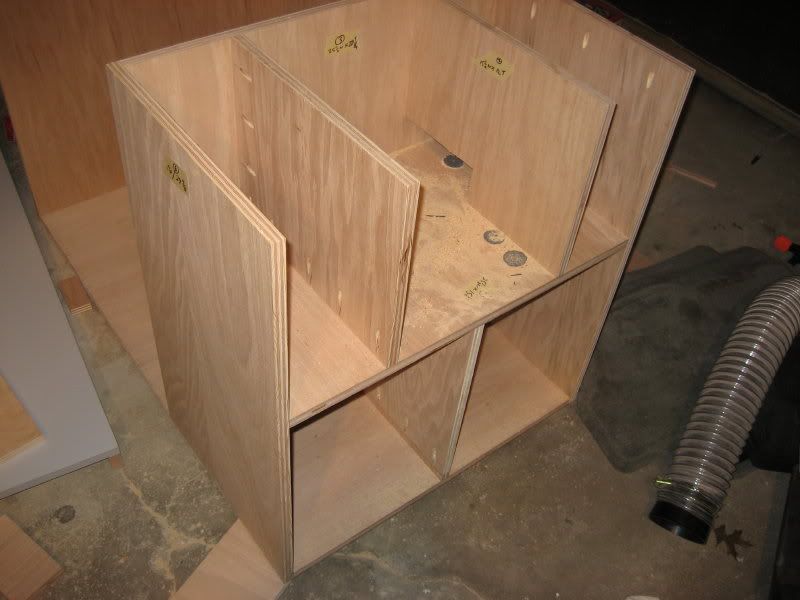
Cabinet w/o top:
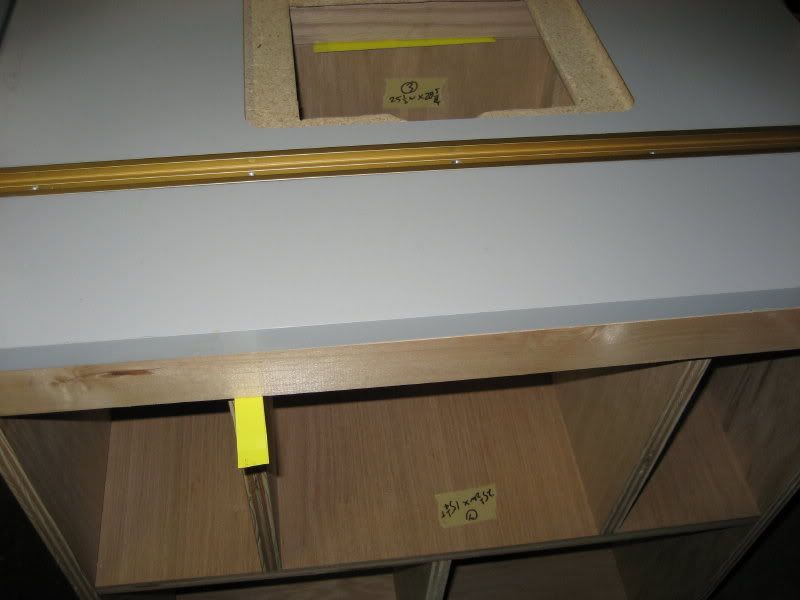
I had to add shims to level the top:
In my case, you can see from one of the photos above I used pocket screws to hold the top to the cabinet. These screws provided enough load to straighten out the table. It's been almost a year since I built it and it's still very flat.
Hope this helps???
Mike
[OP]
Member
Hmmm. Am I expressing some dissatisfaction? Yes, I guess so. For one thing, the T Tracks are just a hair short of being perfectly flush with the top (write that off to my own ineptitude, I guess). Anyway, they often "catch" just a tiny bit and that seems to telegraph to the piece I am routing, so there is frequently a slight dimple in the machined surface. This is usually when the piece catches the T Track on the out feed side.
As far as the miter slot, I can't think of even once when I have needed it (usually a coping sled, or something similar, gives better stock control). Mostly it is just a place to store spare sawdust, in my judgement.
I have seen setups where the router table is locked down to the lip of the table and that seems much preferable to me.
And, yes, as you suggest I DO suspect the T Track slots have compromised the integrity of the top. For one thing, when the fence is secured to the track, it places pressure on the MDF substrate and creates some distortion. For another thing, the MDF into which the track is imbedded is essentially unsealed which makes it pervious to moisture (the same for the miter track, I think).
Maybe what I'm looking for here is just an excuse to build a new top! Ya think?
 Contributor
From the pictures, it looks like the top sits down on another flat surface? If so, this won't work. If there is some space, or if some relief slots could be cut, the some angle iron screwed under the top should pull it back flat. I suppose you could take the top off run some 1" deep slots across the bottom and sink the the angle iron into that channel. Could probably daddo a shallow area for the angle iron to recess into the top so it wouldn't change the height of the top at all. It would weaken the top some where it would be thin, but the angle iron should more than compensate. Only problem with this idea is the t-track might be in the way. Angle iron could be notched at that point though to allow it to work. If you are going to junk the top anyway, this might be a quick-n-dirty temporary fix. Jim.
Coolmeadow Setters...Exclusively Irish! When Irish Eyes are smiling....They're usually up to something!!
Home of Irish Setter Rescue of North Texas.
No, I'm not an electrician. Any information I share is purely what I would do myself. If in doubt, hire an electrician!
Member of the G0691 fan club!
At a minimum, I'm Pentatoxic...Most likely I'm a Pentaholic. There seems to be no known cure. Pentatonix, winners of The Sing Off, s3.
[OP]
Member
I think I see the same thing you are looking at. The part of the fence that looks like it is pushing down on the insert is actuually just lyin loose on it. The fence itself seems to be perfectly flat. In the picture you can see that it is resting on the insert and on the left side (out feed side, not visible in the photo) it is resting on the edge of the table. The gap you see between the main fence and the table top is the amount of sag there is in the table.
Guest
Is there sawdust under the fence ? I would think that your fence should be able to pull that sag out. The router plate looks a little high on the left side. I just noticed that the track on the left side of your table is far away from the insert, if it were closer like the right side is it would have a better chance of pulling the sag up, if it is a sag and not just being pushed down. I hope I'm not bothering you with all this.
Last edited by Chuck Lenz; 09-11-2007 at 10:47 AM.
Member
I would use aluminium open channel, the extrusions are readily available, it is light and easily worked and you could do it yourself. The top sheet could be anodised and it would look trick (the trendy word for the week). With aluminium you can use as much framing as you want due to its ease of use and lack of weight. I would just make the internal frame stringers parallel with an external perimeter frame. I have not given the router attachment much thought, how about this. Leave the frame surrounding the router opening exposed and make your attachment plate out of whatever. Cut the exposed frames down to the attachment plate thickness and it will drop in flush. This will need to be refined as you go, but the general idea is there. The result will be a good looking, light and flat table that will never move, you could jump on it and the thing wouldn't bend. I tend to think of the unusual as you can see. You could trim it in timber around the edges, glue laminate to it and no one would know what was underneath if you wanted. Your TS top isn't timber for a good reason and router tops shouldn't be for the same reason.
Chris
Everything I like is either illegal, immoral or fattening
Guest
Hi Rick, I had the same problem from the get-go when I built my table. Same size and material you used. On inspection, it was obvious the drawer dividers on my cabinet were not flush with bottom of top. The combination of the big PC-7518 and router lift caused it to sag! My solution was to shim the drawer divider walls, and add additional bracing around the router.
If you look close you can see there are two cross braces - in front of, and behind the router. A picture is worth a 1000 words! Here's a link to my album for more pictures.
http://www.ncwoodworker.net/pp/showgallery.php?cat=852
-Don
[OP]
Member
Hi Don-
Other than the top's dimensions and material, there is no comparison between your work of art and my utilitarian clunker. Do you actually USE this? I'd be worried about getting it dusty, or something. VERY IMPRESSIVE.
Anyway, thanks for chiming in. Several other folks seem also to think part of the problem may be the contact point(s) between the top and the frame.
Nevertheless, I think I'm going to abandon this particular top and start over. I can fix it up enough to "get by" while I'm dreaming up something else.
I'm going to stop at the local machine/welding shop today and get some advice from them on an integrated metal frame for the top.
Member
Rick,
Can't tell you why your tabletop is no longer flat.
I'd suggest building a support frame. You're a woodworker, so make it out of wood. Use well-seasoned, straight pieces about 3/4" x 2 1/2", and assemble the frame with rabbets and dadoes. Do the glue-up on a surface you know is flat--like your table saw top--and be sure that clamping doesn't twist the frame.
If you want to try rehabbing the top you've got, remove it from the table, turn it upside down and set it on a flat surface on blocks--one at each corner. Pile weight on the center and let it sit. Check with a straightedge periodically. When the top is flat once again, attach the support frame.
On the other hand, it may be just as expeditious to make a new top. I'd say you should nix the slots and grooves and even the mounting plate. See the photo.
The photos show my current alpha table, built a couple of years ago. The top is two 1/2" pieces of MDF, glued and screwed face to face. I cut a hole for the router base through one piece before glue-up. The router is attached directly to the top; motor drops out easily for bit changes. (I'm finishing up a table with the same sort of frame, but only a single piece of 3/4" MDF.)
To mount the frame to the top, I used machine screws. Drilled holes through the edges of the frame, used a transfer punch to transfer locations to the top, drilled 13/64" holes through the top, then tapped them for 1/4"-20 screws. I did this after applying the laminate to the underside of the top, but before applying it to the top surface. Did that after drilling and tapping the holes.
The frame is birch, as is the edge banding. Formica on the top surface, backer (a.k.a. balance sheet) on the underside.
More info on this table and other router table construction issues in Woodworking with the Router.
Hope you get your problem solved. Maybe this will be of some use to you.
Bill
 Member
As usual, I am inclined to say something like "What did you expect with MDF?". But I won't. Instead I'll suggest you use two layers of 3/4" MDF or "Melamine". But don't just stick them together. Rout or cut 1/4" wide 1/2" deep dados in the pieces and imbed 1/4" X 1" steel "stringers" when you bond the pieces together. I have used this method on long melamine shelves ("back in the days" when I would actually consent to work with this stuff). I was able to make 6 - 8' long shelf spans that you could sit on without noticeable sag. Heavy? Well.....yeah.....
David DeCristoforo
 Posting Permissions

 Reply With Quote