Results 1 to 12 of 12

Thread: LEIGH D4R - Any tips on project?

  1. #1
    Join Date
    Jan 2007
    Location
    Wellsboro, PA
    Posts
    375

    LEIGH D4R - Any tips on project?

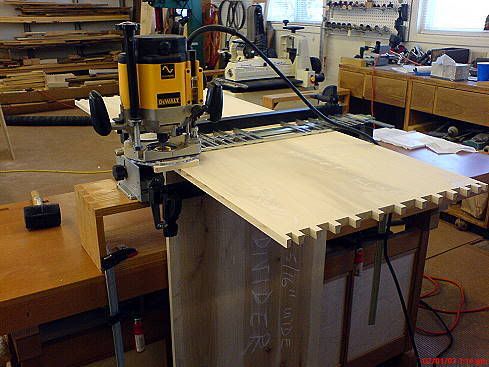
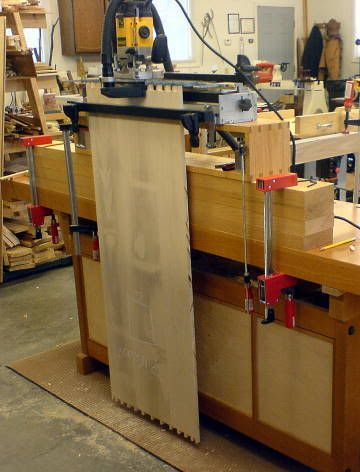
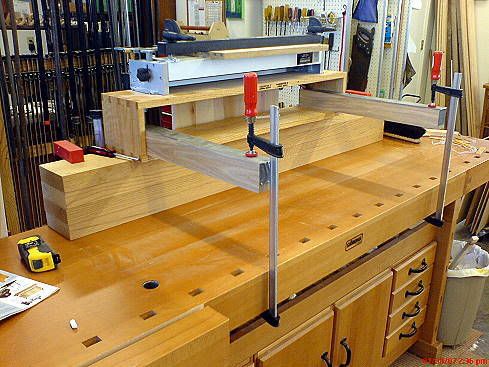
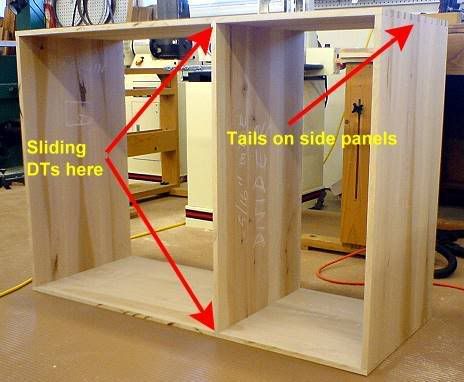
    Here's the deal... I've just purchased a Leigh D4R and have used it to build a couple of test boxes. They both came out good btw. I made one out of butternut and used a backer board to prevent chipping which worked very well. I'm now going to build a blanket chest for my wife for christmas.

    It will be made out of butternut that I had cut down and sawn. It's been stored in a barn for the past 12 years. The main box (dove tailed section) will be 19.5 inches high. The panels have been glued up and cut to size so I'm ready to start dove tail cutting.

    Any last minute tips?

    Bryan

  2. #2
    If you have 1/4 shank bits upgrade to the 8mm - they work much better. Of course you don't see the 1/4 Leigh bits around much anymore - and there is a reason for it.

    The other tip is don’t spin your router!!! Unless your bit is centered perfectly in you router and the collar of is also dead center, any rotation of your router will affect the fit of you DT's. It good to get in the practice of always of keeping your router in the same orientation for both the pins and tails when using it with the D4.

  3. #3
    Join Date
    Feb 2006
    Location
    Country Club, MO, USA
    Posts
    897
    Quote Originally Posted by Bryan Berguson View Post
    ...I'm now going to build a blanket chest for my wife for christmas.

    ... The main box (dove tailed section) will be 19.5 inches high. The panels have been glued up and cut to size so I'm ready to start dove tail cutting.

    Any last minute tips?...
    Bryan,

    What is the size of the boards in which you will be cutting the dovetails? You mentioned 19.5" tall/wide - how long will they be?

    The reason I wonder: If the boards are very long, you might have to raise the D4:


    I made the following changing table:


    The main carcass is all through dovetails, and the partition is a 21-inch sliding dovetail.


    .
    Al
    http://www.sawmillcreek.org/images/buttons/fotc.gif
    Sandal Woods - Fine Woodworking

  4. #4
    Join Date
    Jan 2007
    Location
    Wellsboro, PA
    Posts
    375
    Jeff,

    I have the 8mm bits already. I won't rotate the router - that is bad. Thanks! I've been using a 1.5 horse Dewalt for practice and it cuts okay but feels a little underpowered. I have a new Freud 3.25 horse that I bought for the jig but I haven't tried it yet. I'm going to cut some more practice joints with it before I try the big panels.

    Al,

    18 inches front to back, 36 wide. I have the jig high enough to make it work. My biggest concern is ruining one of my panels. The wood is limited not to mention the time involved in glue and dimensioning. Beautiful projects btw. Love your videos too!

    Thanks guys!

    Bryan

  5. #5
    Quote Originally Posted by Bryan Berguson View Post
    Jeff,

    I have the 8mm bits already. I won't rotate the router - that is bad. Thanks! I've been using a 1.5 horse Dewalt for practice and it cuts okay but feels a little underpowered. I have a new Freud 3.25 horse that I bought for the jig but I haven't tried it yet. I'm going to cut some more practice joints with it before I try the big panels.

    Al,

    18 inches front to back, 36 wide. I have the jig high enough to make it work. My biggest concern is ruining one of my panels. The wood is limited not to mention the time involved in glue and dimensioning. Beautiful projects btw. Love your videos too!

    Thanks guys!

    Bryan
    Bryan - if you do mess up a dovetail, you can always make the chest .5" shorter of course I would never do anything like that.

    When I work with my Leigh I tend to leave all my parts a few inches long and use my actual parts for the test cuts, then trim them to size and do the real cuts.

  6. #6
    Join Date
    Jan 2007
    Location
    Wellsboro, PA
    Posts
    375
    Quote Originally Posted by Jeff Norri View Post
    Bryan - if you do mess up a dovetail, you can always make the chest .5" shorter of course I would never do anything like that.

    When I work with my Leigh I tend to leave all my parts a few inches long and use my actual parts for the test cuts, then trim them to size and do the real cuts.
    Jeff,

    Leaving them long is an excellant idea... Sure wish I'd heard that before I cut everything to size! Actually, they'd have to be shorter by .75" but that would throw my box out of square.

    Okay, now a couple of other questions. With a box this size, would you make the pins wider or leave them the default one router bit width?

    Also, when attaching the bottom/base, would you dado or rabbit the bottom into the case and then have an extra trim piece that protrudes out for the decorative trim or make the entire bottom that oversize and have the box sit on top of it?

    Thanks

    Bryan

  7. #7
    Join Date
    Feb 2006
    Location
    Country Club, MO, USA
    Posts
    897
    Quote Originally Posted by Bryan Berguson View Post
    ...With a box this size, would you make the pins wider or leave them the default one router bit width?...
    Bryan,

    My preference is to progressively increase the spacing, starting narrow near the edge, with larger spacing toward the center of the board - I hope you can see well enough in this shot:


    .
    Al
    http://www.sawmillcreek.org/images/buttons/fotc.gif
    Sandal Woods - Fine Woodworking

  8. #8
    Join Date
    Jan 2007
    Location
    Wellsboro, PA
    Posts
    375
    It looks like your pins are the same width but a different spacing on them. Is that correct?

    Bryan

  9. #9
    Join Date
    Aug 2007
    Location
    Sitting in front of my PC
    Posts
    649
    Blog Entries
    2
    Bryan,
    I am also new to the Leigh jigs, and have been told if you have 2 routers use one for the dovetail bit and one for the straight bit.

    Set both of them up, and do your test runs, get your desired fit and you sould be good to go, without having to switch bits and possibly mess up in the middle of the process.
    Hope that helps and please post pics when finished.
    Good luck.
    Remember, you are NOT your post count.
    American & Proud
    ~Powermatic 3520B~
    "The GOLDStandard since 1921"
    Graphtec CE5000-60, FlexiSIGN PRO 8.6v2, Refine MH871,
    Photoshop CS5 Extended, Illustrator CS5, CorelDRAW X4, Wacom Intuos3 6x11, Wacom Cintiq, Dual 24" LCD's on MoView Stand, GraphixCALC Pro 2.0.4, QuickBooks 2010, Grain Fraim.

  10. #10
    Join Date
    Jan 2007
    Location
    Wellsboro, PA
    Posts
    375
    Good news guys!!! I've cut the 19.5 inch joints without any problems and they came out perfect! Sorry, no pictures yet, I'll wait until I put it together.

    The Leigh D4R is a great jig! I can't wait to make some more projects with it but I guess I'd better get this one done first.

    Thanks for all your tips!

    I should add that the butternut behaved very nicely and didn't blow out anyplace. Unfortunately, I'm almost out of it. I'm trying to calculate if I have enough to build a matching dresser. It will be close, really close...

    Bryan
    Last edited by Bryan Berguson; 11-11-2007 at 8:50 PM.

  11. #11
    Quote Originally Posted by Jeff Norri View Post
    The other tip is don’t spin your router!!! Unless your bit is centered perfectly in you router and the collar of is also dead center, any rotation of your router will affect the fit of you DT's.
    Jeff,

    Could you elaborate a bit more on your comment; "Don't spin your router"'?

    Thank you,

  12. #12
    Join Date
    Mar 2005
    Location
    Prosper, Texas
    Posts
    1,474
    Quote Originally Posted by Bob Genovesi View Post
    Jeff,

    Could you elaborate a bit more on your comment; "Don't spin your router"'?

    Thank you,
    Well I don't own a Leigh jig, but I believe Jeff meant to orient the router the same for the whole project - that is, if the right handle of the router is at, for example, the 3 o'clock position, route the complete project with it at 3 o'clock.
    Regards,

    Glen

    Woodworking: It's a joinery.

Similar Threads

  1. Weekly Woodturning Photography Tips 1 & 2
    By Brian Brown in forum Turner's Forum
    Replies: 25
    Last Post: 01-05-2008, 11:27 AM
  2. Woodworking Project Photographic Tips
    By Brian Brown in forum General Woodworking and Power Tools
    Replies: 2
    Last Post: 05-10-2007, 9:25 PM
  3. Latest project underway-Platform Bed
    By Fred Voorhees in forum General Woodworking and Power Tools
    Replies: 19
    Last Post: 04-27-2007, 9:12 AM
  4. A finished project to report
    By Mike Heaney in forum General Woodworking and Power Tools
    Replies: 22
    Last Post: 04-17-2007, 7:52 AM
  5. Mantle “Capper” Project Complete & Installed
    By Jim Becker in forum Woodworking Projects
    Replies: 32
    Last Post: 03-24-2005, 7:24 PM

Posting Permissions

  • You may not post new threads
  • You may not post replies
  • You may not post attachments
  • You may not edit your posts
  •