Page 1 of 2 12 LastLast
Results 1 to 15 of 23

Thread: Workbech Completed!

  1. #1

    Workbech Completed!

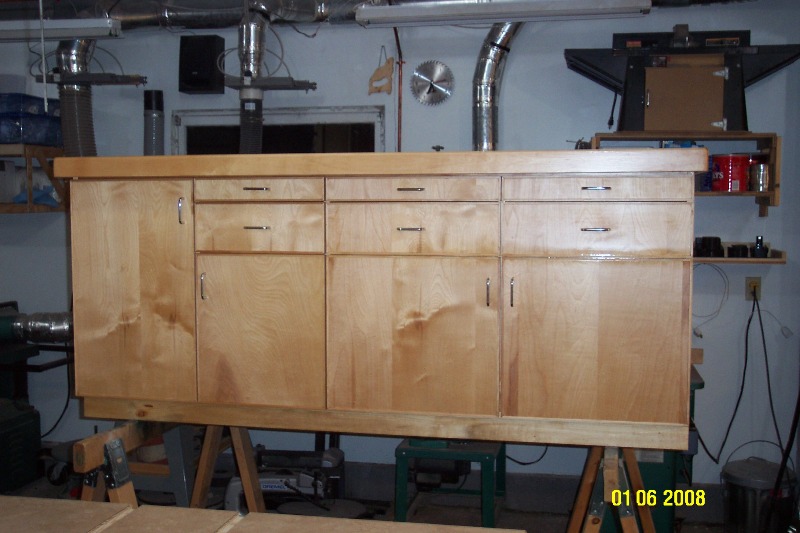
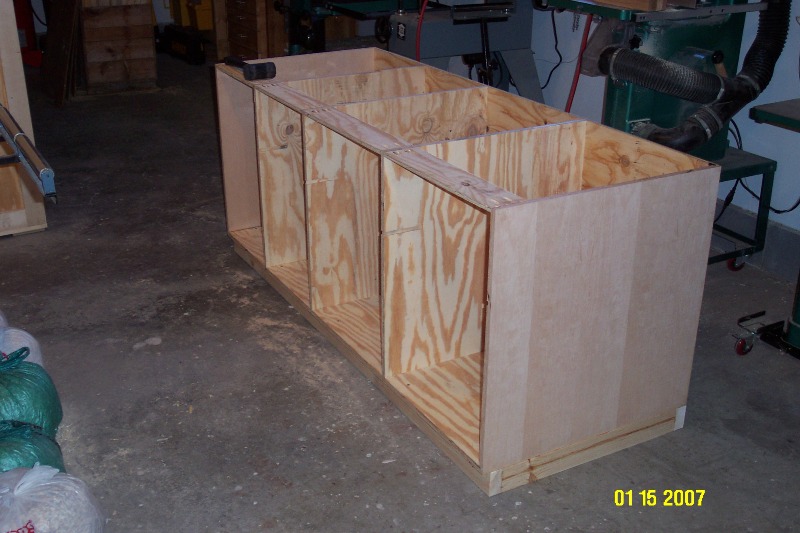
    I finally have finished a workbench for my shop that I started last January. I got it finished enough to use it for the summer, and then got it completed this winter.

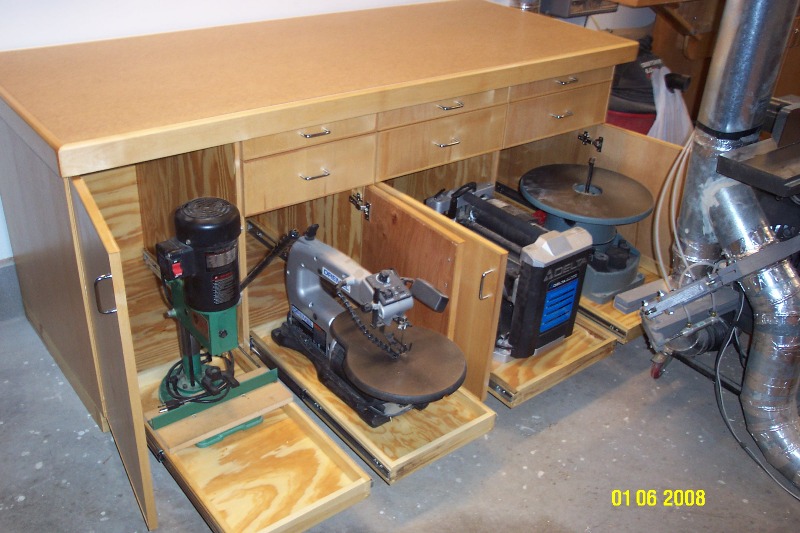
    There are six drawers and behind the four doors there are sliding shelves to store the scroll saw, mortiser, spindle sander and benchtop planer.

    The top is replaceable hardboard.

    Todd


    Todd Crow
    Northern MN

  2. #2
    Very nice, very functional looking - I need to build a new one for my workshop.

  3. #3
    Join Date
    Feb 2003
    Location
    In the foothills of the NM Sandia Mountains
    Posts
    16,651
    Very nice Todd, lotsa storage!
    You will enjoy that for many years to come.
    Please help support the Creek.


    "It's paradoxical that the idea of living a long life appeals to everyone, but the idea of getting old doesn't appeal to anyone."
    Andy Rooney


  4. #4
    Join Date
    Mar 2006
    Location
    SoCal
    Posts
    22,514
    Blog Entries
    1
    Let me just respond with Ohhhh, Ahhhhh, etc. I love the pullouts. I use them around my shop as well. Better than drawers for many things. You'll be glad for your handle style as well; no catching the bottom of your t-shirt or drill cord on those puppys. The left hand pullout has a lot of headroom. Just curious, what goes in there?
    "A hen is only an egg's way of making another egg".


    – Samuel Butler

  5. #5
    Join Date
    Oct 2006
    Location
    Bloomington, IL
    Posts
    6,009
    I am betting dedicated mortiser goes on the left. Looks great. Norm built a similar setup in a wall unit.

  6. #6

    Wow

    Nice, Nice, really nice. Great job on the workbench but it looks a little high, you must be 7' tall.

  7. #7
    Join Date
    Mar 2003
    Location
    SE PA - Central Bucks County
    Posts
    65,935
    That's REALLY nice, Todd!
    --

    The most expensive tool is the one you buy "cheaply" and often...

  8. #8
    Quote Originally Posted by Todd Bin View Post
    Nice, Nice, really nice. Great job on the workbench but it looks a little high, you must be 7' tall.
    That's nothing, check out the jointer above to the right. Todd must be at least 12' tall.

    Seriously, looks great. How is it constructed? Tongue in groove? Pocket Screws? Combination?
    Please consider becoming a contributing member of Sawmill Creek.
    The cost is minimal and the benefits are real. Donate

  9. #9

    Construction

    I wanted to get the bench off the sawhorses before posting, but couldn't resist, and I wasn't sure how I was going to get it down. It is HEAVY! and I live alone. After dinner I couldn't take it any longer so I took off the doors and drawers and barely got it on the floor in one piece.

    The bench is mainly constructed with rabbets and dadoes, frameless in design. There are a few pocket screws as well on the top horizontal dividers.

    The item on the shelf to the upper right of the workbench in the previous picture is a Craftsman Router table.

    Todd


    Todd Crow
    Northern MN

  10. #10
    Join Date
    Mar 2006
    Location
    North Hempstead, TX
    Posts
    379
    Quote Originally Posted by Todd Crow View Post
    I wanted to get the bench off the sawhorses before posting, .......

    Seems to me it would have been easier to lift and move those pieces of equipment if the table was still on the saw horses,... I think I hurt my back looking at that picture...
    That's a very nice table, I like!!
    Ted
    "And remember, this fix is only temporary, unless it works." - Red Green

    THIS THREAD IS USELESS WITHOUT PICTURES


  11. #11
    Join Date
    Oct 2007
    Location
    Independence, MO
    Posts
    324
    Blog Entries
    1

    THAT"S IT!! That is what I want to build!

    I want that exact cabinet, but on wheels!
    Thanks for the pics, Todd! Nicely done.

    Greg
    My continuing search for old tools- rusthunter dot com

  12. #12
    Join Date
    Mar 2007
    Location
    Stony Plain, Alberta
    Posts
    2,702
    Todd

    Nice work bench! Great job....
    I like all the storage.

  13. #13
    Join Date
    Apr 2007
    Location
    Phoenix, AZ
    Posts
    1,417
    Great looking bench Todd! I love the shot with all the tools nestled in their places. This may be the one I copy for my shop!
    Thread on "How do I pickup/move XXX Saw?" http://www.sawmillcreek.org/showthread.php?p=597898

    Compilation of "Which Band Saw to buy?" threads http://www.sawmillcreek.org/showthre...028#post692028

  14. #14
    Good construction, and looks nice too boot. Felt strips around the inside of the doors and drawer fronts will keep out most of the dust (can never keep it all out), but it will help.
    I know it was here a minute ago ???

  15. #15
    I'm in the thought process of making one myself, so really appreciate your sharing your ideas...good...no, great job!

    I'm assuming you screwed it to the wall...if not, how do you keep it from tipping over with all of the drawers/pull-outs extended with somewhat heavy tools on them?

Similar Threads

  1. mission style queen size headboard completed - pics
    By Rick Doyle in forum General Woodworking and Power Tools
    Replies: 10
    Last Post: 06-13-2007, 9:06 AM
  2. Completed work? Or just more tool junk. You decide...
    By Mike Wenzloff in forum Neanderthal Haven
    Replies: 21
    Last Post: 07-28-2006, 10:34 PM
  3. Pakaging/Shipping Completed Pens
    By Ken Salisbury in forum Freedom Pens
    Replies: 3
    Last Post: 07-14-2004, 7:59 AM
  4. Cradle completed
    By Fred LeBail in forum General Woodworking and Power Tools
    Replies: 10
    Last Post: 06-28-2004, 9:12 PM
  5. Shipping Completed Pens
    By Ken Salisbury in forum Freedom Pens
    Replies: 0
    Last Post: 04-26-2004, 11:35 AM

Posting Permissions

  • You may not post new threads
  • You may not post replies
  • You may not post attachments
  • You may not edit your posts
  •