Page 1 of 2 12 LastLast
Results 1 to 15 of 23

Thread: First project from the new shop!

  1. #1

    Talking First project from the new shop!

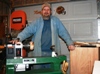
    Whoo-hoo! Yesterday I completed my first project from the newly setup shop. It was a great chance to validate my machine placement before I install ducting for the new Super Gorilla (just installed.)

    [Oh how I HATED to see the big Gorilla sleeping when I was fighting dust, moving the shop vac around, cleaning the shop vac filter about every hour of operation, etc. Soon the dormant Gorilla will arise ]

    The project involved creating efficient storage for our new-to-us little retirement house. We decided to convert one of the clothes closets (which only accumulated stuff and junk, but no clothes) into drawers and a bookcase.

    I removed the bi-fold doors and took out the clothes rod and measured and figured and remeasured, etc. Then for the first time ever in my WW experience, I took the time (about 10-12 hours) to completely plan the project on graph paper down to the cut list from plywood. The time spent was well worth it as it greatly sped up production, however even with all of the planning, I still managed to catch a couple of minor errors after I got going in the shop.

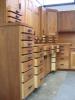
    The end result is three base cabinets of three drawers each (about 30" tall, 20" wide and 23" deep. On top of that is 1/2" plywood with a poplar edging, and on top of that are three bookcases each being about 48" tall and about 20" wide and about 12" deep.

    I used 3/4" Chinese ply for the cabinet carcasses, and 1/2" Chinese ply for the desk top. The bookcases were built from 3/4" domestic birch ply with 1/2" Russian Baltic birch for the backs and the cabinet drawers and drawer fronts.

    Poplar was used for bookcase trim, bookshelf edging and desk top edging.

    Drawers were sprayed with polyurethane, everything else was stained with a gel maple stain and then sprayed with either two or three coats of polyurethane (satin finish.)

    Drawers were just built as a simple box with no dovetails - just glued and bradded. Even the bottom is just glued and bradded on - I didn't even use a dado for it. The drawer construction is plenty strong and it will easily handle anything we can ever stuff in them.

    What worked well:
    • Carefully planning the project. All of my plans were kept in a notebook to keep them in one handy and easily located place
    • Designing the project around a sheet of plywood - I might need to make a dimension 47" and not 48" so I can cut the parts from one piece. Sometimes it was necessary to go into a second sheet, but I certainly minimized waste with lots of time spent in planning/layout
    • Staining parts before assembly and glue up (I'm sure everybody does this)
    • Making the shelves in a long piece and staining/finishing BEFORE I cut them to length. In fact I didn't validate my shelf length until I installed the bookcase - only then I felt comfortable with my calculated measurement
    • Wetting the wood before sanding to raise the fibers up
    • Using Japan Dryer to greatly accelerate the polyurethane dry time - I was able to spray three coats in a single day if I could spray the first coat about 9AM. (On another bookcase project for the last house I used lacquer and that worked quite well with even faster dry times, but I discovered it is a very poor desktop finish - too soft and vulnerable to solvents)
    • I built a crosscut sled specifically for this project and I took great pains to make sure it was as perfect as I could make it. Eventually I was producing almost (+- 1/32" corner to corner) perfectly square parts
    What didn't go well:
    • Anything that had to do with Chinese plywood. I built the cabinet carcasses from the Chinese ply and that was an absolutely horrible and dismal experience. I assumed since the carcasses were going to be essentially hidden, why use the $60 a sheet domestic ply? NEVER, EVER AGAIN will I do this!
    • I am still having trouble producing exactly parallel rips (exactly same rip width for the length) in spite of completely setting up my Jet JTAS saw again and being extremely careful in how I move wood through the saw. I also use a featherboard at every opportunity but I still haven't broken the code
    • Trying to figure out the size of the rabbit I needed since 3/4" ply isn't 3/4". It's not as simple as making the rabbit 3/8" x 3/8"
    • Mounting the drawer fronts was a challenge - I used double-sticky tape and positioned the fronts after the drawers were all mounted and installed, but trying to perfectly align all of them and not have one fall off was frustrating and time consuming
    It was a fun project and I certainly learned quite a bit. My challenge to myself was to make this as perfect as possible, and most of it was pretty darn good. Some of it isn't, but it's close.

    Wow - sorry this turned out to be so long...

    -=John=-

    (there are a few more pictures at http://gallery.janeandjohn.org )
    Attached Images Attached Images

  2. #2
    Join Date
    Oct 2007
    Location
    St Marys, West Virginia
    Posts
    597
    I think it came out well. Nice job!
    One good turn deserves another

  3. #3
    Join Date
    Apr 2007
    Location
    Phoenix, AZ
    Posts
    1,417
    Very nice look, interesting project.
    Thread on "How do I pickup/move XXX Saw?" http://www.sawmillcreek.org/showthread.php?p=597898

    Compilation of "Which Band Saw to buy?" threads http://www.sawmillcreek.org/showthre...028#post692028

  4. #4
    Join Date
    Aug 2007
    Location
    east coast of florida
    Posts
    1,482
    Looks great. Was this just the first in this shop or was it the first period?

  5. #5
    Join Date
    Dec 2007
    Location
    West Michigan
    Posts
    558
    Blog Entries
    8
    Looks Great.

  6. #6

    Not the first

    Quote Originally Posted by keith ouellette View Post
    Looks great. Was this just the first in this shop or was it the first period?
    Keith - the first from this shop. At the last house I built a super-sized version of the bookcases - they were floor to ceiling and completely covered two 12' walls.

    This was however my first ever cabinet/drawer project. The drawers consumed quite a bit of time due to the fact there were nine of them.

    -=John=-

  7. #7
    Join Date
    Aug 2007
    Location
    east coast of florida
    Posts
    1,482
    You must be very pleased. Its great to finish a first ever. I just completed my first real project and it was cabinets and drawers. It was very exciting for me.

  8. #8
    Join Date
    Oct 2007
    Location
    St Marys, West Virginia
    Posts
    597
    Hey John I wanted to add making cabinets can be tricky to make them look nice. Easy to mess up and it shows.

    Yours looks good as said before. I personally would be very pleased if this was my finished project.
    One good turn deserves another

  9. #9
    Thanks very much Rick!

  10. #10
    Join Date
    Mar 2003
    Location
    SE PA - Central Bucks County
    Posts
    65,902
    Great looking project, John!!!!!!!
    --

    The most expensive tool is the one you buy "cheaply" and often...

  11. #11
    Join Date
    Mar 2007
    Location
    Stony Plain, Alberta
    Posts
    2,702
    Good job on the project.

    Can't have too much storage space...

  12. #12
    Great project! I have a closet just like it that I am staring at right now that I have been considering something like that as a solution. I need to show this to my wife to get buy in cause she is very visual, can't just picture things.

    Nice work and thanks for sharing,

    Dave

  13. #13

    Thumbs up Thanks!

    Thanks for the kind remarks guys!

    I forgot to mention one aspect of the finished project - the visual "weight" of the bookcase seems to not match the fine and more delicate appearance of the drawers. That could be fixed with smaller bookcase trim or a thicker desktop or even larger drawer pulls.

    This is a design element that isn't apparent when creating on paper, and isn't apparent due to my relative inexperience.

    That's being pretty critical, but that's my job as the creator

  14. #14
    Nice job.

    I like the details on the bookcase. And I have always been a proponent of properly utilizing closet space like that !!!

    Thanks for sharing.

  15. #15
    Quote Originally Posted by John Canfield View Post
    • Trying to figure out the size of the rabbit I needed since 3/4" ply isn't 3/4". It's not as simple as making the rabbit 3/8" x 3/8"

    I am confused by this. I cut my rabbits 3/4 all the time and just flush trim off the extra that isn't needed.

    Congrats on everything else though. It all looks great.

Similar Threads

  1. Shop Fox Molder
    By Don Abele in forum General Woodworking and Power Tools
    Replies: 11
    Last Post: 12-18-2007, 6:01 PM
  2. Almost lost the shop last week... (long)
    By Nathan Conner in forum General Woodworking and Power Tools
    Replies: 12
    Last Post: 12-18-2007, 5:26 PM
  3. Shop Project: Screw organization
    By Wes Billups in forum General Woodworking and Power Tools
    Replies: 17
    Last Post: 11-21-2007, 2:27 AM
  4. Building a Shop Table
    By Tom Clark FL in forum General Woodworking and Power Tools
    Replies: 14
    Last Post: 10-18-2007, 1:27 PM
  5. Quick Shop Project: "Screw House"
    By Jim Becker in forum Woodworking Projects
    Replies: 21
    Last Post: 05-16-2005, 1:34 PM

Posting Permissions

  • You may not post new threads
  • You may not post replies
  • You may not post attachments
  • You may not edit your posts
  •