Hi All,
I'm running low on photos to share...
but, I did find this comfy Morris chair.
morris_chair_kitty_edit-1.jpg
Looks comfortable to me!
Even napworthy?
Walt


 [OP]
Contributor
[OP]
Contributor
Hi All,
I'm running low on photos to share...
but, I did find this comfy Morris chair.
morris_chair_kitty_edit-1.jpg
Looks comfortable to me!
Even napworthy?
Walt
There are no shortcuts to anywhere worth going! WCC
Be who you are and say what you feel, because those who mind don't matter and those who matter don't mind - Dr. Seuss
Crohn's takes guts. WCC
[OP]
Contributor
Hello Everyone,
High time for me to offer my thanks to all who have posted content and/or compliments.
When a woodworker receives praise for their work from a non-ww'er, that's good.
But when I woodworker receives praise from a fellow ww'er, it carries more weight and means more.
Thanks for all the 'attaboys' by email, pm and postings.
It means alot to me, and I really appreciate them all.
Stan- oh ya, handtuning thru-tenons for a sweet fit with no gaps takes time and patience.
You seem to have first-hand knowledge?
John Dodson- yes, I strived for hand-friendly but crisp edges.
Less rounding than I would normally do on other things.
Ben M.- Wow, during your first major project you are also planning a Morris sofa and bed? ambitious.
Brian W.- ya, I'd like my first chair to remain in the family as an heirloom. It will certainly outlast me!
Kevin P.- developing skills is our hobby. I learned much on the fly in this build. Trial by fire.
Never thought of myself as able to inspire another? shucks... that's very kind
David G.- the arm's ended up a full 1.25" thick, with lam's taken from a single 2" thick slab to be more discreet.
I tried to find pleasing grain for specific spots, trees don't always cooperate!
Sarge- wonderful story about working the details, and well told.
Thanks for sharing!
Glenn C.- My city of Windsor set a record this year, first time in over 70 yrs we make it into December with zero snow.
(Toronto same record, but over 160 years - crazy weather)
Dean K.- ya, keep improving your skills, also much can be learned on the fly while building.
Nothing teaches how to do it, like doing it. Go ahead, dare to jump in! That's all I did...
Do Not fear applying finish to your chair. I'll make a post about how I did mine.
Jeff M.- It always amazes me when a Creeker says they skimmed this entire monster thread.
Very cool that you found the orig. Wood mag from '99, plus bonus covershot!
Thanks all, for the warmth of your sharing.
All this sharing, sweetens the whole show, and adds value to our lone-wolf hobby.
We labour in our shops, in solitary confinement.
The noise, dust and danger, seems to keep others out.
We stumble and learn, to make better things.
We push 'til another, project pops out.
see you in the sawdust,
Walt
ps I believe it is cosmic law, that you cannot give more than you receive.
I believe it, because it is fun to believe it. That's the kind of world, I want to live in.......
Last edited by Walt Caza; 12-03-2009 at 7:48 PM.
There are no shortcuts to anywhere worth going! WCC
Be who you are and say what you feel, because those who mind don't matter and those who matter don't mind - Dr. Seuss
Crohn's takes guts. WCC
Member
Just wondering although I haven't figured it out. But does anyone know how many board feet of lumber there is in the Morris chair. Thanks.
[OP]
Contributor
Hi Brian,Originally Posted by Brian William

I think you are not getting any answers to your question...
because there are too many variables to give you a meaningful answer.
There are many different chair designs in play in this thread.
I first kicked around this question back in posts #22 and 23.
We revisited this topic with Brad Wood around post #356.
I skimmed and could not locate it, but I believe it was also discussed
elsewhere in this big, unruly thread.
Even if you got a ballpark guesstimate of how much wood is in the finished chair...
I know I paid for lots of wood that did not end up in the finished chair.
Which is not to say it was wasted, but instead hangs around my shop
waiting to find someplace useful to end up.(the wood - land of misfit toys)
I also used different thicknesses of rough stock on my own chair.
I used 8/4, 5/4 and 4/4 inch rough QSW oak.
Your mileage may vary...
I recall that you mentioned wanting to build some Morris chairs to sell to some interested folks.
Whatever floats your boat...
However, in fair warning, I strongly urge you to fully complete a Morris
chair build, before even trying to figure out a price to tell someone.
It takes alot of effort and alot of hours to finish the job. (pun intented)
Sorry Brian, no quick or easy answers.
I'm sure that is why noone has responded.
I can assure you, that every board will be just a bit too short to get out the needed parts.
And you'll have to cull some boards to find the desired pretty ones for key locations.
Oh, and you'll lose some to end checks, splits, miscues and booboos.
In summary, How long is a piece of string?
As long as it takes to get the job done.
Besides, the Creek pic police say, no pics/never happened.
So, as far as I can tell, your chair build is nothing more than a rumour?
good luck with all that,
Walt
Last edited by Walt Caza; 12-09-2009 at 7:28 PM.
There are no shortcuts to anywhere worth going! WCC
Be who you are and say what you feel, because those who mind don't matter and those who matter don't mind - Dr. Seuss
Crohn's takes guts. WCC
 Member
Well, it is "coming down to the wire" for me. I need to have my chair in pretty much finished shape for next weekend since my parents will be in town; I hope to get my mom to make the cushions then.
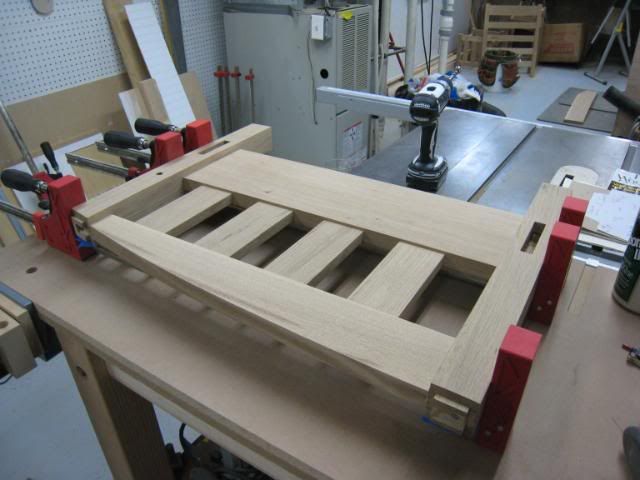
I shaped the sides to fit the arms, this was done using a template I built from the arms (sorry, no pics of the template but you should get the idea).
And then transfered the curve to the legs and chiseled to fit. After finicking for a bit, I discoverd that the curve doesn't have to be "perfect" the clamps will bring it down pretty close.
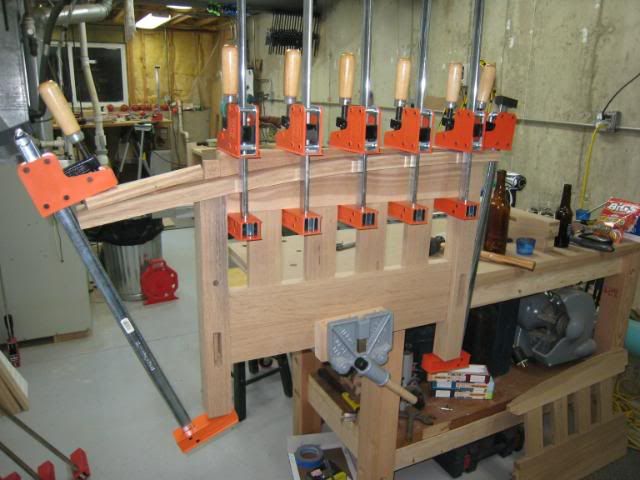
Next was the glue-up of the arms to the legs:
And then the arm to the side assemblies.
All in all, everything is going pretty well. I decided to add 4 screws to the arm to keep them attached that will be covered up with Walnut dowels (thanks for the show and tell on that Walt, I liked the contrast). I will add the screws after the glue dries, so technically they won't be structural, just peace of mind for me...
 Contributor

Ok - you got me ! I just downloaded the plans. I need a good chair and to build something for *ME* so I am in. I will be picking up the lumber this weekend and post pics as I progress.
Kudos to you Walt for starting this ! (Although I may be cursing you later. LOL)
"The element of competition has never worried me, because from the start, I suppose I realized wood contains so much inspiration and beauty and rhythm that if used properly it would result in an individual and unique object." - James Krenov
What you do speaks so loud, I cannot hear what you say. -R. W. Emerson
Member
Congrats Keith! It is a very fun and rewarding project, but it seems like the order of the day for me is always hammer it out a bit at a time.
[OP]
Contributor
Hi Ben,
Your progress looks terrific!
I feel like I got a mini shop tour with these latest pics.
Very enjoyable and thanks.
These 4 screws to strengthen the arm to rail joint...
are we talking through the top of the arms?
I'd still wanna believe they will help, even if drilled after glue dries.
Nicely spaced, and with contrasting plugs?
Way to make your chair your own! Do your thang, Dog.
Not much looks better to me than seeing mortise & tenons in progress.
Nice job on using your offcuts as clamping aids.
Way to work those curves smart.
Thanks for sharing a peek with the Creek,
play safe,
Walt
ps If by chance you manage to get your cushions done...
you will pass a few guys who are sitting on their naked chairs...
waiting for them to hatch!
haha
Last edited by Walt Caza; 12-11-2009 at 12:30 PM.
There are no shortcuts to anywhere worth going! WCC
Be who you are and say what you feel, because those who mind don't matter and those who matter don't mind - Dr. Seuss
Crohn's takes guts. WCC
[OP]
Contributor
I'm pleased to extend a hearty welcome to our newest Morris chair builder...
Welcome aboard Keith!
Keith has shown some diverse projects and strong skills on our beloved Creek.
He turns bowls and pens, handcuts dovetails, has posted some handsome projects and
even once confessed to erotic wood dreams. Dreams about wood, that is...
I leave you, dear reader, to deal with... whatever that might mean.eek
Fair warning, you well know by now the Creek is hungry for pics.
We circle overhead, like vultures... scanning the hills for a tasty peek...
How about giving us a lil show-and-tell when you score your lumber?
Here's a little taste of Keith's work in QSW oak:
I can't help but wonder if we might see your homemade vacuum press used on your chair?!?
This shared shop experience has proved rewarding,
and we look forward to you,(dramatic pause) taking us,(dramatic pause)... for a pleasant ride.
on we roll chairfans,
Walt
ps ...and then there were ...umm ...errr ...well, lots of chair builders!
haha
(jolly good fun this...)
Last edited by Walt Caza; 12-11-2009 at 1:31 PM. Reason: dug up a tasty pic...
There are no shortcuts to anywhere worth going! WCC
Be who you are and say what you feel, because those who mind don't matter and those who matter don't mind - Dr. Seuss
Crohn's takes guts. WCC
Member
I've been a quiet follower of the GMC thread for some time. I have talked with Walt several times offline. When I first started following this thread I didn't think I could possibly build this chair. But, as time went on, I lusted after owning one, so I bit the bullet. My major concerns at first were how to form the bow arms, and how to do the through mortises.
I decided to resaw 5/4" QSWO for the arm laminations. I then jointed and planed them to 9/32" each, using four for each arm. I used DAP weldwood plastic resin glue (my first time) to glue the laminations - worked great.
After I milled and laminated the four legs to final size I built a jig to hold the leg and used a 1/2" carbide router bit to rout all the leg mortises. I could go about 1 3/4" deep from one side, then flipped the leg over, aligned it to the reference mark on my jig, and routed through from the backside. This worked very well, leaving very clean sides. I squared the mortise ends using a 1/2" mortise chisel from the outside face.
For the mortises in the rails, back, and seat I used a 3/8" mortise bit. All told, there are seventy mortises in the chair.
I found it easier to drill the dowel holes in the arms at the drill press prior to cutting the arms to final shape (i.e. when they were rectangular.) Thus, avoiding that little jig shown in the plans. I drilled my dowel holes with a 1/2" bit, at four locations along the arm. I used a 4" metal rod inserted into a wooden handle. I haven't glued the rod into the handle because it effectively gives me eight postions if necessary (although I've set it to the spot where it will probably never move from.)
I used the template I created for the arm pattern to first, bandsaw close to the line, and then, routed the final edge on the arm.
I masked off areas on the legs for glue space for the corbels. Since I don't bandsaw very well, I did make a template and routed the corbels to final shape (it's just easier for me.) Also, masked off the underside of the arms for gluing to the upper rail. The 1/4" dowel in the leg and arm were a great help in aligning, and clamping the arm to the chair.
I finished the chair prior to glue up. I used Bartleys Pennsylvania Cherry and two coats of satin polyeurethane ( three on the arms.)
I do have one concern about the design. With the chair finished I took two cushions from my sofa (each 6" thick) and tried out the chair. It felt pretty good, if just a tiny bit low. I triple checked the plan dimensions and everything seems right. Since I'm onlly 5' 9", I think a 6 footer would be uncomfortable in this chair. I spoke with an upholsterer who said that a standard chair measures 18" to 22" from the floor to the cushion top. I measured my chair and it's barely 16" from floor to top. I might try adding a 1" to 1 1/2" thick piece on the seat bottom to raise the seat a bit.
I want to thank Walt and all the guys that participated in the early group build. They're insights, ideas, and quality of workmanship gave me the motivation to attempt this project.
I've posted several photos of the project at:
http://picasaweb.google.com/hughandb...isChairProject if anone's interested.
Again, thanks Walt, and everyone who participated in the group build.
 Member
That is one fine chair you have built there Hugh.
At first glance I thought you had gone right to the end and got the cushions done!
Some day mine will make the treck from my finishing room to the house.
I can see lots of time and effort has gone into your heirloom.
Thanks for the link to the extra pics.
The Creek loves lots of pics...
Great first post to the Creek Hugh.
Welcome.
Hope to see more of your work in the future.
And congrats again on the job well done on your Morris Chair..
Member
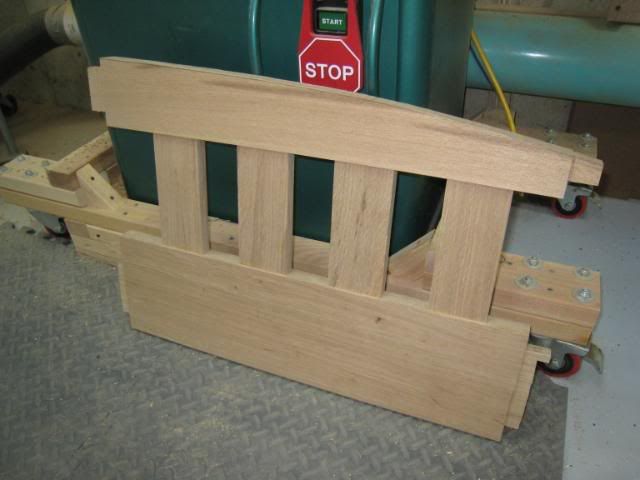
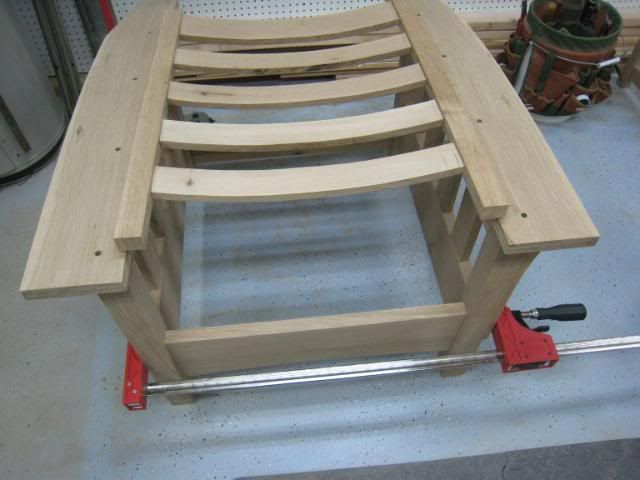
Well, anxiety has turn to frustration at the Martin house hold...
Do you notice anything wrong in this picture?
Does anyone know how to fit a 23 1/4" wide back into a 22 3/4" opening? I guess I have discovered another issue with the American Furniture Design plans. They instruct you not to cut the mortises on the arms as shown in the drawing, they will be determined at a later time, but never instruct you what to do after that point. I remembered somewhere in the FWW article it saying that there was only supposed to be a 1/8" over hang of the arms from the legs, but when laying mine out (using the dimensions from the plan) I could tell that I was going to get much more than that. I guess this never sank in until tonight though...
SO, I am asking fellow Morris Chair builders for suggestions on how to remedy my problem, I have thought of 4 possible scenarios, numbered 1 through 4:
1) Trim a 1/2" off of each rail for the back, this would pretty much turn all of the tenons for the back slats into through tenons since there would be less than 1/16" of material between the edge and the bottom of the tenon. I am not confident in my ability to make this look good...
2) Purchase (I don't have any more) 6/4" QSWO, and make new back rails that are 1/2" narrower. I would also then trim 1/2" off of each tenon for the back slats turning them into 1/2" long tenons instead of 1". Do you guys think there would be any structure issues with only a 1/2" tenon on the back slats (I am leaning towards no...)?
3) Trim the arms so that there is only a 1/8" overhang. I imagine that this could be done by rough cutting them down with a jigsaw and then coming back through with a router, ruler as an edge guide and top bearing flush trim bit (which I do not have) to make it look good. This sounds easy to me in theory, but I am scared of using the bowed rails as my guide, perhaps this could also be done on the table saw even though the arms are glued to the sides?
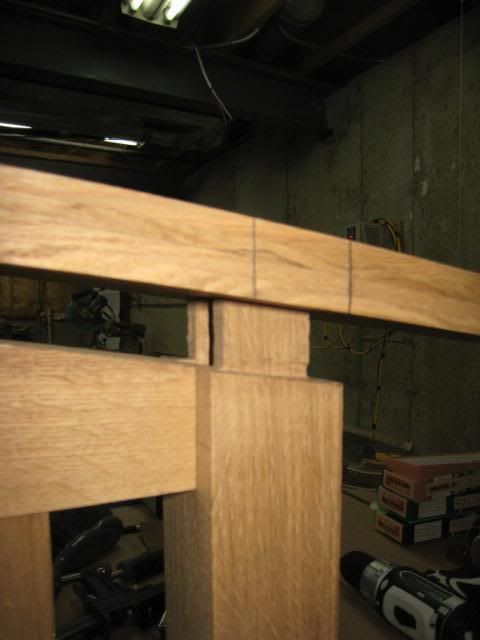
4) Completely scrap using this set of arms for the morris chair and save them for the morris "love-seat". This didn't hit me until the frustration wore off and realized that having more over hang would improve the strength of the back on the love seat version. The way I plan on attaching the arms to the sides can be seen here (although my arms have MUCH more over hang than the ones in this photo):
So, those are the options as I see it, what do you guys think? In case this will help sway your response, I am leaning towards either 2 or 4...
PS. Hugh, Great looking chair that come out fantastic! Like Gary said, an heirloom for sure!
[OP]
Contributor
Good Day Morris fans,
I will be responding to Roy's kind posting, and also to
Hugh's fabulous bow-arm Morris chair, in my good time.
But in this moment...
We have our first Morris chair emergency! So this leapfrogs that...
Ben Martin was going 'great guns' on his build, and
finding his way through some ambiguous, if not spartan, chair plans.(errors even?)
Ben uncovered some issues and kept building. Until now, that is...
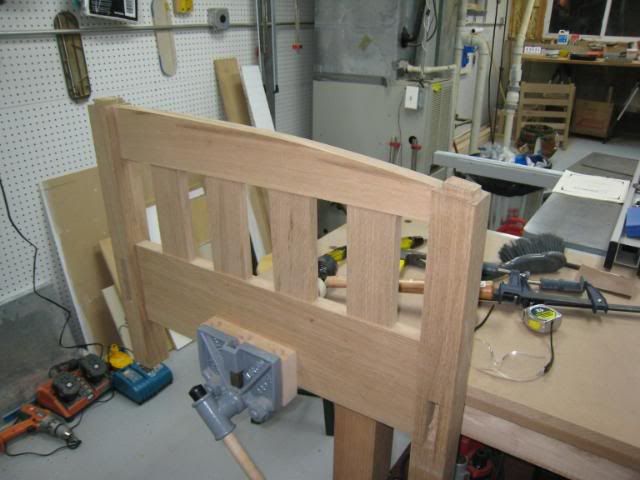
Upon bringing backrest into the between-arms-gap, he discovered that the gap is not large enough. ('inside')
There ought to be a word for a 'Eureka' moment of discovery, but for bad stuff.
Ok, I guess there are many such words, regrettably, none are fit to print.
Ben, your best shot at getting meaningful help, from well-meaning Creekers...
would have to start with getting our facts straight.
I'm sure your feathers are fluffed... Don't panic yet!!
I'll clearly state what we know, Ben can further elaborate:
-backrest assembly is wider than gap-between-arms of chair assembly
-sideframes are glued into a single piece
-arms are glued onto toprails of sideframes (also screwed, but that is readily undone)
[what's the difference between a lightbulb and a pregnant lady? -you can unscrew the lightbulb]
-Ben plans another project which could use these arms in future
Ben???
-The 'inside' shortage is a 1/4" per side, total = 1/2 inch?
-the backslats (splats?) are curved and glued to backrest rails?
-at issue, is the amount the arms overhang the sideframes, toward inside the chair seat?
Which is most correct to plans Ben?
-is the overall backrest assembly the width that was called-for?
-the rail and sideframes are correct in and of themselves
-but the relationship of arms to sideframes is too much 'inside' overhang
Please help us, to help you!
Don't pick up a sledge hammer just yet...
please advise,
Walt
ps I guess it'd be prudent to hold your cushions in abeyance until this problem solved!
Last edited by Walt Caza; 12-17-2009 at 10:16 AM.
There are no shortcuts to anywhere worth going! WCC
Be who you are and say what you feel, because those who mind don't matter and those who matter don't mind - Dr. Seuss
Crohn's takes guts. WCC
[OP]
Contributor
Hi All,
Going back to the first post in this thread, you can see one of the goals was to address our build problems together.
A year and a half down the road, and we have a chance to try to help Ben. He's in a pickle!
I encourage anyone with an idea to throw it into the mix, let's show some warm spirit, and help our fellow Creeker.
Ben, my own first thought, is your photo shows a clamp across the front stretcher.
Now, I am just 'blue-skying' here...
but, it seems to me that if the stretcher was glued...
you'd have pulled the clamp off by now?
The overall width of the chair is not crucial, especially since your cushions are Not made yet.
If your front and back stretchers are not glued,
then you could pull them apart, and set them aside.
Remake your front and back stretchers... but longer....
long enough to fit your existing backrest assembly,
leaving the arms glued to the tops of the sideframes,
and keeping your current arm to sideframe overhangs.
If this is possible, it'd prove less destructive... and solve all relevant issues.
I'm guessing you located your bow-arms onto the sideframes in a
position which you found aesthetically pleasing, including the overhangs.
If you can re-do your f & b stretchers longer,
you can keep those overhangs, and Not need to bust things apart.
All of this depends on the f & b stretchers not being glued yet.
any chance this could work?
good luck with it,
Walt
Last edited by Walt Caza; 12-17-2009 at 10:27 AM.
There are no shortcuts to anywhere worth going! WCC
Be who you are and say what you feel, because those who mind don't matter and those who matter don't mind - Dr. Seuss
Crohn's takes guts. WCC
[OP]
Contributor
Quick thoughts tossed at Ben:
1. Cutting into the backrest siderails to slim them brings 2 problems.
-slender siderails offer less support to the chair rider
-exposed tenons are carefully made in the knowledge that they will show,
exposing intended blind tenons after the fact may get ugly
2. Narrower backrest siderails offer less structure.
Shorter tenons bring less strength, but might still be adequate for loads.
Seems to me, better to re-do with shorter slats, not slimmer rails.
3. Trimming the mounted bow-arms in situ would be tricky, but could be accomplished.
Seems it'd be better to leave your arms wide, and find another approach.
The arms are a key feature, plus you wanna keep all the oak you paid for, in the finished chair.
4. You assume that your glued bow-arms could be removed from the sideframes with minimal damage to both.
Didn't you attach them in such a way as to be for 'keeps'?
If your overhangs look good to you, seek a way to them.
Do you really wanna bend another pair of bowarms?
re: future possible Morris loveseat project,
The pic of the back join area with the pale red cushion shows a non-pivoting backrest design.
Looks like the arm is notched out to let in that backrest, offering some support to make the assembly more rigid.
So, you are saying more arm overhang = deeper notch, and thus more support for sofa backrest?
If I understand your situation, I hope my post #449 would be a plausible solution.
Think out loud for us, Ben.
be well,
Walt
Last edited by Walt Caza; 12-17-2009 at 12:04 PM.
There are no shortcuts to anywhere worth going! WCC
Be who you are and say what you feel, because those who mind don't matter and those who matter don't mind - Dr. Seuss
Crohn's takes guts. WCC
 Posting Permissions


 Reply With Quote