Page 1 of 2 12 LastLast
Results 1 to 15 of 25

Thread: Blanket Chest Completed!!

  1. #1
    Join Date
    Jul 2003
    Location
    Wixom, MI
    Posts
    1,163

    Blanket Chest Completed!!

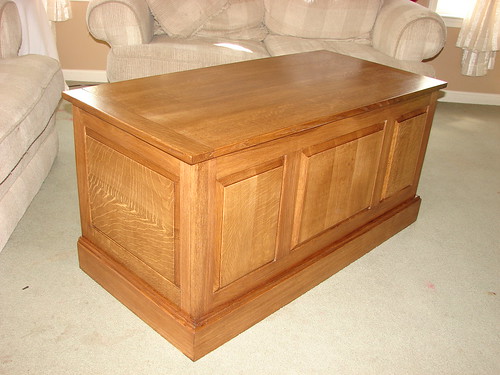
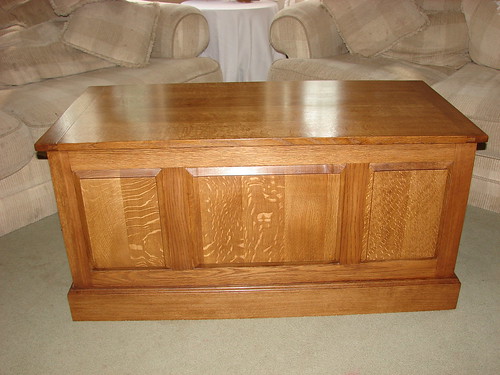
    I'm pretty happy with the way this one came out. It's my first piece of actual "case work", as well as the first time I've done breadboard ends and raised panels, so I was nervous going in. I made this blanket chest as a wedding gift for my brother-in-law and his bride-to-be. It's made from RS and QSWO. After sealing it up with dewaxed shellac, I stained it with General Finish's walnut gel stain, then applied three applied three coats of GF's Satin High Performance topcoat. A couple of coats of paste wax later, this is where it's at.


    .
    .


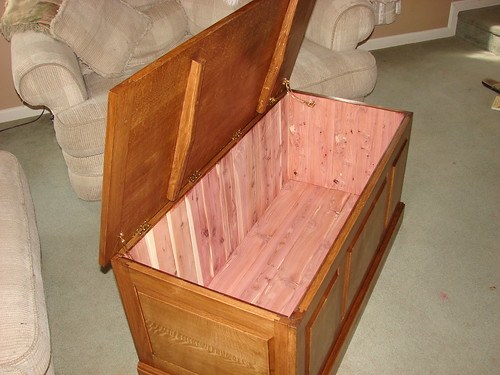
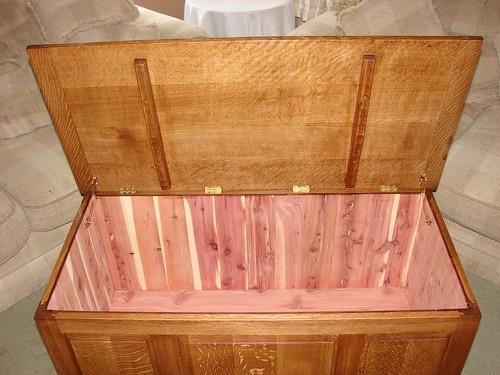
    I lined the interior with aromatic red cedar panels purchased at Home Depot. After a light sanding, they came out pretty nicely...


    .
    .


    I'm hoping they like it. Thanks for looking!!

    - Keith
    "Listen, here's the thing. If you can't spot the sucker in the first half hour at the table, then you ARE the sucker. "

  2. #2
    Looks great, I'm sure it will be a certer piece at their home.

  3. #3
    Nice work!!!

  4. #4
    Join Date
    Dec 2005
    Location
    Virginia Beach, VA
    Posts
    283
    That's gorgeous! Nice work!

  5. #5
    Join Date
    Mar 2007
    Location
    Jacksonville, FL
    Posts
    733
    Great project and nice work.
    "History is strewn with the wrecks of nations which have gained a little progressiveness at the cost of a great deal of hard manliness, and have thus prepared themselves for destruction as soon as the movements of the world gave a chance for it." -Walter Bagehot

  6. #6
    Join Date
    Jul 2003
    Location
    Wixom, MI
    Posts
    1,163
    Thanks, guys!!
    "Listen, here's the thing. If you can't spot the sucker in the first half hour at the table, then you ARE the sucker. "

  7. #7
    Join Date
    Oct 2007
    Location
    Fort Worth, TX
    Posts
    1,389
    How did you secure the cedar panels on the inside for the lining? I like that look and style. They the 5/16" thick planking? It looks like you just mounted them flush to the lip of the chest.

    Very well done project by the way. Sharp look to it, and one heck of a gift.
    Grady - "Thelma, we found Dean's finger"
    Thelma - "Where is the rest of him?!"

  8. #8
    Join Date
    Mar 2003
    Location
    SE PA - Central Bucks County
    Posts
    65,926
    Looks to me like a case of good work...
    --

    The most expensive tool is the one you buy "cheaply" and often...

  9. #9
    Join Date
    Jul 2003
    Location
    Wixom, MI
    Posts
    1,163
    Quote Originally Posted by alex grams View Post
    How did you secure the cedar panels on the inside for the lining? I like that look and style. They the 5/16" thick planking? It looks like you just mounted them flush to the lip of the chest.

    Very well done project by the way. Sharp look to it, and one heck of a gift.
    Thanks, Alex! The panels are a hair thicker than 1/4", so I just decided to use 3/4" brads, sunk just below the surface. It looks very clean, even up close. I did mount the cedar flush with the top lip of the chest. I had originally considered putting a small chamfer on the inside edge of each piece of planking, but decided against it in the end.

    - Keith
    "Listen, here's the thing. If you can't spot the sucker in the first half hour at the table, then you ARE the sucker. "

  10. #10
    Join Date
    Jul 2003
    Location
    Wixom, MI
    Posts
    1,163
    Quote Originally Posted by Jim Becker View Post
    Looks to me like a case of good work...

    Thanks, Jim!! I'm just glad to have the thing outta the shop. It was taking up way too much space....

    - Keith
    "Listen, here's the thing. If you can't spot the sucker in the first half hour at the table, then you ARE the sucker. "

  11. #11
    Very nice execution. Just curious, why did you orient the grain on the side raised panels perpendicular to those on the front and back?

  12. #12
    Very nice looking chest. I bet they will be happy

  13. #13
    Join Date
    Jul 2003
    Location
    Wixom, MI
    Posts
    1,163
    Quote Originally Posted by Jim Kirkpatrick View Post
    Very nice execution. Just curious, why did you orient the grain on the side raised panels perpendicular to those on the front and back?
    Simply.....a rookie mistake. I didn't take my time. I didn't notice the grain orientation until it was too late, and didn't have the material to fix my mistake. While it didn't "junk up" the project, it is something I wish I could go back and do over.

    - Keith
    "Listen, here's the thing. If you can't spot the sucker in the first half hour at the table, then you ARE the sucker. "

  14. #14
    Keith

    great looking blanket chest. What are the dimensions?

  15. #15
    Join Date
    Jan 2008
    Location
    Savannah Georgia
    Posts
    102
    Great finishing job on an impressive first major project. Keep on working past your comfort zone.

Similar Threads

  1. Stinky blanket chest -- what to do???
    By Jason White in forum General Woodworking and Power Tools
    Replies: 14
    Last Post: 10-29-2007, 9:10 AM
  2. Blanket chest finished and delivered
    By Mike K in forum Neanderthal Haven
    Replies: 10
    Last Post: 10-23-2006, 8:08 PM
  3. Blanket Chest - Work in Progress advise needed...
    By Rich Stevens in forum General Woodworking and Power Tools
    Replies: 6
    Last Post: 06-23-2006, 7:19 PM
  4. Pennsylvania Blanket Chest...completed
    By Ron Mitchell in forum General Woodworking and Power Tools
    Replies: 11
    Last Post: 06-15-2006, 10:55 AM
  5. Top coat blanket chest
    By Richard Ferment in forum Project Finishing
    Replies: 2
    Last Post: 05-30-2006, 12:03 PM

Posting Permissions

  • You may not post new threads
  • You may not post replies
  • You may not post attachments
  • You may not edit your posts
  •