Page 1 of 2 12 LastLast
Results 1 to 15 of 22

Thread: Help me improve my turning photos please....

  1. #1
    Join Date
    Jan 2004
    Location
    Lewiston, Idaho
    Posts
    28,559

    Help me improve my turning photos please....

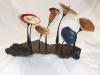
    Here's the latest thing off my lathe and the first photos using my new photo tent and lights. The form of this was dictated by the way it was cut with the chain saw. I'm not totally in love with the form but it is special. I left the sides thick to insure the bark remained intact. This wood, maple burl 9"x4 1/2" , was given to me by a fellow Creeker. It came from a tree in his Dad's yard. Unforturnately his Dad died some months later. I managed to get this out of the piece of wood. My intentions are to return it to the person who gave it to me. The finish is 2 coats of Minwax Antique Oil.
    Critique the NE and the photos. Brian and Tamara...I would sure appreciate your comments and suggestions about the photos. You saw the piece while you were here. I used my new donut chuck to turn the tenon off.

    n1.jpg[ATTACH]n3.jpg[/ATTACH]
    n4.jpgn5.jpg
    Attached Images Attached Images
    Last edited by Ken Fitzgerald; 10-19-2008 at 3:16 PM.
    Ken

    So much to learn, so little time.....

  2. #2
    Join Date
    Dec 2003
    Location
    Delton,Michigan
    Posts
    668

    dont use a camra:)

    then yur pics will be just right..FLAT looks good there fitz..what kind of burl was that?
    If in Doubt? Build it Stought!

  3. #3
    Join Date
    Jan 2005
    Location
    University Place, Washington
    Posts
    1,268
    Ken, Looking good ! Only comment would be to increase your depth of field (F stop ) You seem to be losing some sharpness from near (your focus point) to far. Who would have thought the vortex would include a new camera and photo tent
    Sometimes we see what we expect to see, and not what we are looking at! Scott

  4. #4
    Join Date
    Jan 2004
    Location
    Lewiston, Idaho
    Posts
    28,559
    Larry,

    That's maple burl.
    Ken

    So much to learn, so little time.....

  5. #5
    Join Date
    Dec 2006
    Location
    Mesa, Arizona
    Posts
    1,799

    Good job!

    Ken,

    You did a very good job with a very special piece of wood. I'm sure the family it's going to will cherish it.

    As for critiques and suggestions, I only have a few: I think you did right in keeping the form simple and without embellishment. The wood is the star and your design does not get in the way. I would have preferred that the outside curve of the bowl to have been more rounded -- closer to the inside. You said that wasn't possible due to the way the blank was cut from the tree. I think you got the finish right. It allows us to see the depth and beauty of the burl without being so glossy the bowl has a plastic look.

    Scott mentioned the most serious (not all that serious) short coming with the photos -- lack of depth of field. Your camera may not allow you to adjust the f-stop. In that case, you might try shooting from farther back and then zooming in with the lens or cropping afterward. If the bowl is 9" across, you need a depth of field of at least 9". That's easier to achieve if the camera is 18' from the subject than it is if the camera's 18" from the subject.

    Another small issue is that in the profile pics we can see the edge of the table the bowl is sitting on. For some reason, this is distracting. (Worse, the tablecloth is in perfect focus, making the out of focus base look worse than it otherwise might.) Perhaps you could have moved the bowl farther back and/or taken the picture from a slightly higher angle. Another approach would have been to use a mason jar ring (or something similar) underneath the tablecloth to raise the bowl up.

    Those are very minor quibbles. You did a very good job. In particular, I thought you lit the bowl very well.

  6. #6
    Join Date
    Oct 2006
    Location
    Harvey, Michigan
    Posts
    20,804
    Ken - great job on the bowl! Beautiful wood!

    Photos: really like the lighting and the contrast between the wood and background. Focus is usually the biggest issue with all of us. How do you get the correct depth of field with a camera not really designed to do that? David's suggestion of moving the camera back is the easiest fix but then you have to depend on the zoom capabilities of your camera - if there are any! Next step is software and it's ability to enhance focus, contrast and color. Overall, I think you did good on the photos and hope Brian can offer some constructive comments on photos for us all!
    Steve

    “You never know what you got til it's gone!”
    Please don’t let that happen!
    Become a financial Contributor today!

  7. #7
    The piece looks very nice.

    Besides the depth of field that has been mentioned previously. I think you need more white space in you pictures. Try haveing the bowl only take up about 1/3 of the total picture.
    Mike Vickery

  8. #8
    Join Date
    Aug 2007
    Location
    Sunrise Beach, MO
    Posts
    1,153
    Ken,
    I think your pictures just took a giant leap forward. The Maple burl is stunning and the color really suits the wood. The form is most pleasing and I like the thickness of the piece, because it shows so much of the burled bark. It adds a real dimension to it. You could not of shown it better. Very well done my friend.
    Regards, Ken

    Become a Contributor at SMC and keep this great source of Knowledge and help from becoming only a memory.

  9. #9
    Join Date
    Dec 2007
    Location
    Nehalem, Oregon
    Posts
    206

    Looking good

    Ken: I would agree with everything said to this point. You may be having a bit of trouble with two areas on the photos. Are you using a tripod? If yes then the next item would be auto focus. The modern auto focus units have problems with exact focus on objects that are darker or lighter than mid toned. Some times I have to switch to manual (I hate doing it) or focus on a different spot and hold the button half way down then re aim before exposing. As tempting as it might be the auto everything on your camera is not a good idea for still work.

    I love the wood. Looks like you made the best of what you had with all factors considered in. I'm sure they will love it. Good job.

  10. #10
    Join Date
    Jul 2007
    Location
    Central Indiana
    Posts
    955
    Ken,

    First off the bowl looks great. Lovely wood and your form is just right to show it off.

    I have learned much about photos since I started turning bowls.

    1. Ditch the pedestal that you have your bowl setting on. I did the same thing when I started taking pictures and I thought they were crazy about getting rid of it but after following the advice they were right.

    2. Iron your back round to remove the wrinkles. Once again a mistake I made. The wrinkles are a distraction to the subject matter.

    3. If you can afford it, purchase a variegated back round. Really makes a difference. I would like to get a darker one than I have now but I just have not got around to it.

    4. As mentioned - depth of field. Can you set your camera to a aperture setting? I have been experimenting with my Canon G2 and 6.3 seems to do a good job with keeping everything in focus from the front to the back of the bowl.

    5. I assume you are using a tripod. Also use the timer function if you are not.

    6. Use manual focus. I put a piece of tape on the bottom of my light tent. For profile shots in particular, I printed some words on a piece of paper that I set at the piece of tape. I focus on this in the manual mode, so I know exactly where my focus point is. I then replace the piece of paper with my bowl.


    7. Experiment. The great thing about digital photography is that you are not wasting film and money. Take A LOT of pictures with different settings, keep track of which photograph was taken with what settings and keep the good ones noting which settings give you the best results.

    Good luck, I hope some of this helps.

    Toney

  11. #11
    Join Date
    Jan 2005
    Location
    Goodland, Kansas
    Posts
    22,605
    Ken that is a beautiful piece. The burl is a fantastic piece of wood. Photos look good to me and you have definitely improved. I will will leave the crtique to the experts of which I am not.
    Bernie

    Never put off until tomorrow what you can do the day after tomorrow.

    To succeed in life, you need three things: a wishbone, a backbone and a funnybone.


  12. #12
    First off, that's a beauty of a bowl and some amazing burl. As for the photo, it looks like you got a tent very similar to the one I have. The background they send with them is some sort of nylon material that comes permanently wrinkled. I personally think the wrinkles in the background are a distraction. The graduated tint backgrounds that you can buy make a very professional looking photo. I've never gotten one but I use a full sheet of watercolor paper for my background. A large sheet of a light gray colored paper works too. I let the camera do its thing on the auto setting and then use Google Picasa for photo editing. I usually just hit the "I'm feeling lucky" button, sometimes add a little fill light, and crop.

  13. #13
    Join Date
    Aug 2005
    Location
    Midwest
    Posts
    2,043
    Ken,
    You are off to a great start!!!

    To add to Curt's suggestion...a gray background and a black background would be good additions. Usually you want a light background for dark pieces and a light background for dark pieces to give good contrast. For your piece and other midtoned pieces, you may have to experiment to see what background looks best. The gray background is also good for calibrating white balance if your camera has a manual adjustment.

    IMHO photo matte board is one of the best materials for backdrops in photo tents. You can buy a whole sheet for $5 and get it to look graduated via lighting. It is a little stiff out of the box but a light spray of water on the back of the matte board with make it pliable. Then, once it dries it will hold its curved shape pretty well. I also have mine attached to my tent frame to keep it from shifting during shooting.

    Thanks,
    Dick

  14. #14
    Join Date
    Aug 2007
    Location
    Caledonia, Ohio USA.
    Posts
    1,937
    Blog Entries
    9
    Ken,

    Tha turning looks great. F Stop could be reset... if you have a Macro setting you might want to play with that a little bit.

    I have found just taking a bunch of pic's, watching your setup.. then you'll find your correct settings.
    Have a Nice Day!

  15. #15
    Join Date
    Jan 2004
    Location
    Lewiston, Idaho
    Posts
    28,559
    Thanks folks for the comments. I've spent part of the day trying different photographic setups on the camera trying to improve the photography.

    I know this camera has a "macro" setting. I'm going to have to break out the owners manual.

    This piece of wood was cut with a chain saw and it was pyramidal in shape. Where the bottom of the bowl is, was a very sharp point. I actually turned this last fall on my Jet Mini VS but decided I didn't like the form. My wife and several others said I ought to finish it. The burled bark within the piece was so pretty once I turned the outside, I didn't want to reduce the depth of the bowl. I left the walls thick so the outside bark would be less likely to detach.
    I'm not overly happy with the form but that form does maximize the displaying of the burl and bark inclusions.
    Last edited by Ken Fitzgerald; 10-20-2008 at 2:07 AM.
    Ken

    So much to learn, so little time.....

Similar Threads

  1. Now that I have recent photos, our shop
    By Al Navas in forum General Woodworking and Power Tools
    Replies: 17
    Last Post: 09-26-2007, 10:08 PM
  2. A little "HOW" turning fun...
    By Jim Becker in forum Turner's Forum
    Replies: 12
    Last Post: 04-04-2005, 10:57 PM
  3. Review: Bill Grumbine's Bowl Turning Video
    By Rod Peterson in forum Turner's Forum
    Replies: 12
    Last Post: 02-16-2005, 5:29 PM
  4. Gear needed for Turning Pens?
    By Gilbert Vega in forum General Woodworking and Power Tools
    Replies: 4
    Last Post: 02-21-2004, 8:36 AM
  5. turning tools: Robert Sorby or Crown PM
    By Bob Weisner in forum General Woodworking and Power Tools
    Replies: 2
    Last Post: 01-30-2004, 5:18 AM

Posting Permissions

  • You may not post new threads
  • You may not post replies
  • You may not post attachments
  • You may not edit your posts
  •