Did you see the video that goes with the Rockler jig? It shows a guy getting whacked by a kicked back piece of wood. I can't believe someone would voluntarily do that. I wonder if the video was doctored..Originally Posted by Matt Paldy


 Contributor
Did you see the video that goes with the Rockler jig? It shows a guy getting whacked by a kicked back piece of wood. I can't believe someone would voluntarily do that. I wonder if the video was doctored..
 Member
I've been using this for 25-30 years. Works for me.
Last edited by Glenn Clabo; 10-30-2008 at 8:58 AM. Reason: Links to other public or private forums are not allowed.
 Member
ditto that.
also look at the video that came with the grippers. that was very helpful
joe
Vortex! What Vortex?
Member

Found the above pics on the web...
This seems like a simple jig to use for your purpose. Seems like the only safe way to use it is with the splitter installed though.
Member
I use a simple carry board that I usually just make up when I need it. It is more basic version of what David Schnegg posted.
Joint and rip a board of suitable width that will give you plenty of room for your hand to go between the fence and the blade. Screw a stop to the end of the board (not the face like in David's pic so there is no danger of cutting the screws.) Start with your stop a little long so you can use it to set the width of your strips- trim it until the amount that sticks out is the same as the desired width of your strips. You are good to go. A handle like David pictures is a nice option. Use it with a splitter.
With this simple method you don't need to reposition your fence after each cut, and feather boards, special stop blocks, etc, are unnecessary.
Then again, I sometimes just use my Unifence set in the low profile position and a push block that rides on the fence.
Last edited by Alan Schaffter; 10-30-2008 at 3:07 PM.
 Member
Dewey
"Everything is better with Inlay or Marquetry!"
Member
There are a lot of approaches, but one thing that can affect your choice is the length of the strips. For instance, the reason I cut a lot of 1/4" strips was to build a canoe. If your strips are 20' long, that makes some of the approaches less appealing. In fact, with 20' long stock I find it easier to have the stock stationary and to move the saw -- a circular saw with a special jig. Let me know if that's your application, and I'll post it.
 Member
I just did this the other day. After seeing all the solutions my Incra fence just paid for itself again.
Member
Years ago when I built my cedar stripper, I only had a Shopsmith with its tiny table. I knew I would be doing a lot of planing and sanding to fair the relatively soft Western Red Cedar so wasn't too concerned about maintaining perfect thickness. I used the fixed fence method and a push stick for the last few inches. I also to apart a twelve foot extension ladder and jury rigged the halves to the saw for extra long infeed and outfeed tables.
Contributor
I like the Grr-Ripper, but after trying it and a couple of other commercial products, I decided that the following trivial jig (like David Schnegg's with the addition of a hold-down cover) was easier and safer.
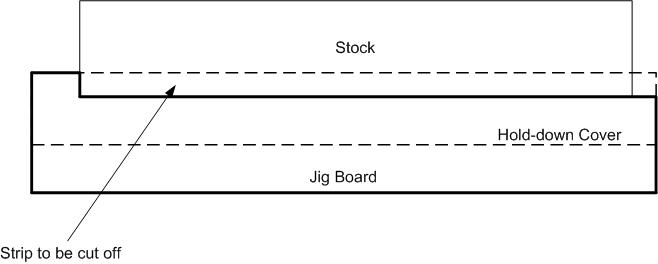
Rip a jig board the same thickness as your strip stock, longer than the strips you need, and roughly 6" wide. Create a "push-foot" at one end to push the strip (either with a second narrower rip stopped about 1" short of the end, or by attaching a cross piece to the end). The result will look like a traditional taper jig, except with no taper -- as shown above.
Adjust the fence the width of the jig board plus the strip width. Set the stock against the jig board and its "foot" and run the pair through your saw. Blade guard or splitter do not need to be removed, as with a Grr-Ripper. Multiple thin strips can be cut without moving the fence or making any other adjustments. There is zero setup for new tasks other than setting the rip fence (again, unlike the Grr-Ripper or other thin-strip products).
For safety, I hold the stock against the jig board (and the jig board against the fence) with a push-stick or feather board just short of the blade, and use a hold down feather board over the jig board or attach a handle to the jig board. I also attach a thin piece of plywood or masonite on top as an added measure to hold the strip down against the table top
For long strips, a thin base under the entire jig board and stock helps to keep the end of the stock from dropping below the "push-foot". A couple of thicknesses of these in reasonably long lengths has served all of my needs for ripping thin strips.
 Member
I just found this video on the Woodworking Channel which seems like a good method also
http://www.woodworkingchannel.com/do...eo_library.php
Member
Seems to me the greatest danger is the back side of the blade lifts the stock, then tilts it a little to the side, the stock jams and throws it upward and back at the operator.
Sooo -- I make sure my fence is angled a skosh to the right. Then I clamp a small piece of scrap to the fence starting about mid blade and extending past where the teeth exit the table in the upward direction a little bit.
A zero clearance insert should be used, not only for narrow strips, but all the time, in my opinion. It just makes for better cuts.
 Member
There was a gizmo sold a few years ago called Vac-u-fence by a fellow named Rudy Ramirez from Arizona. This thing is a hollow square straight aluminium casting the size of a fence that has a bracket on the back to attach it to a regular fence or in my case to my existing fence bracket. It has a series of holes along the face that provide suction against a piece of wood as it travels down the fence. This suction comes from a vacuum hose hooked to a fitting at one hollow end. All of this sounds complicated but it isnt. The end result is that the piece of wood wont move away from the fence! Cutting thin strips, for example, is easy. Too bad Mr. Ramirez didnt merchandise his idea very well. It really is an elegantly simple concept that makes any rip cut safer and quite accurate.
In Memoriam
Contributor
Yes. The thin strip lifting at the back of the blade is exactly the reason I added a "hold-down cover" to my thin-strip jig.
 Posting Permissions

 Reply With Quote