Doors used between the garage and house are heavy, solid, fire doors. They make great work bench tops. Look on craigslist or yahoo freecycle in your area.


 Contributor
Doors used between the garage and house are heavy, solid, fire doors. They make great work bench tops. Look on craigslist or yahoo freecycle in your area.
Never, under any circumstances, consume a laxative and sleeping pill, on the same night
 [OP]
Member
[OP]
Member
Maybe counter-top sounds too "kitchen-like." I can't find any plans online for a "garage / workshop countertop." Maybe workbench is more appropriate. But workbench brings up mostly free-standing, center of the woodshop, vice and bench-dog, workbenches. What I need is basically just a flat surface against the wall, with some shelving underneath for storage. Any suggestions on where to find plans for this?
Thanks,
Greg
 Member
Hi Greg.
I have built several cabinets,5, roughly based upon the NYW Workshop Hutch.
In each case the top was constructed of a bottom layer of CDX 3/4 plywood glued and screwed to the cabinet base, followed by a layer of BC 3/4 playwood. The "C" sides were glued together with Tite Bond 2 glue. The plywood sandwich was built in place on top of the cabinet frame.
I bought a sheet of Wilson Art laminate from the orange borg and covered the top with it using DAP contact cement. Be careful because once one layer contacts the other, the game is over and you can't take it apart. Get some 1/2 dowel rods to keep the two surfaces apart while positioning the laminate over the plywood top. I cut my laminate oversize using my cabinet saw with the good side up. A good blade, spelled F O R R E S T, will make a clean, no chip, cut leaving a little fuzz on the backside. Keep the blade exposure low, say not more than 3/4".
Once the top laminate is in place and before doing any trimming, apply a laminate apron around the top. Last step is to run the router around the edge to trim the over hang back even of the edge.
This works for me, others may do it differently. I feel that I can't put enough of a load on the tops but what they will stand up to it.
Best Regards, Ken
 Member
Try 'workbench surface' or 'shop workbench' and you will get more hits.
 Contributor
I made my work tables with a 2x4 frame, topped with 3/4" plywood, then 1/4" hardboard on top, banded with oak to hold the hardboard in place. They have lasted for years now, and someday, I expect to have to replace the hardboard, but the rest of it is very stable. And, it didn't take long to construct.
Doc
As Cort would say: Fools are the only folk on the earth who can absolutely count on getting what they deserve.
Member
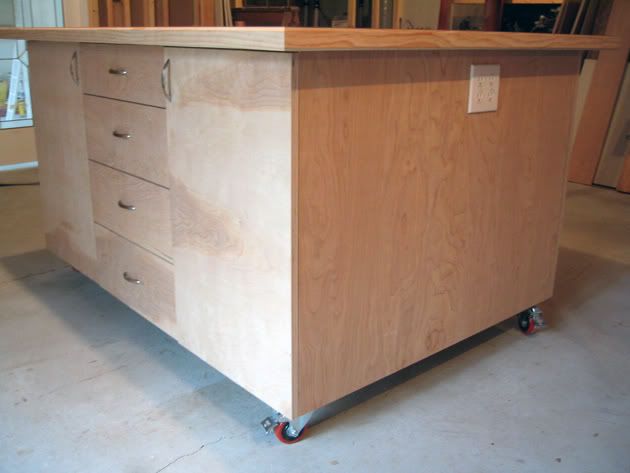
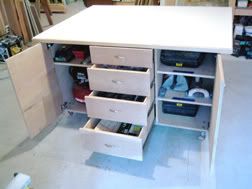
I don't know if this is what your looking for but this is my mobile assembly table that I couldn't live without. The top is 2 sheets of MDF glued and screwed with a white laminate on top and the edges wrapped in pine.
If a brad nailer shoots brads, and a pin nailer shoots pins, a framing nailer must shoot framers ... right?
Contributor
I used 2 layers of MDF, faced with an Oak edging. Then a couple of coats of poly or tung oil to keep glue from sticking, and you have a budget-oriented work surface. You can sometimes find laminate countertop pre-made that can be cut down for your needs.
Member
I started my entire Woodworking experience from "Wood Magazine's "How to Build a Great Home Workshop."
It has at least 3 different bench top examples, including a Laguna type with even a stronger top. All have great strength, for different types of benches.
Greg seems to have followed most of the advice they give.
A review:
- The showpiece Wood Magazine plans, "Mobile Sawing/Router Center" & "Bench-tool System" are not in the book
- The book starts you with Shop infrastructure first! Great advice and follow the chapter order. Everything you do will revolve around electric, dust, lighting, and the walls. Even the most experienced woodworking will tell you they wished they had done those things first.
- Electricity: Make all boxes a 20amp Dedicated Circuits, and remember the 220 runs. Switches for at lease one outlet per box makes life grand. Example: You can place cheap timer switches for things like your compressor (always forget to turn that thing off). Your DC can be turned on without expensive gadgets etc.
- Lighting: Like clamps, never can have enough.
- Dust: Unless you have monster space, build a small shed for your DC and run the main to outside or at least another room. DCs produce a lot of noise and do smell funky over time. With 2HP you can exchange air in 5 minutes, vice all the cost of filters to try and filter melted plywood glue and burned pine. If you place it outside near your windows or doorways, it actually will muffle some tool sounds from the shop for your neighbors.
-Walls: Stud them and cover. The cinder blocks and/or concrete look nice and clean. However over time, its so much easier to just slam a few deck screws into a stud to hang, and call it a day. Interlocking wood walls or Wainscot seem to have everyone's attention. If you do not cover them, micro-dust will collect between the studs and actually become dangerous over time. Also, the air flow becomes hindered when using a air purifier.
- The wall storage plans work better then advertised. They look great too. The book becomes WORTH the price just for those.
- Does not talk about floors.
- Most plans use Maple, Birch Plywood, and then MDF for strength. They are over-engineered. You can downgrade Maple to BP, BP to MDF, or MDF to Particleboard, etc. However the FLIP TOPS that hold the planers...stay on target with those!
- The plans have precise dimensions and seemingly small and subtitle cuts, that make or break most Wood Magazine plans. When modifying their plans to fit different tools, take care in looking at ALL the cut list pieces. Overcutting all parts (modified and/or original sizes) works well in these cases.
- Many of the Wood Mag plans cut stock in module sections, and not all at once. Follow this. It gives you a nice flow between glue times and cuts. Most of use to not have a lot of space and a 100 clamps. Also, if you miss cut any portion, you only return to the last good module, instead of turning the entire thing a mess.
Just my 2 bits....
John
Photo: - Initialy, I converted the Quick-And-Easy Mobile Storage plan to hold several main tools. This has allowed me to plan in stages. They look horrid, but stay level and have a lot of strength.
Last edited by John Kasparian; 12-24-2008 at 10:52 PM.
 Posting Permissions

 Reply With Quote