The beginning and the end. It always amazes me what a little bit of sandpaper and finish can do to the wood. And yes, the first photo and the second photo are the same pieces of wood!


 [OP]
Member
[OP]
Member
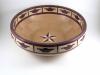
The beginning and the end. It always amazes me what a little bit of sandpaper and finish can do to the wood. And yes, the first photo and the second photo are the same pieces of wood!
Member
I've never seen that dowel trick before, but I've never studied segmented turning. It's a great idea.
 Contributor
I am not a segment-or by any stretch... but I believe I could figure out how to do it, however, I am drawing a blank on the purpose of the dowels. What's so great about their use?Originally Posted by Michael Kellough

A great looking bangle BTW.
____________________________________________
JD at J&J WoodSmithing
Owingsville, Kentucky
"The best things in life are not things."
[OP]
Member
James, If you glue it up into 2 halves with a round spacer between them, the spacer takes out any errors in the cuts. It kind of acts like a pivot point so that all of the segments slide into exact alignment. You then sand the ends of the halves flush, which is where any errors accumulate, and glue them together. If you look at the finished product, it is hard to see that it is really 12 individual pieces of wood.
Contributor
Gotcha, thanks, makes a lot of sense "now". :-)
____________________________________________
JD at J&J WoodSmithing
Owingsville, Kentucky
"The best things in life are not things."
 Member
Very nice. What's the finished size?
 Member
Robert , Curious to note how you chucked it up to turn ??? Neat looking item really . what wood is that ? looks like quarter sawn Lacey Oak .
John 3:16
[OP]
Member
Paul, The wood is Lacewood, also known as Leopardwood. To turn it, I simply used a chuck with small jaws to hold the inside and larger jaws to hold the outside.
 Member
Nice !!, good way to keep the lace showing all around
Have fun and take care
Member
Lacewood , that is what I was thinking about ... and hard to tell by the picture what the dia's are ... I used the dowel trick when I made a flour container for the LOML in Honduras mahogany ( took blue ribbon at the fair in 2009 ) It ( the dowels ) work very well !
John 3:16
[OP]
Member
For those that asked, the inside diameter is 2.75". Yes, that is kind of large, but it was a custom fit for someone.
 Member
Robert, you mean you don't cut your segments precise enough that they will fit properly without cheating with dowels, LOL? Beautiful piece.
TW
Tom
2 Chronicles 7:14
Member
That's a LOT of sanding......
Nice!
[OP]
Member
Tom, I cut them precise enough, it is simply that the glue and the wood have some sort of conspiracy going on that I have not figured out yet!
Member
I find 2 5/8" is quite a common size, and I make many at 2.75" as well.....
Nice work, Robert!
 Posting Permissions

 Reply With Quote