

Congrats on your new soon to be shop! Sounds awesome and I would be excited too.


 Member
Congrats on your new soon to be shop! Sounds awesome and I would be excited too.
Sometimes decisions from the heart are better than decisions from the brain.
Enjoy Life...
 Contributor
Sweeeet! Green with envy! Congrats!!
Brian
"Any intelligent fool can make things bigger or more complicated...it takes a touch of genius and a lot of courage to move in the opposite direction." - E.F. Schumacher
[OP]
Member
On Monday I took down my existing meterbase and overhead weatherhead and conduit and lines to main house panel. I then installed a 400amp meterbase and two200amp disconnects immediately off of it. Then routed new wire into main pane in house. Also installed a second ground rod and new ground wires. The second disconnect will be where I connect the new pole barn too after it is built.
Also got some good deals on romex, L6-30 recepticals, Liftmaster jackshaft garage door openers, and some HID commercial bay lights. Also ordered the URD services entrance wire that will be in a trench to the new shop.
Looking to get site prep done next week.
Glad its my shop I am responsible for - I only have to make me happy.
Contributor
That's the way I did my new shop/house as well. One meter, one bill, simple.Originally Posted by Mike Heidrick

On the infloor heat, I always do a variable spacing. Closer loops on the outside and gradually getting farther apart as they get closer to the center. Cold comes from the outside, not the center. It gives a much more even heat.
Recently a homeowner had a system designed by a company in a warmer climate, and against my recommendations, in writing, he installed it as they speced. We tore it out and put it in my way when it would not get the house to 50 degrees mid winter. $100K mistake. So, I am a big fan of overkill on infloor systems, as there is no going back.
That will a nice size shop. My new shop is 36 x 50, a bit small but was there when I bought the property. My old shop was 140 x 56, and that was too big to heat and maintain once things slowed down.
How far are you from Valpo? I get down there to see my daughter/grandson once in a while.
Larry
[OP]
Member
Larry THANK YOU for the advise. Man I need as much as I can get. I am in Bloomington IL which is about 2 hours from Chicago fairly middle IL. You are welsome ANY time to visit. (Same with any members.
The shop will be 3X the space I have now so I am excited and will have room for a loft in the future. Right now it is all I can do to afford this shell of a project.
I am concerned how the heck they will pour this floor with all the lines ran to a far corner where the power is coming in. Not sure how you do a large radiant heat floor poor and reach everywhere with all the pex lines down. I will be talking to my concrete guy about that tomorrow I guess.
Need to some up with some DIY pex uncoiler, a romex uncoiler, and a large cable spool unroller for the main line from the shop to house - that spool is very large. Plan to use the 3pt on the tractor to help with that.
Larry, do you do this work for a living??
Glad its my shop I am responsible for - I only have to make me happy.
Contributor
Mike
I do not do heating specifically, I am a general contractor. A lot of the homes I work on have infloor heat, and after the first one I had done failed to heat the house I did a lot of research so as not to have to deal with that embarrassment again. Other than the house I have just finished that is forced air [Money] ,my last three homes had infloor heat systems that I designed myself.
Some things I have learned.
If you are in a wet area with high ground water, provide a gravel base that will drain under your insulation. Water will carry away heat faster than dry dirt. Providing a dry base breaks that mechanical connection.
Don't be talked into an instant heater type boiler or one of those high tech water heaters. The best and most economical results I have seem are with conventional high efficiency boilers using a valve that mixes return water with boiler water to come up with the right temp. I like two smaller boilers on a big house rather than one large just for the redundancy factor. It gets very cold up here and most of the houses I build are vacation homes so I like the idea of a second line of defense. In the case of a shop your size with a boiler on each end it will cut down on the length of runs, I like to see no more than 250' on a run. Because of the shear size of you're shop this may not be possible but something to keep in mind. Water can only carry so much heat and after 250 feet the temp is getting down too low. I would however overlap at least one run from each boiler to keep the other end warm in case one of the boilers fails, especially in the area where there is water such as a bathroom.
A good base for the floor is critical, severe shifting of the concrete can sever lines, so if you have loamy soil have it scraped out and use a good base such as crushed limestone. One of the failures I saw was a half mile long concrete driveway that was not given a proper base, and it shifted in several spots from frost severing the lines. We get about 4' of frost, and I did not consider the driveway environmentally responsible, but it did fail because of poor preparation. Insist on steel reinforcement in the concrete. Contractors will try to sell you on the fiber concrete as being just as good, but it is not. Its easier for them. If there is a cold joint, poured in more than one day, make sure the joint is pinned well with rerod. It is easy for them to do, they just have to drill holes in the bulkhead that stops the pour and insert rod through the holes a foot each way.
Do some reading on oxygen permeation. If the tubing you use does not have a good oxygen barrier, a form of scum can start to develop inside your tubing and eventually clog your system. I have used Stadler [spelling?] tubing in my own homes and insist on it in the homes where I have a say for my customers. My oldest system is over 22 years old and my ex wife says its working just fine.........
I recently moved into my new house and I already miss the infloor heat. At the old house I had to walk outside to know what the weather is like as the huge mass of the floor kept the temp constant, even in the summer. As well as my new house is insulated, extreme to be sure, I have a lot of windows and can feel the weather changes. I may have to buy slippers!
Gotta go work on my greenhouse..........
Larry
 Member
Mike, congrats on your new shop! It ought to be great when you're finished. A few comments and suggestions.
First, I concur with Larry's comments re the Pex. I ran mine on staggered spacing (closer loops to the outside) and have been very pleased with it. Be sure that you have a good, unbroken vapor barrier underneath the shop too.
Second, I have what appears to be the same MH light fixtures in my shop, and like them a lot. Your's are low bay fixtures, which is exactly what you want as they throw light both down as well as to the side. Mine are installed at 15'6" above the floor, and I have twelve fixtures inside of a 50' x 60' room (and it is very well lit!). In areas where I do handwork, I have T8 flourescent fixtures suspended about 4' below the ceiling.
Third, have you considered running conduit underneath the floor? One thing that I did in my shop that have been a real lifesaver is that every wall section is fed by a 3" conduit coming up from below. The conduits run from every wall and come up into a common chase mounted below my load centers. By running conduit under the slab I saved a lot on wiring as opposed to dropping down from above (shorter runs), and it allows me to have a built in chase to pull additional wiring anywhere that I need it within the shop.
Re how they will get the concrete on top of the pex, they will either ring the slab with concrete trucks with extended chutes or they will use a concrete pump. Be sure that they pull the pex up into the slab so that it is totally encased with concrete instead of underneath the slab. In my instance, for my 6" slab I used 2" slab bolsters to hold the rebar, and tied the pex underneath the rebar so that I have 4" of clearance from the top of the pex to the top of my slab. That way I can sink an anchor 3-1/2" w/o worrying about drilling into tubing.
Be sure to sleeve your pex where it comes out of the slab, else it may break at the slab in the future.
Best of success to you on your new shop!
[OP]
Member
Scott you PM is full.
Crew worked till 7pm last night and got the double top 2X12s installed.
I bought two rolls of 20'X100' 10mill poly. My plan is to lay that down on the pea gravel and tyvek tape it together and maybe over lay another sheet across the middle seam and tape it. Then put 1.5" XPS extruded poly styrene (foamular) on that, then the mesh concrete panels and then twist tie the pex in staggerd loops on the panels. I will have the pex sleeved as well.
Does that sound about right. I am totally trusting what I have read from others.
I bought a 2001 140,000 natural gas fired water boiler (80% efficient) off CL and am considering using an extra water heater (I convinced the guy it was part of the setup he was selling - he was taking it out of a house that would be demolished) I have as a holding tank too. The boiler has a taco circ pump, expansion tank, relief valve and pressure and temp gauge on it and an auto flue setup for the vent. Thats what I plan to heat with. I need to get a thermostat and will have a piece of pex in the floor for an in floor temp sensor.
Glad its my shop I am responsible for - I only have to make me happy.
Member
Mike, I've emptied my PM box - sorry bout that!
Sounds like you're headed down the right path. My only comment is to suggest that you use slab bolsters under your wire. Many installers simply lift up on the wire during installation, but the problem with that is that you have inconsistent wire spacing in the slab. I have seem a lot of slabs after they were demolished and noted that on many the wire was at the bottom of the slab - in effect useless from a reinforcing perspective.
In my instance, I used a 1-1/2" slab bolster with the pex tied to the bottom of the reinforcing wire (instead of the top), so that I did not have to worry about drilling an anchor into a pex line down the road.
Sounds like you got a good deal on that boiler package! The extra water heater won't hurt; if nothing else it provides you with more thermal mass of stored water. You will want to consider adding an air eliminator to your system as well.
I would suggest that you place your thermostat sensor a ways away from where the pex tubes exit your slab. In my instance, that is the warmest portion of the entire slab due to the high volume of tubes congregating in one location.
[OP]
Member
IMG_233948789611711.jpg
Today's progress. Where do you buy slab bolsters? Also how much do you use per panel?
Last edited by Mike Heidrick; 08-15-2014 at 11:55 PM.
Glad its my shop I am responsible for - I only have to make me happy.
Member
Slab bolsters can be purchased at a concrete supply store. Usually places that sell rebar will also have bolsters. Spacing is determined by the size of the voids in your mesh/rebar mat - usually no greater than 4'. There are charts in the Code books that provide guidance based upon your type and size of reinforcement. You can also but them online and have them shipped in.
I prefer the SBU type for distributing the load and not punching into the insulation.
Last edited by Scott T Smith; 08-16-2014 at 6:39 AM.
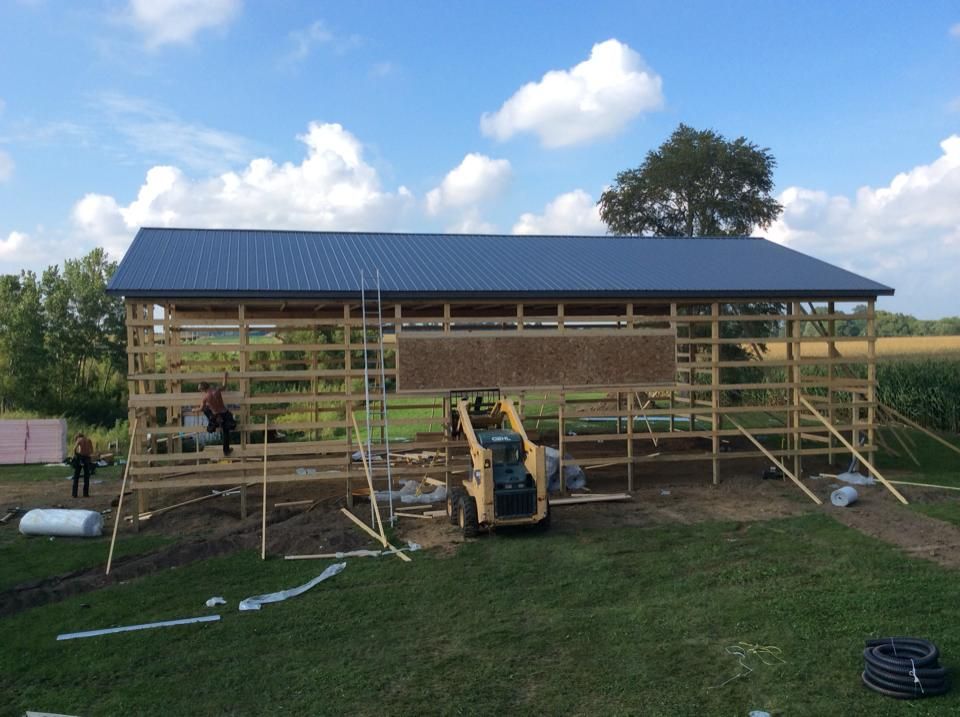
[OP]
Member
Today we got vented overhangs, a roof and bubble wrap under it, the porch started, windows framed, and pedestrian doors framed. I got a free (freeebie in that cool voice) window upgrade because they forgot them on the semi last Thursday and Menards only had 4 windows in the 36X60 low E argon insulated. Also the porch trusses were for a 12X24 porch so we are getting a 12' porch ceiling depth as a freebie too. Will add to concrete now though. Also raising the porch a bit to account for space needed for the larger windows.
Here was 5:30pm on day 3 - They worked till 7pm again tonight.
I also just came in. Johnny and I got the gas line and two cat6 lines to existing shop in conduit and 90% buried.
Glad its my shop I am responsible for - I only have to make me happy.
 Posting Permissions

 Reply With Quote