Results 1 to 15 of 36

Thread: Drill w/guide or router?

Hybrid View

Previous Post Previous Post   Next Post Next Post
  1. #1
    Join Date
    Jan 2009
    Location
    N.E, Ohio
    Posts
    3,029
    What is the reason the doors drift apart? If the tracks are level they should not move on their own. Sounds to me like there is something wrong with the installation of the doors. I have had several pocket doors including one I installed myself and they have never moved from either the closed or open position.
    George

    Making sawdust regularly, occasionally a project is completed.

  2. #2
    Join Date
    Sep 2016
    Location
    Modesto, CA, USA
    Posts
    10,091
    Shoot some sawdust and sand into the bearings and it will not drift around.
    Bill D

  3. #3
    Join Date
    Nov 2006
    Location
    NE Ohio
    Posts
    7,048
    George - I think they drift apart simply because there is air movement.
    When I say drift, I'm only talking about a very small amount also.
    What make is so pronounced is that the dining room side is dark due to there being now windows and the family room is very bright because it has a lot of glass.

    What we refer to as our family room - is more like an enclosed porch we had the builder bump out on the backside of the house. It's about the same width and depth as a sliding door and a half.

    Bill - interesting devices. I'll have to look into them more. The cost isn't that important - as long as I can find other uses on other projects.
    "Life is what happens to you while you're busy making other plans." - John Lennon

  4. #4
    Join Date
    Sep 2016
    Location
    Modesto, CA, USA
    Posts
    10,091
    A pancake or porkchop drill attachment allows me to reach into an electrical box and drill holes sideways into the studs for mounting screws. It uses the same 1/4-28 threaded drills, countersinks and rivet shavers a regular micro sink cage uses. I install using hex drive sheet metal screws driven by a 1/4" air ratchet.
    Bill D
    Attached Images Attached Images

  5. #5
    Join Date
    Feb 2004
    Location
    Perth, Australia
    Posts
    9,506
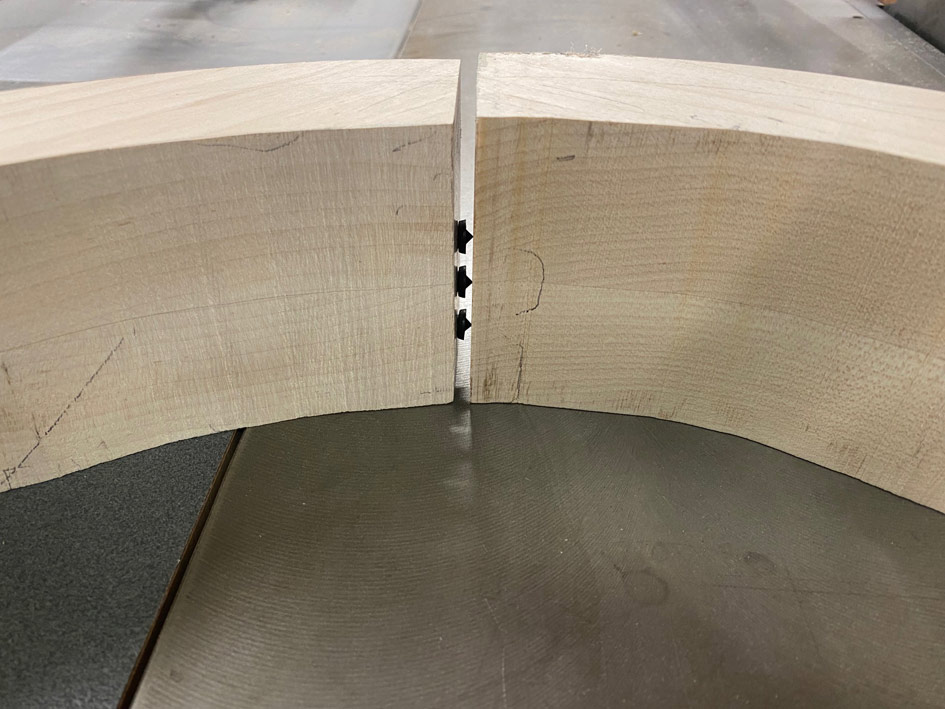
    What I would do is sink the magnet first. Just use a correctly sized forstner for the magnet, just deep enough. This is easy to do free hand.

    Then use a dowel centre point to find the matching position on the facing jamb. Simply use the magnet to hold the point facing the opposite side.

    I connect chair aims this way ...


    Regards from Perth

    Derek

  6. #6
    Join Date
    Nov 2006
    Location
    NE Ohio
    Posts
    7,048
    Derek - Thank you! Great idea.
    I don't have the dowel points - but - I can get some easy enough.
    "Life is what happens to you while you're busy making other plans." - John Lennon

  7. #7
    Join Date
    Nov 2022
    Location
    Northern Colorado
    Posts
    1,183
    Quote Originally Posted by Rich Engelhardt View Post
    Derek - Thank you! Great idea.
    I don't have the dowel points - but - I can get some easy enough.
    This is exactly what Edward and I were both suggesting as well.

  8. #8
    Join Date
    Nov 2006
    Location
    NE Ohio
    Posts
    7,048
    Quote Originally Posted by Michael Burnside View Post
    This is exactly what Edward and I were both suggesting as well.
    Yes - I'm sorry I didn't mention that along with Derek. Thanks to both of you also for the suggestion.

    Derek's big giant screen filling pictures, showing the points being used in thicker wood just brought the idea home.

    When I earlier saw the mention, my mind just saw points being used to mark 3/4" boards.


    Warren really cut through a lot of layout work though and a lot of fun time making my own 3/4" pins.

    I think if I just hammer a 5/8" 18ga brad nail in one side and bring the doors together that should do it for layout.
    Last edited by Rich Engelhardt; 04-13-2024 at 9:42 AM.
    "Life is what happens to you while you're busy making other plans." - John Lennon

  9. #9
    Join Date
    Apr 2017
    Location
    Michigan
    Posts
    2,787
    Edward's suggestion seems like the way to go, a magnet on one side only and a washer on the other. You can reduce the grip and the snapping noise by setting the washer deeper or bring it forward with another washer. This is not possible with two epoxied in magnets. Get maximum grip by leaving the washers a little loose so they can align with the magnet. Countersink the hole in the front washer.

    Don't put the magnets at the top or bottom, that will make opening wonky. Put them around the height of the pulls. I say them but hopefully just one.

  10. #10
    Join Date
    Nov 2006
    Location
    NE Ohio
    Posts
    7,048
    There's little pop out pulls on the doors - where the latch would be on a door with a regular knob and latch.
    I'm planning on locating the magnets a little above those - thinking that in that already "busy" location, the extra hardware will just look like it belongs there.

    The magnets themselves are 3/4" in diameter and roughly 3/8" tall. They have a hole in the center for a screw.
    I plan to glue and screw (with brass screws) them into the hole I make.

    I have an old set of bifold doors I plan to practice on when the weather warms up enough for me to go outside.
    I'm going to take the hardware off them so I can make a hole in both and test the attraction of the magnets I bought.
    I'm hoping I can get by with one magnet on one and a washer on the other. If not, then a magnet in each door.

    I really don't want to have to resort to putting magnets in more than one location on the doors - like middle and top.
    "Life is what happens to you while you're busy making other plans." - John Lennon

  11. #11
    Join Date
    Apr 2017
    Location
    Southwest US
    Posts
    1,124
    Someone posted a comment about making certain the magnets touch each other to get maximum pull force.
    From what I have read you don't want the magnets touching each other (or the magnet touching the steel disc if you are only using one) if they are going to be joined and pulled apart a lot.
    Magnets can be damaged when hitting hard surfaces.

    https://www.kjmagnetics.com/blog.asp?p=breaking-magnets


    Yes, the attractive force will be reduced, but that can be compensated by using a slightly stronger magnet.
    If you are using magnets to hold something more or less "permanently" in place, then actual contact is not a problem as there is not constant "hitting".
    So you need to recess the magnet just a little maybe a quarter or at most a .5mm

    In making my 2.5 inch magports I recessed the magnets about a .25mm
    Last edited by Patty Hann; 04-25-2024 at 9:41 AM.
    "What you see and what you hear depends a great deal on where you are standing.
    It also depends on what sort of person you are.”

  12. #12
    Join Date
    Jun 2012
    Location
    New Westminster BC
    Posts
    3,049
    If the magnets have center holes for screws I would just use screws, no glue. Much easier to adjust the depth to get it just right. Set them a few thou below the surface so they don't make contact when the door is slammed closed which may happen if the magnetic force is too much. If the force is too strong set them a little deeper. If not strong enough, remember magnetic strength can be increased by backing the magnet with a steel disc (washer works) so drill deeper and add a washer behind or a second magnet. You can see how not gluing them in would make this much easier.

  13. #13
    Join Date
    Nov 2006
    Location
    NE Ohio
    Posts
    7,048
    Quote Originally Posted by Patty Hann View Post
    <<snip>>

    https://www.kjmagnetics.com/blog.asp?p=breaking-magnets


    Yes, the attractive force will be reduced, but that can be compensated by using a slightly stronger magnet.
    If you are using magnets to hold something more or less "permanently" in place, then actual contact is not a problem as there is not constant "hitting".
    So you need to recess the magnet just a little maybe a quarter or at most a .5mm

    In making my 2.5 inch magports I recessed the magnets about a .25mm
    Interesting link.
    I'll keep that in mind when I install the magnets.
    Thanks for that info!
    "Life is what happens to you while you're busy making other plans." - John Lennon

  14. #14
    Join Date
    Jun 2012
    Location
    New Westminster BC
    Posts
    3,049
    Quote Originally Posted by Rich Engelhardt View Post
    Derek - Thank you! Great idea.
    I don't have the dowel points - but - I can get some easy enough.
    Dowel points are necessary if high accuracy is required in matching the holes when using dowels but not in the case of matching the holes for magnets. I think you should be able to lay out the hole locations with adequate accuracy with just some painter's tape, a T square and center punch.

Posting Permissions

  • You may not post new threads
  • You may not post replies
  • You may not post attachments
  • You may not edit your posts
  •