How do you cut a by dovetail in the middle of a large panel? I think I know how to make the cut, but how do you get out the waste?
Thanks,
George


 [OP]
Member
[OP]
Member
How do you cut a by dovetail in the middle of a large panel? I think I know how to make the cut, but how do you get out the waste?
Thanks,
George
 Member
Maybe I'm dense, but I think you need to be more specific or more detailed or both. Do you mean a slot for a sliding dovetail? Do you mean dovetails on the edge of panels that come together to make a carcase? I'm just not clear what you want to know.
Guest
chisel.
.........

 Contributor
Is it possible what you mean is a tapered mortice?
A dovetail is a method often used for edge joining two or more pieces of material. It is possible to use a dovetailed dado and edge for shelves. The same is sometimes used to join the sides of a drawer to the front. This is a more modern method since it is often done with machines and requires less set up than traditional dovetails seen on drawers.
Knowing what you are trying to join would help to answer the question.
jim
[OP]
Member
Yes a dovetailed dado that is what I'm talking about. I'm a newbie so I don't have all the terminology yet.
Member
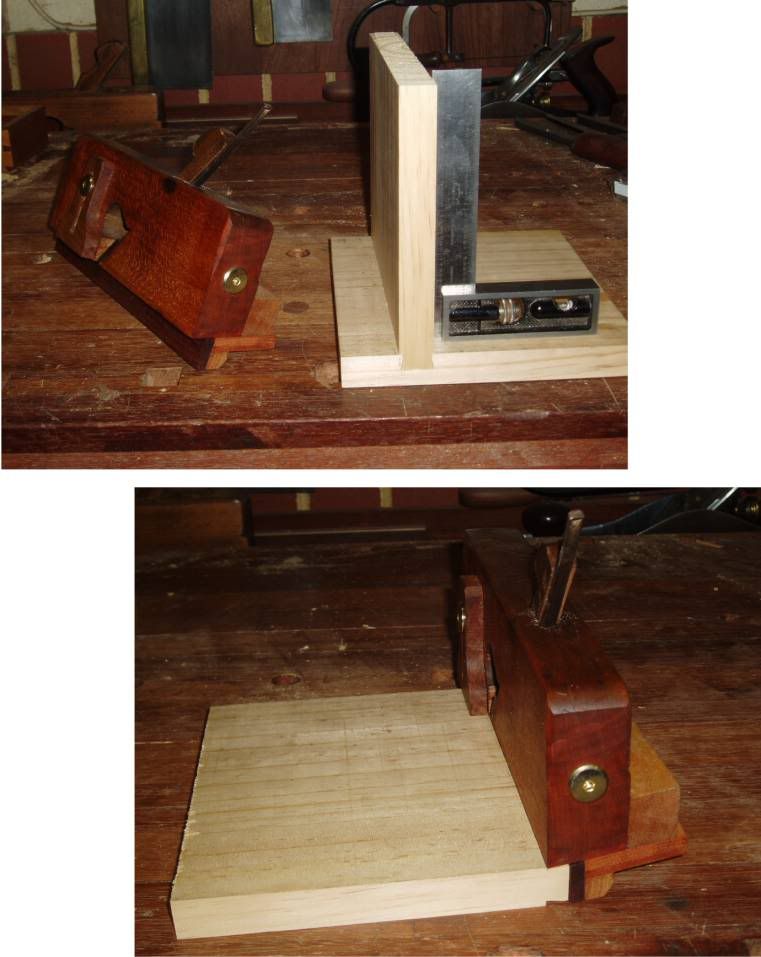
Take a look here http://www.onlinetoolreviews.com/rev...outerplane.htm.
Toward the bottom you will find how Derek Cohen does it.
 In Memoriam
It sounds like a butterfly joint
http://www.customcabinetmakers.com/p.../join/sbut.jpg
"All great work starts with love .... then it is no longer work"
Member
No offense, but that is a rather challenging joint, especially to accomplish by hand. If you have an electric router, it would be slightly easier.
The joint is especially hard the longer it gets. As in a 5 inch sliding dt works well, but a 20" one, much much tougher to make tight enough but not so tight that it doesn't bind up during assembly.
 Contributor
The joint is especially hard the longer it gets.
Remember it only needs to be tight at the ends. Another way is to taper the male and female parts.
Regards from Perth
Derek
Member
Very nice work, Derek. My point was that this would be quite a challenge for a self-described "newbie" is all. Do you disagree?
Contributor
Hi Sean
Agreed. This is more apparent when you break it down.
A sliding dovetail is definitely not the first joint to learn (in this type of joint). I'd master rebates first, then grooves, and finally dados. Once you have a feel for those, a sliding dovetail should be in sight. It also helps to be able to cut a drawer dovetail since the principle is similar (sawing at an angle, and transfering angles).
I am not sure which part is easier/harder - the male or the female section.
The male section can be cut with a saw and chisel, which is how I used to do them before I built a dovetail plane. A dovetail plane makes it an easy task.
The female section is a saw and chisel affair, with a router plane to finish (as detailed earlier). I know that there are dovetail planes that can do this as well - I have yet to make one. It's been on the drawing board for a few years.
Once you have done a few, then these are straight forward. I actually prefer to do these by hand than tediously set up and use a power router.
Regards from Perth
Derek
Member
Strangely enough, the last ones I did, I fit my router with a collar and just ran it along a clamped board for the female grooves. I then cut the male parts using a handsaw for the shoulder and a chisel to pare the cheeks. As they slid in from the back of the carcase, tidiness was not terribly important. It worked a treat.
Member
One comment worth mentioning relating to the difficulty of this joint - it is very, very rare to find a lengthy sliding dovetail joint in (really) antique furniture - in other words, furniture from the age where there were few, if any, machines.
There are exceptions such as the case/top attachement on pieces made primarily in Boston, but even here shortcuts were usually made - typically, the dovetail is one-sided.
The attachments of drawer dividers and/or dustboards (dustboards are also unusual in 18th century colonial furniture) where a sliding dovetail joint is in evidence on the outside of the case are usually very shallow - perhaps 3" at most, with the rest of the divider housed in a wider dado in the case side.
Point here is that these guys also thought of this joint as tough to execute, or at least too time consuming to be profitable. Interestingly, a wooden dovetail plane from this era is a very rare item - it certainly appears that most of these were cut with a saw and pared with a chisel (both male and female parts).
 Member
In the Tage Frid book he shows and in depth explanation on how to make a tapered sliding dovetail. If you have the book it is worth reading. I bought a stair saw from Mike Wenzloff just so I can cut that sliding dovetail joint.
Good Luck,
Carlos
Member
George,
It doesn't seem like anyone has yet asked what application are you thinking of using this joint for?
As David mentions, this is a very rare joint to have been cut without the aid of power. Not that it can't be done, just that it typically would not have been. If you look at the front of a drawer blade on a period case, it may look like a full length sliding dovetail but in fact it is only the front 2-3" or so that have a sliding dovetail. The rest is simply housed in a wider dado. A full length sliding dovetail is not a common joint in traditional/period construction that was built entirely by hand. You will find that it is much more common in more contemporary pieces, as in after the introduction of routers, where this joint became more plausible to make easily and quickly. I look at it similar to finger joints. These weren't used in the age of hand work but became much more common after the introduction of machinery because the finger joint is easier to cut by machine than the dovetail.
 Posting Permissions

 Reply With Quote