Page 1 of 2 12 LastLast
Results 1 to 15 of 29

Thread: Powermatic 300 Sander Rebuild

  1. #1
    Join Date
    Nov 2009
    Location
    Northern Half of NY
    Posts
    59

    Powermatic 300 Sander Rebuild

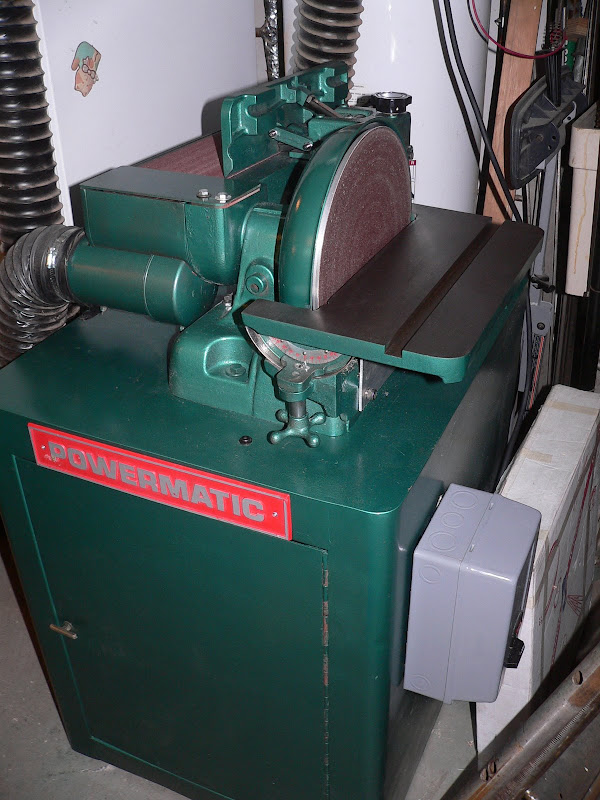
    Over 2 years ago I bought a Powermatic 300 sander through E-bay from the Oriskany School district which is 100 miles or so from me, my wife was giving birth at the time I bought it so I was trying to arrange a time to go pick it up when the guy from the school said he was coming to my town the next weekend because that is where his father lived. Double score, my winning bid was $61 I think and the guy delivered it, I gave him $75 and said thanks. Unfortunantly I don't have any pictures of how it arrived but it was in pretty good shape for being 30-40 years old and coming from a school.

    I just started to restore it, I am not worried about making it factory original, I just want to make it very usable. The only issues so far have been the two bearings that needed replacing, they cost $40 each from Kaman Bearing. Also I will have to rebuild the dust cover for the belt side and try to find some turn knobs or make some to replace the stripped out ones from the machine. Here are some pictures.
    Attached Images Attached Images

  2. #2
    Join Date
    Nov 2009
    Location
    Northern Half of NY
    Posts
    59
    Here are a few more pictures, the picture of the Dewalt box is the color I am going to paint the sander and the rickety press is what I used to remove and install the bearings.
    Attached Images Attached Images
    Last edited by Tim Livingston; 12-30-2009 at 2:35 PM.

  3. #3
    Join Date
    Feb 2005
    Location
    Goodyear, Arizona
    Posts
    58
    Looks like a good project Tim. Keep us posted on your progress.

  4. #4
    Join Date
    Mar 2004
    Location
    Portsmouth, VA
    Posts
    476
    Nice sander, excellent price. I have a 30A that I redid last year. Good luck with the restore. For the life of me, I have never heard of a model "300" sander and if I didnt see the tag, I wouldn't believe it. They are normally a model 30A or 30B or 33, 33B, 35 or 35B. By the serial number, I would put it at a 1963 vintage. Take a looksee here for Powermatic serial numbers: http://wiki.owwm.com/PowermaticSeria...ashx#Sanders_8 and here if you want to see other examples of similar sanders: http://www.owwm.com/mfgindex/detail.aspx?id=655&tab=4

  5. #5
    Join Date
    Nov 2009
    Location
    Northern Half of NY
    Posts
    59
    Thanks Bob I was wondering about the age and reading the other charts I have seen was very cryptic but I figured it was between 1961-63. There is one other sander on OWWM listed as a model 300, it was painted gray and looks as if it came from an industrial setting http://www.owwm.com/photoindex/detail.aspx?id=8903 but the base is different than mine, I wonder if they made optional bases during a model year. As near as I can tell it's a model 30 but got the 300 name for some reason, maybe that was some special school system number.

  6. #6
    Join Date
    Dec 2006
    Location
    Porter,TX
    Posts
    1,538

    Pm300

    Maybe they double stamp the zero by mistake,either way that is one nice sander.Dang the price not bad also,so with the cost of the good bearings your still way under.How about afew pics of your bearing press,it also looks good.Keep posting pics of your progress,love to follow along---Carroll

  7. #7
    Join Date
    Mar 2004
    Location
    Portsmouth, VA
    Posts
    476
    Quote Originally Posted by Tim Livingston View Post
    Thanks Bob I was wondering about the age and reading the other charts I have seen was very cryptic but I figured it was between 1961-63. There is one other sander on OWWM listed as a model 300, it was painted gray and looks as if it came from an industrial setting http://www.owwm.com/photoindex/detail.aspx?id=8903 but the base is different than mine, I wonder if they made optional bases during a model year. As near as I can tell it's a model 30 but got the 300 name for some reason, maybe that was some special school system number.
    I saw that too, so it couldn't be just a fluke of stamping one machine. That funky serial number with the extra -3 on the end is also on that other machine listed on the "mothership".

    Here is the machine I finished up with. The only thing I would do over again would be to shoot the base with something other than a rattle can. You just cant get real good coverage on a large area with one. It was missing some original parts, I keep my eyes open for them and have already gotten the end casting for the belt side.


  8. #8
    Join Date
    Nov 2009
    Location
    Northern Half of NY
    Posts
    59
    Mine came with two tables and is very complete, it's just a little beat! The one thing it doesn't have is the fence for the belt sander like yours. If you come across one of those let me know, I think it would come in handy. By the way yours look nice Bob

  9. #9
    Join Date
    Nov 2007
    Location
    Mid Missouri (Brazito/Henley)
    Posts
    2,769
    A worthy Project, Tim! I enjoy seeing any good old machine be brought back to life again. Keep after it.

    Years ago I found a Rockwell 6" belt/12" disc sander in VGC, for less than $200. But, it was missing the CI table for the belt. This was wayy before eBay or CL. Several years later I lucked into the complete table on a pallet-full of odds and ends at a business auction--$10!

    Perservere!
    [/SIGPIC]Necessisity is the Mother of Invention, But If it Ain't Broke don't Fix It !!

  10. #10
    Join Date
    Dec 2006
    Location
    Porter,TX
    Posts
    1,538

    Pm30

    Having the table is a big plus,wish mine had the fence also.Bob,nice job and can't tell rattle from other---Carroll

  11. #11
    Join Date
    Nov 2009
    Location
    Northern Half of NY
    Posts
    59
    The arm that holds the belt had some pretty big grooves in it from 40 years of high school kids not caring how the belt was tracking. Let me next say I consider myself a jack of many trades but a master of none, that being said I tried a new process today, I do a little welding on the side just as another hobby and only for personal use, I have TIG, MIG and stick welders and figured I could fill in those grooves on the side so I started researching about fixing the grooves, in the past I have used nickle rod to fix cracks in cast but have had limited success because the extreme heat causes more cracks. Well today I read about TIG brazing which uses a silicon bronze rod and a TIG torch to braze the grooves closed. It's a bit different that oxy-acetylene brazing but also similar. Here are some pictures of the before and after.
    Attached Images Attached Images

  12. #12
    Join Date
    Feb 2003
    Location
    In the foothills of the NM Sandia Mountains
    Posts
    16,669
    That is going to be nice when you're finished!
    I refurbed an older Delta a few years ago but it ain't half the machine those old PM's are.
    I'm looking forward to the finish pics.
    Please help support the Creek.


    "The older I get, the better I used to be."
    Lee Trevino


  13. #13
    Join Date
    Nov 2009
    Location
    Northern Half of NY
    Posts
    59
    Quote Originally Posted by Carroll Courtney View Post
    How about afew pics of your bearing press,it also looks good.Keep posting pics of your progress,love to follow along---Carroll
    The press is nothing special, I borrowed it from a friend but I can see I need to build one similar but a little more heavy duty. It is basically some channel iron welded together and teh bottle jack is not a permanent installment. Here are some pics of it, as you can see the bottom rails are adjustable and the top got reinforced after the fact.
    Attached Images Attached Images

  14. #14
    Join Date
    Nov 2009
    Location
    Northern Half of NY
    Posts
    59
    Just a small update of pictures, haven't worked on it all weekend because I am working nights.

    Anyone have a source for the original adjustment knobs? If not I will probably make some new one but that is going to mean I am going to have to get off my butt and get my South Bend lathe up and running too which is going to require me to build a new stand for it because the tired old wood table is.....well tired.
    Attached Images Attached Images
    Last edited by Tim Livingston; 01-03-2010 at 4:16 PM.

  15. #15
    keep the pictures coming...that is going to be one nice machine.

Posting Permissions

  • You may not post new threads
  • You may not post replies
  • You may not post attachments
  • You may not edit your posts
  •