Results 1 to 8 of 8

Thread: Crosscut sled

  1. #1

    Crosscut sled

    Here is my version of the Eagle Lake Woodworking sled

    Top view:


    Bottom view (dado's are 5/8th, through holes are 3/8):


    The first runner is dado'd in (very, very shallow) as per Alan In Little Washington's advice:


    Setup for crosscut:


    The hold downs are bandsawn out of maple:


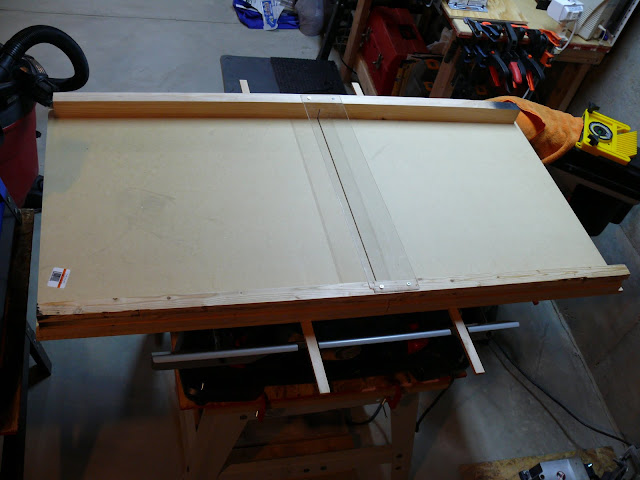
    Setup for miter (note the plastic square will be removed before the cut):


    It turned out very nice. There is no slop in the runners (UHMW PE). And using the 5 cut method it was only off .016 in over 60" of cut (off by .015 degrees ). I really, really like the design of the sliding clamps on this sled. They are very fast to lock down/release and hold the work very stable. Really great when the stock is very long or very short.

    The only thing I would change is the material used for the sliding clamps. I used MDF and it is really too weak where I routed out the long 3/8 through hole. But this only really matters when using the back edge to set an angle referenced off the fence. Just have to be careful.

    I still have to make stop blocks, put a block of wood where the blade exits the fence and add a mechanism to make sure the sled is not pushed too far. The left hand edge of the sled is flush with the edge of my saw so I will bolt a piece of wood onto the saw wing and a matching piece on the edge of the sled to set the maximum depth.

    I pretty much stuck to the plan with a few exceptions:
    1) I did not add the handle and I don't think I will.
    2) I did not cut big through holes in the slots. 3/4" as in the plans is not big enough and I don't think they are really needed.
    3) I used 3/4" ply instead of 1/2" ply. It is what I had .

    I will probably also build their tenoning jig that rides on the sled. If you need a new sled check out EagleLake's plans and video.
    Salem
    Last edited by Salem Ganzhorn; 01-11-2010 at 11:19 PM. Reason: fixed broken link to the sled plans

  2. #2
    Join Date
    Mar 2008
    Location
    Mansfield MA
    Posts
    1,372
    Salem, that is very nice. Looks like you can do quite a lot on that sled.
    I wondered why the baseball was getting bigger....then it hit me.

  3. #3
    Join Date
    Oct 2009
    Location
    Pacific Northwest
    Posts
    281
    Nice work! I have not had luck with crosscut sleds. Mine always bind so I use a miter gauge instead.
    But this version looks very versatile, I may try it.

  4. #4
    Quote Originally Posted by Nick Lazz View Post
    Nice work! I have not had luck with crosscut sleds. Mine always bind so I use a miter gauge instead.
    But this version looks very versatile, I may try it.
    I love a sled compared to a miter gauge. With a stop block you can get perfect matching lengths without measuring. I definitely think it is worth it to build one (or buy a sliding table saw attachment ).

    I think the key to the rails is the material.

    I have had sleds get harder to push at times when I used oak/maple/cherry runners. But using UHMW PE or steel runners should fix this.

    This is about my 5th sled of various designs. I have tried many methods of fixing the runners. This is what works the best for me:

    • use a dado stack to route an exactly .75 slot where you want one of the rails. You only need to go ~1/32nd deep.
    • Fit the first rail to the slot and screw it down.
    • put double stick tape on the other rail. I just put a wide strip on it and trim it back to the edge.
    • put some scraps in the opposite miter slot and put the second rail on top of the scrap. Ideally you want a very small amount of the rail to protrude above the table (1/16th?). If the rail is not perfectly .75 then take up the slop with a playing card on the outside edge (pushing the second rail toward the first).
    • put the sled on the table with the first runner in the open slot. Gently lower the sled until it touches the other rail. Push down to make good contact.
    • Carefully remove the sled by sliding it out (not lifting).
    • screw down the other rail.

    I have tried glue etc but tape and screws is sufficient and you don't run the risk of disturbing the placement of the second rail.

    When you screw down UHMW PE it typically bulges out a little. In my case this "little" made it way to tight. I took a shoulder plane and 2 quick swipes fixed it.

    I am really happy with the rails this way. I have yet to see (or even hear!!!) the blade remove any amount of material from the kerf in the sled (after the initial plunge of course). This tells me there is very, very little slop in the rails.

    Best wishes,
    Salem
    Last edited by Salem Ganzhorn; 01-11-2010 at 10:03 PM. Reason: because I can't spel "slop"

  5. #5
    Join Date
    Apr 2009
    Location
    Palm Springs, CA
    Posts
    1,085

    Looks great

    Salem,

    Very nice sled. I've made some simple, non adjustable, but very precise sleds which have worked well, but yours has me re-thinking ! Thanks for posting.

    Regards,
    Dick Mahany.

  6. #6
    Join Date
    Jul 2007
    Location
    Spring Hill, FL
    Posts
    42
    Very nice sled. I've been looking for something this versatile. Mind telling me what size the knobs and bolts are your using on your hold downs and other hardware? TIA.
    The older I get the faster I was.

  7. #7
    Quote Originally Posted by Don Inghram View Post
    Very nice sled. I've been looking for something this versatile. Mind telling me what size the knobs and bolts are your using on your hold downs and other hardware? TIA.
    These go on sale every other month for ~20$: http://www.rockler.com/product.cfm?page=21276
    The knobs are really nice in this kit. I wouldn't buy the hold-downs they sell though. 10$ is a little silly. Only takes a couple minutes with a bandsaw.

    Reading the item description I must be using 5/16th inch bolts .

  8. #8
    Join Date
    Jan 2010
    Location
    Northern Colorado
    Posts
    1,884
    Wow.

    If they GET any better than that ... I'm not sure how

    Very nicely done. Love the UHMW runners.

    Mine was thrown together, but turned out pretty well and cuts verrrry straight.

    Oak runners. Bottom, runners, and miter slots all drink Johnson's Paste Wax, occasionally:


Posting Permissions

  • You may not post new threads
  • You may not post replies
  • You may not post attachments
  • You may not edit your posts
  •