Page 1 of 2 12 LastLast
Results 1 to 15 of 21

Thread: sawing tenons

  1. #1

    sawing tenons

    Hi all---I'm working on my first workbench, which is in the roubo style and cobbled together from a few different plans. I am still very much a beginner with hand tools and have learned a lot from building and making tons of mistakes on this bench.

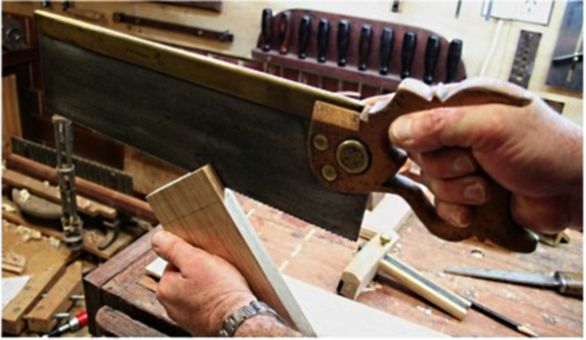
    The other day it was time to cut the tenons on stretchers between the legs. I recently purchased a pretty nice/pricey tenon saw from LN to help with the job, as I didn't really have any hand saws that were up to the task. The tenons are 4" wide x ~2.5" long x 1/2" thick. My cuts for both the cheeks and the shoulders were pretty bad---not very consistent, and also not to the lines. I tried a few different techniques, including putting the stretchers in the vise at an angle and trying to saw to two lines at the start, then proceeded down each line. But I always seemed to be off on one of the lines when I was tracking well on another. I was also surprised that, when I cut through the long edge of the shoulder to remove the waste along the cheek, I was cutting into the tenon itself---I couldn't seem to cut straight down and get an even cut without cutting into the tenon on either end of the cut. In one case, the tenon was cut into so deeply that it snapped right off when I accidentally dropped the stretcher on the floor!

    Any tips? I'm going to scrap these pieces and cut four new stretchers. Thanks for any advice,

    Chris

    IMG_0044.jpgIMG_0043.jpg

  2. #2
    Join Date
    Oct 2009
    Location
    Ossining, NY USA
    Posts
    61
    Blog Entries
    2
    Cut the tenons off square and use the remaining too short stretchers for practice. That's what I'm planning on doing with the 6x6 spare leg that I have for my own workbench. My original 6x6 was long enough to make five legs so I'll use one to get the technique down correctly.

  3. #3
    Join Date
    Aug 2012
    Location
    In my basement
    Posts
    736
    Practice. That's what I've found.

    I've also found if I start the saw at 45* or greater and follow the closest line down a ways until most of the teeth that are cutting lumber are below the surface, then drop the toe of the saw into the cheek. I have found this gives the saw something to track and since the tenon saw I use has very little set to the teeth (BA 16"), it won't hop out of the initial cut down the face.

    If that's a little confusing, I can post pictures. I'm not sure it's the "right way", but I've learned there's not really a "right way" and "wrong way" in most of this.
    The Barefoot Woodworker.

    Fueled by leather, chrome, and thunder.

  4. #4
    Join Date
    Feb 2004
    Location
    Perth, Australia
    Posts
    9,508
    Hi Edward

    I make 6 saw cuts for a tenon cheek.

    As Adam wrote, saw diagonally along two lines. Do this for both cheeks. Now turn the stretcher around and do the same on the other side.

    Having got this far, simply slip the saw into the kerf at the apex of the triangle you have created, and saw straight (horizontally) in this "guide" until you have reached the baseline of the shoulder. Do the same at the other cheek.

    Now remove the shoulders (or do them first - my preference).


    I had a chance to try out one of Joel's saws at TFWW in January (and bought the saw) ...


    Regards from Perth

    Derek

  5. #5
    Thanks for the replies, everyone. I guess I just need more practice. Is there a generally accepted order of operations for cutting tenons? Seems like a lot of people start by cutting the long edge of the cheeks, but Derek said that he actually cuts along the shoulders first. Does this make it even harder to ensure you don't cut into the actual tenon?

    Chris

  6. #6
    Join Date
    Feb 2004
    Location
    Perth, Australia
    Posts
    9,508
    Hi Chris

    I saw the shoulder first because I would rather overcut (if I do) into the tenon cheek (which cannot be seen) than saw the cheeks and overcut into the stretcher itself (which can be seen).

    Regards from Perth

    Derek

  7. #7
    Join Date
    Jan 2008
    Location
    Washington, D.C.
    Posts
    70
    Chris,
    I'm a fellow newbie, so take this for what it's worth. I found it extremely useful to practice a lot on scrap, for example drawing 10-20 lines and trying to saw to them. Over the course of days or weeks, I got better. Still not where I'd like to be, but noticeably improved.

    Also, you may be doing this already: when I cut the shoulder, I first knife the shoulder line deeply. Then I use a chisel to deepen the line (chisel bevel on the waste side, obviously) and then take out a little sliver, creating a "V" notch with a vertical face on my cut line. I can drop my backsaw into that V notch, and saw down to my line. In effect, the show part of the cut is actually chiseled, rather than sawn. Like you, I cut into the tenon many times before I got sufficiently precise.

    I usually cut cheeks before shoulder, but folks do both ways, I believe.

  8. #8
    Join Date
    Aug 2012
    Location
    In my basement
    Posts
    736
    Quote Originally Posted by Chris Henke View Post
    Thanks for the replies, everyone. I guess I just need more practice. Is there a generally accepted order of operations for cutting tenons? Seems like a lot of people start by cutting the long edge of the cheeks, but Derek said that he actually cuts along the shoulders first. Does this make it even harder to ensure you don't cut into the actual tenon?

    Chris
    Like Derek said, due to oversaw concerns, generally doing the shoulder first is advisable.

    Now, if you don't care if you accidentally oversaw, I can't see a reason to do one before the other.
    The Barefoot Woodworker.

    Fueled by leather, chrome, and thunder.

  9. #9
    Join Date
    Jun 2008
    Location
    Charlotte, MI
    Posts
    1,525
    If you saw the shoulders first you can split the tenon cheek waste away with a chisel. Much faster than sawing. Assuming you have straight-grained wood.
    Your endgrain is like your bellybutton. Yes, I know you have it. No, I don't want to see it.

  10. #10
    Join Date
    Dec 2010
    Location
    South Coastal Massachusetts
    Posts
    6,824
    I don't saw my tenons, I split them.

    You saw the shoulders, as normal but use a chisel to split off the waste.
    Paring gets you down to the desired tenon thickness.

    It's counter-intuitive, but I get better control than with a saw.
    http://www.youtube.com/watch?v=H3VTOpumi58

  11. #11
    Join Date
    Feb 2004
    Location
    Perth, Australia
    Posts
    9,508
    A good technique, but don't try that unless you are certain the grain is running straight.

    Below, 22" wide tenon ...


    Regards from Perth

    Derek

  12. #12
    Some food for thought in at PBS try here http://video.pbs.org/video/1772025726/ or Google woodwright sawing secrets

  13. #13
    Join Date
    Aug 2007
    Location
    Dickinson, Texas
    Posts
    7,655
    Blog Entries
    1
    Add this link for Paul Sellers.

    http://www.youtube.com/watch?v=H3VTOpumi58

  14. #14
    Derek, I assume those cross cuts for the tenon shoulders were cut with a table saw? Just wondering, as I don't have a table saw, so it would be interesting to hear how you did those cuts if you used something besides a table saw.

    Best,


    Jonas

  15. #15
    Join Date
    Feb 2004
    Location
    Perth, Australia
    Posts
    9,508
    Hi Jonas

    You are correct. I have a sliding tablesaw, which is great for crosscuts for long and thick hardwood. If I did not use one I would either have rigged up a circular saw on a guide. Sawing it by hand is doable, but comes in third place for a job such as this. Of course you may have no alternative

    Regards from Perth

    Derek

Posting Permissions

  • You may not post new threads
  • You may not post replies
  • You may not post attachments
  • You may not edit your posts
  •